
|
| AUDIO-VISUAL AIDS |
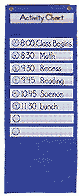
| Audio-Visual aids are devices that appeal to the eyes and ears of the learners. Audio-visual aids: * motivate learners * save the teacher voice * economise teaching time * help teachers * etc. WHAT ARE AUDIO-VISUAL AIDS REALIA Realia are people and real objects that give us information. "People" means anybody in the environment: students, teachers, visiting native speakers, etc. The teacher can make use of his/her movements, gestures, signals, mimics, and hands. Real objects should be small enough to bring into the classroom but large enough to be clearly seen. Real objects can be used for various purposes, such as teaching pronunciation, vocabulary, grammar, etc. For example, you may bring a map into the classroom and use it to practice comparative and superlative adjectives (Which country in Europe is bigger than X?); to practice passives (Where is "orange" grown in T³rkiye?); etc. Other examples of reali are clock faces, toys, brochures, catalogues, magazine and newspapers, board games, posters, wrappers, labels and logos from various products, records, stamps, coins, old tickets, ticket stubs, postcards, programmes, timetables, calendars, containers, cans, bottles, flags, menus, puppets, etc. PICTURES Most learners are visual minded, so pictures are a great help in teaching. They remind the learner of the meaning and help him/her communicate. They help the teacher save his/her voice. Also the same pictures may be used for several purposes, and for review purposes. When selecting a picture, some points should be kept in mind: * The picture should be large enough for the entire class to see clearly. Small pictures can be used for pair work, group work, and games. * The picture should illustrate, at first glance, the point under the study. * The coloured pictures are more effective than black and white ones and can be used for many purposes. * The picture should fit into cultural pattern of the learner. * The picture should tell the learner something familiar to connect it with real life. * The pictures should be labelled to ease classroom practice. * Pictures should not be confusing. BLACKBOARD It is the most common visual aid available to the teachers. When using blackboard, some points should be kept in mind: * Start each lesson with a clean blackboard. * Organise the material effectively so that students can easily understand what you are trying to do. * Number items that belong together. * Leave only the correct forms on the blackboard. If you are analysing an incorrect form, correct it and then erase it. * Write legibly and large enough so that the students can read without difficulty * Erase the board frequently. Do not leave a mess of material on it. * Do not write unnecessary material on the board. * Use coloured chalk/ marker for special effect. * Watch your own spelling and punctuation for correctness. * Underline the main points written on the board. * Erase all unnecessary material at the end of the class hour. FLASHCARDS These are pieces of cards large enough for the whole class to see. These may either drawings, magazine cut-outs, pictures, written words or numbers. They are called flash cards because they are shown to the class for a short time. The words, phrases or sentences written on them should be written in thick, high and block letters. These cards are held up for the class to see, and they can be used for a great variety of activities. WALL CHARTS These are large pictures with a lot of in them. They are used for question-and-answer work, for oral composition, for practising adjectives, and for discussing the relations of objects and people. They may display different scenes, landscapes, or may develop a situation, or tell a story in one or sequential pictures. They are especially useful to display things which cannot be brought into the classroom. POCKET CHARTS Pocket charts are investigative tools which use pictures as stimulus to encourage people to assess and analyze a given situation. "Pockets" are made of cloth, paper or cardboard and are attached to a poster-sized piece of paper or cloth. Rows and columns of pockets are arranged into a matrix. Drawings serve as captions for the columns of pockets. In general, the combination of activities in a pocket chart exercise - participating in the creation of a display, looking closely at it, and discussing it - has proven to be a successful means of generating participation and consensus in both community and classroom settings. A major advantage of this tool is that it can be put together with whatever materials are available. The materials needed are: a set of pictures (photos or drawings) which represent areas in which data are needed; a clear space to set the pictures up at the head of as many columns as their are pictures; a bunch of ballots (slips of paper, straw, cloth, leaves); and receptacles (cloth pockets, pots, jars) for ballots under each column. A large rectangular cloth with pre-sewn rows and columns of pockets can serve as a re-usable, standard pocket chart. POSTERS Read the article online. TAPE RECORDER AND TAPES They present exercises related to classwork and homework. These aim at improving the listening and speaking skills. In teaching environment, the audio material may be accompanied by visual material. For instance, while doing exercises they may look at visuals which are cues for substituting, completing, answering, etc. A tape recorder should have a rich volume, a meter counter. The teacher may record radio broadcast, interviews with visiting native speakers, the students in class (who then correct themselves), or any other material suitable to give his/her students practice in listening comprehension or speaking. SLIDES The most commonly used visual aids are 35mm slides, overhead transparencies, and computer-generated slides. Slides are probably one of the most common and easily accessible mediums for projecting large images in classrooms, lecture halls. Nowadays, many schools have necessarry equipment with slide projectors and long extension cords for the remotes. You will also need a slide carousel so that you can put all of your slides in the order that you'll view them. [Remember: slides need to be put in upside down and backwards.] Slides are nice and easy to use, but creating them can be expensive. Slides can be created from any object, event, or image. You simply have to point a camera at it, with the proper film, and take a picture. You can also make 'copy slides' from illustrations/photos, books, magazines, other color or Black & White prints, radiographs, posters, gels, three dimensional objects of varying size, people, and more. Slides can also be made from computer files. Burn-ins are a special type of slide. With a burn-in you can take a B&W image, line drawing, or text (note that images with gray tones wonÆt work) and burn it as another color onto another slide. OHP You can read the related pages from there. In addition to them, overhead transparencies are also very helpful materials for the teachers. You can either write down your notes as you talk using a Visa-Via pen or have them pre-made. Most schools are equipped with overhead projectors, but since they are not very portable teachers may not prefer them. You may also find the overhead inconvenient because they are loud and the bright light makes it difficult for some people to read. However, it offers a cheap and immediate solution to visual aid needs. How to Make Overheads: There are three ways of making an overhead. 1.) You can hand write your text and pictures using an overhead pen. This may look unprofessional, but gives immediate, cheap results. 2.) You can photocopy text and images onto a special type of heat resilient transparency. First cut-and-paste your desired images and text onto a white sheet of paper. 3.) The third way to make transparencies is to print onto the transparency directly from a computer. This process can be used for presentations you've put together on the computer using programs like Word and Power Point. Note: There are several different types of transparencies out there. They're not all made to withstand the high temperatures of copiers or laser printers. Be careful, with the wrong material you can not only melt your overhead, but you can also ruin the machine you used to make them. VIDEO/TV FILMSTRIPS As a teacher always watch them and listen to their soundtracks before using them in class. You may teach vocabulary, grammar, culture, pronunciation, etc. through video films. How to use Videofilms in Classroom ? There are many advantage of using video in classroom, such as: Students can listen and see orinal speech and it the same time they can see the positions of the lips, teeth and tongue, things that help a lot the listen comprehension.. This is an alternative video lesson plan: I - Introduction II - Predictions exercise a - Ask questions b - Show the video c - Discuss questions III - Subsequent exercises 1 - Comprehension questions a - General b - Specific c - Implication 2 - Grammatical structures 1 - Drill a - Mechanical b - Transformation c - Communicative 3 - Dialogues a - Pair work b - Group work c - Vocabulary exercises d - Note-taking exercises IV - Follow-up exercises a - Discussions on cultural content b - Roleplays c - Audiotape exercises d - Reading exercises e - Writing exercises |
|
|
 |
 |
 |