How to replace a wheel stud.
The vehicle used for this demonstration is a a 92 model Liberty, but the same or very similar steps apply for many Subaru models, and some other makes.
 Along with a jack and chassis stands, you will need all that is pictured here except maybe not the whole case of beer, or the 3/4'' drive breaker bar and socket (I thought you had to undo the hub bolt, but I was wrong.)
 You will also need a couple of nuts, one that is the same thread as the stud, and another to put between the hub and the stud nut to help pull the new stud through. I also used a little Loctite Anti-Sieze on the threads of the studs. and the threads of the other bolts used itn this operation.
 Here is the wheel before the front is jacked up to remove it. Remember to put the centre cap somewhere you can find it again, and always turn the wheel nuts enough to loosen them slightly when the vehicle's weight is still on the wheel. Jack the car, place chassis stands in a suitable location and remove the wheel nuts and wheel.
 After removing the wheel, undo the caliper retaining bolt (on the lower rear side of the caliper - 14mm) and then you can swing the caliper up and remove it from the bracket.
 Just removed the caliper, it is just sitting on the axle shaft behind the wheel. At this point you can remove the brake pads. Notice how the pads and shims etc. are installed and remember to put them back on the same way later.
 Here the pads have been removed and then you need to remove the caliper bracket (shown) by undoing the two bolts on the rear (17mm)
 All that is left of the brake assembly is the rotor, this will now slide off to reveal the hub and the studs.
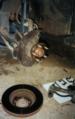 Here the rotor has been removed to reveal where the wheel studs are anchored.
 Viewing the side of the hub, the indent that is highlighted allows you to insert the new stud without removing the hub bolt to remove the wheel stud plate. Using a suitable size bolt, some lube and a hub nut, pull the new stud through until it is firmly seated
 These are the bits you should have lying around now. The nuts were used to pull the new stud through. The short bolts retain the caliper bracket to the steering knuckle, and the other bolt holds the caliper to it. The other bits are to do with the brake pads.
Repeat the above steps in reverse order to put it all back together again.


