Log Bridge Construction
Using Local Timber
![]()
Introduction
The US Forest Service builds and maintains trails within the Wilderness area. In some areas, bridges are built in wet boggy parts of the trail to lessen erosion and pollution of streams.Since the wilderness is free of wheeled vehicles, the only way to get outside construction materials to a work site is a very expensive helicopter crane. While these are sometimes used, in more remote wildernesses, the cost is prohibitive. Very small pieces can be carried in horse saddlebags.
For this reason, local timber within a few hundred feet of the work site is used. Suitable trees are selected on the uphill side of the trail based upon height, straightness, and diameter.
Log bridges may span streams, but if snow melt causes extreme flooding and rising waters, a log bridge will float away. A more typical bridge is the puncheon bridge, which is only meant to span a small streamlet or a boggy area. In this latter use, it is a substitute for a rock causeway.
In heavily treed areas, there may not be enough rock available to build a causeway, and trees are used when the District Ranger authorizes this. Building a log bridge requires a lot of work, and is not to be undertaken lightly.
Planning the Work
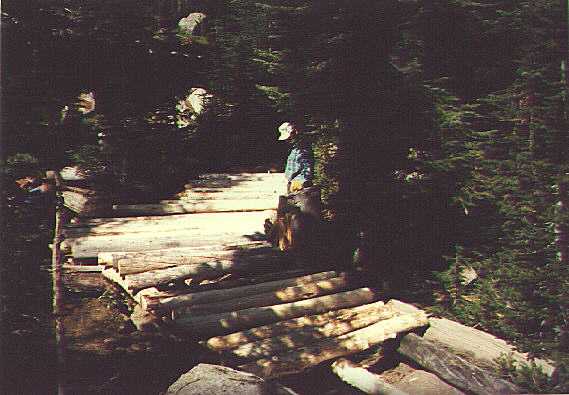
The work site must be carefully assessed to judge exactly where the bridge will lay. During the work, a bypass route may be needed to keep passers by from injury. In this scene, the crew has cleared a seven-foot wide trail (see angled picture below) to the right of the sun-lit tree. To do so, many small pines were cut to about two inches of the ground. This permits rapid regrowth over the next few years. In the center, or tread area, the saplings were cut nearly flush to the ground to avoid trip hazards.

The main established trail leads to the left of the tree, and bends right at a thirty degree angle beyond it. The bed (or tread) of the trail is somewhat trapped by rocks and roots on both sides. A drainage channel descends from the left of the trail (upslope). During rains, the trail was filled with water, and drained poorly. Overall, conventional ditching to drain the area would require extensive work to remove bed rock. The far end of the trail leads up a steep slope, which also catches rain water and channels it to the muddy area. Because of this complexity, a log bridge was built to span the area while leaving sufficient room for snowmelt runoff to flow underneath.
The length of the site to be spanned must be within reason. A length of some 40 ft of bridge may take about four days of seven to eight hours (including breaks). Prior to the trip, a thirty-foot length of heavy string was knotted to provide a measuring device. This string could be used to approximate where the logs would be placed and to estimate the required length.
Since the trail bent sharply in passing the trees, the bridge was planned to have an angled middle. One end was approximately 23 ft; the other, 16 ft. Six long pieces of timber would then interlock to form three horizontal stringers on each side. These were the larger "sticks" used, and were chosen to be some 12 inches thick at the butt end.
Felling Timber
Trees are selected from the upslope side of the trail, and preferably out of sight of the trail. Trees are picked by the diameter about three or four feet above the ground. At this level, the irregularities of the base are avoided. One sights up the side of the trunk to be sure that it is reasonably straight. Most pines or firs in this forest lose their lower limbs as the tree grows. Only the very top looks like a Christmas tree. The height of the tree can be judged by standing well back to get a perpendicular view.The cutting of timber is probably the most hazardous action to occur, although skidding the log to the work site is a close second. The direction of the lean of the trunk and the direction and strength of the wind are of greatest importance. Ideally, the tree will fall cleanly downhill to the work site, scraping the bark off on the way. (More on that later.)
Once the fell is planned, the guard is posted to the side of the tree about sixty feet away. We felled trees are cut using a two-person crosscut saw about six feet long. The sawyers (those who saw) place the center of the saw about two feet up from the ground on the side towards the direction it should fall. They then align the direction of the saw to be at right angles to that direction. They alternately pull on the saw without pushing it into the tree. Pushing on the saw would cause it to bend, increasing the friction and possibly ruining it.
During the cut, the guard intently watches the very top of the tree, preferably relative to another tree behind it. After the tree is cut about one-half to two-thirds of the way through, the saw is removed and placed at an angle of about thirty degrees. Further sawing will intersect the first cut well back in the tree. This wedge can then be knocked out, and the tree will likely still stand. The saw is then placed on the other side of the tree.
They now cut parallel to the back of the notch. The wood in between acts as a restraining hinge that keeps the tree attached as it begins to move. The guard will see this motion as a slight sagging motion towards the falling side. A shout of "Motion!" is given to warn all nearby to get clear. The sawyers decide who will take the saw, and where they will walk as the tree falls.
As they continue sawing, the weight of the tree will begin to close the notch, and swing at the top. The guard then shouts "Timber!" when only a foot or so of motion has occurred. The sawyers hand off the saw and walk carefully away and upslope. The tree will smoothly accelerate, swinging on the hinge until it breaks. This is the point where the tree strikes the ground and the butt end may leap several feet in the air. The tree can then be topped at a reasonable diameter and all side limbs are removed.
Lines are attached to the downhill end to pull it, and three-inch roller logs may be placed under it if needed. Another line is attached to the uphill end to steer the log and to snub the line around a tree if the log begins to go too fast. The tree is then dragged near to the work area, which of course, should be downhill.
Peeling and Cutting

Forming the Base
Since the logs were interleaved at the bend, the bridge base is broader there. Three logs are used in each side to provide good support under the middle of the tread. Since the weight of pack trains is concentrated there, the center log tends to prevent breaking of the deck logs.
Spanning the Gap

Once the three logs for each side were approximately in position, the mating ends were mitered at an angle to lie close together. A "try log" of typical size was used to span the stringers while we decided what to do next. The logs are spiked together using spikes the size of pencils and larger. The largest were used to connect the stringers at the middle. Some end cap logs were then placed at the end of the stringers to control the width of the span. At this point, the bridge structure is sturdy; it just lacks decking.
Decking the Stringers

Notice the size of the sill rocks just behind the end cap. Each of the stringers is blocked and braced so that it will not roll or move. After the decking pins the stringers together, the entire bridge will be stable and withstand the impact of horses.
Deck logs are chosen to be approximately five to six inches in diameter at the butt end. The slight taper is alternated as needed to keep them at right angles to the stringer logs. The decking is begun at the center using the pencil-sized spikes. One end is selected as the alignment end, as the other end will be cut off later. The biggest deck log is placed at the center. The adjacent logs are then added, spiking them down as each is laid. Each log is turned to keep the log as close to right angles to the stringers as possible. Remember that the logs will roll if not spiked down! Work safely.
In this view, the decking is more complete. As each log is peeled and sawn to length, it is placed on the stringers for selection. The thickest logs are prepared first.
Building the Approaches

The approach work proceeds during the decking phase. Large boulders are placed against the cap logs to help stabilize the bridge lengthwise. Smaller rocks are added in layers to form a gradual slope leading up to the level of the deck floor. As rocks are layered up, dirt is scattered into the spaces, and gently tamped to stabilize the rocks. With each rain, the dirt will settle to hold the approach stable. The approach should slope up over a three- to four-foot distance, forming a ramp that is not particularly noticeable.
Finishing Up
The last steps are to smooth the tread for ease in walking on it, and to improve the appearance by evening up the ragged ends of the deck logs. The two-person saw is used to cut across the deck logs in the center four feet of the tread. The saw cuts are spaced about four inches apart, and the depth is to just graze the smaller logs. In this view, the Pulaski fire tool adz is used to chip out the wood between the saw cuts. This leaves a flattened tread that is easy to walk on.The finishing step is to put on side rails known as "bull rails". These logs provide a visual edge to the bridge and pin the deck logs down even better. Finally, the bridge is walked end to end several times to look for cosmetic/esthetic imperfection, such as protruding stubs that should be cut off.

The construction of a substantial bridge from native timber is a satisfying project. The heavy timbers and thick spikes will provide years of service under heavy loads. This bridge was dedicated to the memory of the late Kenneth H. Pellegrini by his family and friends. They worked with great skill and dedication, producing an excellent aid to those who pass by.
![]()