Designing and Building a
Bass Guitar Loudspeaker Cabinet
(A novices account and guide, by neilb)
See also my other project, a 2 x12" Sealed Bass cabinet.
Why Build a D.I.Y. Bass Guitar Cab?
Why go to all that trouble? I've been asked....especially by Susi, who having fantastic patience put up with all the hassle, whirling & drilling noises and endless dust........well.......Why Not? Hmmm...not a very good answer, however, the main reason is I wanted a smaller, lighter & more manageable cabinet than my Marshall 4 x 12" stack. I had looked around at the commercial offerings and I wasn't happy with what I saw especially with the prices. So I had decided why not go and build one myself!
Therefore, I could design & build an enclosure to my own spec's and finish it the way I want! If you design and build the enclosure correctly, you get the Cab of your dreams, for half the cost!! Buying a decent off-the-shelf Bass Cab is not cheap. If you are any way handy with a saw and screwdriver, you'll go a long way.
I
decided to place my experiences on the www 'cos I found very little resources out there relating to speakerbuilding for Bass Guitar Loudspeaker Cabinets. So maybe someone, someday, may find this of some use if they are building a bass guitar cab. I've tried to keep things as simple as possible so even a complete novice could have an attempt at building one! I also made mistakes building this cabinet, but I've learned from them. So when I go about making my next speaker cabinet, I'll be a lot wiser....So what's out on the www at present, you ask? There are lots of excellent hi-fi and Audio Enclosure building pages, that contain valuable info. on all types of speaker building. A lot of basics which can be applied to this sort of design, but there was nothing really specific for building a bass or guitar speaker enclosures.
So how do you go about it? Easy...first of all work out exactly what do you want to from your cab? Low bass roll off or extended bass with a sharp roll off? A large or small enclosure? Vented or sealed Enclosure? What size or how many driver/s? The particular type of driver characteristics do you require? What Amp you have? What can you afford?? Once you know exactly what YOU want, then get out there and research the different designs and building techniques, there is a mountain of information on the net, books etc. Once you are happy with what you know and want, then you're ready to build.
The one thing I've learned, is that designing an enclosure, involves a lot of different audio trade-off and compromises.
Current Speaker Cabinet Offerings?
I initially looked at what Peavey, Trace Elliot, Ampeg and Gallien-Krieger had to offer. First they were all very expensive, some more than others. Peavey were claiming a low Bass response from 30hz for there 15" Cab's!! However since their drivers have a Fs of around 40Hz. I can only guess that 30hz must be a -12db point!! Don't always trust what the manufacture claims!! Overall, the current market offerings were expensive and slightly over-rated.
So after reviewing what was on offer I then decided to build my own cabinet. I had previously built some speaker cabs a few years ago but then I thought that any old box would do!! Yes, I was proved wrong...this time I wanted to do it the right way!
The requirements of Bass is much different to that of other speaker design. The frequency range is 41Hz (E3) to 261 Hz (middle C), so speakers producing deep bass are desirable. Ideally the speaker should go down to 41Hz, if possible. Most manufactures are quite optimistic with their lower level. It is governed by the resonant frequency of the cone, below which the response falls off by 12dB per octave for sealed enclosures. However that frequency is raised by the effect of the air in the enclosure, and small enclosures raise it more than large ones. So, the actual resonant freq. Is always higher with sealed enclosures than the quoted free air resonance. As it is common practice to specify a response some 10Hz below the quoted resonance, the specified bass response is thus likely to be optimistic. With reflex units the bass is extended and is more like that quoted, but it drops off rapidly by some 24dB per octave below resonance.
Since I already have a 4 x 12" Marshall Cab. I had decided I wanted something a little more manageable with one large driver. I felt a decent 15" Driver with a large enough power handling would be ideal to match my
Marshall JMP 100 watt Super Bass (all tube) and be able to handle medium size gigs. I had two 15" Eminence drivers from a few years back. But I still wanted to check out some newer models.I checked into four popular speaker manufactures: Peavey, Eminence, Celestion & Fane. I surfed the Web for information on them and I contacted both Celestion and Fane for more information. Which they kindly forwarded to me, lots of brochures and spec's for free!. Including Speaker Cabinet Information Design handbooks and drawings to suit their range of Speakers!
Eminence wanted to charge £15 for a design Handbook (which they admitted was way out of date!) so I reclined the offer. Note: Eminence told me they will have a new design book (ISBN 0951825216) available from January 2000. This book is now available from
Maplin Electronics. This book will have updated driver info. and updated Designs. I also used a Book for reference throughout my project called 'Loudspeakers for Musicians' by Vivian Capel (ISBN 0859342425), which was a very good read and specifically aimed at a musician designing and building enclosures. It also has a number of outdated design projects (Copied from Celestion) at the end of the book.I found that the Fane speakers required a smaller volume than Peavey's Black widow range and had lower Fs, 35Hz compared to Peaveys 42Hz. Although they both cost around £170, to purchase from Fane I would have to order the Speaker from the U.K. with the current currency rates the Fane speaker was too high. While I could order the Peavey from my local music shop less hassle.
I started to design my Cab using the Peavey Black Widow 1502-8DT,. I found this speaker required a smaller enclosure than the others in the Black Widow range and has a slightly lower Fs.
However, I changed back to using an old 15" Bass driver from Eminence. Model: EM15-100. This was a speaker I had purchased a number of years ago and I had hardly ever used it. So been on a tight budget and not having too much cash, this was the speaker I now decided to use for this project.
For bass enclosures two designs seem to work the best: Sealed and Ported Enclosures. In most Bass applications the vented design (bass reflex) is used nowdays. The advantage of a vented design is the sensitivity at lower frequencies. However, the quality of the transient response is not as good as in a sealed cabinet.
The sealed enclosure design is easier to compute and construct. It also has quite a good transient response. The bad thing about sealed systems is a poor efficiency at lower frequencies. Usually not a very good thing for a subwoofer.
For this project I was going to build a Vented Enclosure...here's a little note on the above:
Vented and Sealed Enclosures
A Vented enclosure contains a port/vent/bass reflex so the interior of the enclosure is open to the outside atmosphere. There are both advantages and disadvantages to the design. The main function of the ported/vented enclosure is to attempt to recover the sound waves coming off the back of the woofer and redirect them to the outside. Thus extending you bass range.
Vented Enclosure Pros:
Vented Box Cons:
A vented enclosure is a little more complex to build, but it has a lower F3 than same size cabinet if sealed, however the ported cabinet will have a sharper roll-off after the F3 point. For a Bass Guitar Enclosure it can be an advantage to have a port to attain that low extended Bass.
For the Box size ratio, I used the Golden Rule ratio: 1: 1.6: 0.6 (width:height:dept) this would help to some degree eliminate standing waves inside the Box.
There are many free software packages out there some seem to work better than others, they also depend upon the amount of information you plug into them. I have found that the software 'SpeakerPro 6.0' worked best for me, so this is what I used.
You can Download SpeakerPro 6.0 free here:
![]()
http://members.aol.com/speaker60e/speakerpro.html
Using the software I first calculated the porting area. As a general rule the ports shouldn't be too small a diameter or too long as they can create a whistling noise effect, nor be too close to any walls. I was able to purchase 10cm diameter port tubing locally. So by using two of these port tubes on my Cabinet. I would get an effective port area of 176cm squared. This would be sufficient for my 15" driver. You can also use cardboard tubing, plastic piping etc.
I then plugged in my Thiele-Small Parameters for the Eminence EM15-100 speaker. Obtainable from the speaker manufacture or you local speaker dealer. From this I was able to calculate the optimum Cab enclosure size and tuning frequency. I wanted a maximum enclosure size of 124 Lts for the cabinet. In the calculations I deducted 10 Liters for internal bracing, speaker volume etc. Limiting the overall volume to 124Lt would effectively cause certain losses in the system, which could result in a peak or slightly boomy sound at certain frequencies. This I could live with, as the optimum vol. recommended by the computer program was way too large. Also the peak was at a max. of about +3db around 100Hz. For musicians this isn't too critical if the peak is high, if fact this may give your sound a certain distinctive feel? However if in excess it will cause your playing to sound very boomy and uneven!
Note: Don't forget to take into account the extra internal volume by the speaker, handles and bracing when calculating the overall volume of the enclosure. I calculated 10 liters for bracing, speaker and internals.
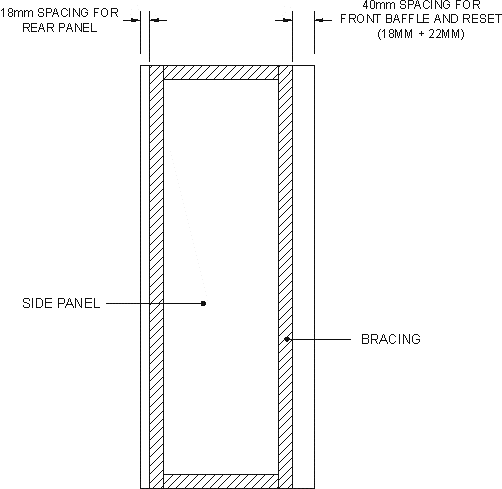
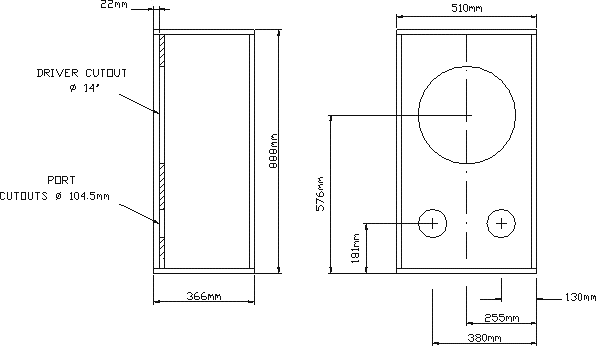
So setting the cabinet volume size at 124 Lts, and I've calculated my enclosure dimensions from this and panel sizes using the golden rule ratio. Now what material do I build it from? See
Figure 13, for a layout drawing of the enclosure.There are many various materials available, however for a musician on the road durability and cost are critical so narrowed it down to M.D.F. (Medium Density Fiberboard) or Plywood. I have used MDF in the Past and it's easy to work with, although it´s heavy and the dust is nasty. This time I had decided not to use a carpet or plastic covering (to keep costs down) on the enclosure but to varnish it. So I went for good quality 18mm thick Plywood laminated on both sides, which could be varnished to a nice attractive finish. It's tough and has fairly good acoustic dampening properties.
With my Panel sizes calculated I went to a local hardware store with a mill one weekend and I got my panels cut to size for £22!
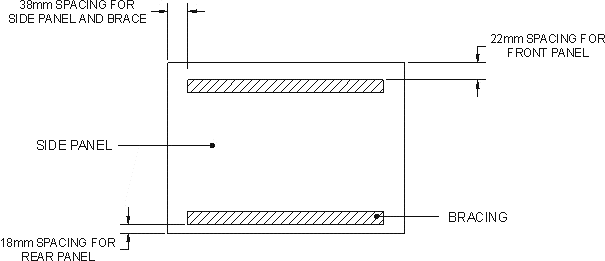
I also got 4 lengths of 20mm x 20mm pine battens for bracing the butt joints. First, I'm going to use butt joints to construct and join the panels. This is a simple way of creating a 90 Deg. joint. It's very strong, secure and simple to construct. I ran my bracing along the full length of the panels, you don't have to, but it will make the joints very strong. See figure 1.
Assembling the Butt Joints.
Figure 1. Simple Butt Joint

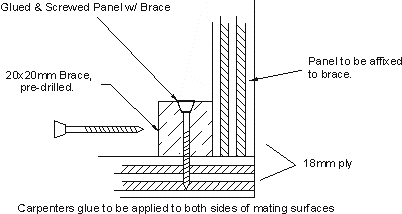
I first choose one of the Side panels to add the bracing to. I cut the bracing to run the full length of the side panels and across at the ends. I also decided to reset the front baffle about 22mm back, this will give some added protection to the speaker and visually look appealing. I pre-drilled and countersunk the braces on the opposite sides facing the panel. I spaced out the holes approx. 8cm. I used plenty of carpenters' glue on both mating surfaces and screwed down the braces to the side panel. This was then repeated for the other side panel. See
Figures 2 & Figure 3. The glued panels were then allowed to set overnight.
Figure 2. Gluing & Screwing Brace to Panel Wall
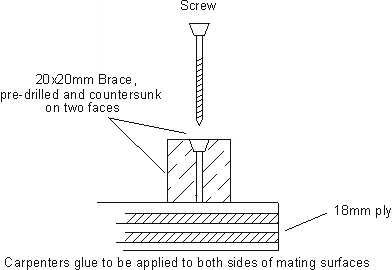
NOTES ON PRE-DRILLING:
Remember when predrilling the braces, make sure that the drill hole spacing on the top and the side of the brace are set at different spacing to each other. Otherwise your screws will clash when screwing the panels together! I kept the hole spacing on the top of the brace about 8cm apart. The holes on the adjacent side were spaced out between those intervals. See Figure 4. IMPORTANT: Do not pre-drill the rear braces on the side for affixing the Rear Panel, otherwise the rear panel screws will become loose and the back panel may vibrate when you play causing unwanted noise and efficiency losses.
Figure 4. Keeping the predrilled holes spaced out correctly.
The Next step in the process was to add the remaining Bracing to the Top and Bottom Panels. The only Bracing will be along the Front and Rear of these panels. This length is the width of the Top or Bottom Panel minus the side panels and bracing (18 + 18 + 20 +20mm). See Figure 5. Again I left the glue to cure overnight before assembling the Cab-Box. Remember not to pre-drill the brace where the rear panel will be screwed to.
Figure 5. Adding the pre-cut bracing to the Top and Bottom Panels.
Having all the bracing glued and screwed onto the panels. The next step was to assemble all four panels together. This is a bit tricky, you may need someone to hold one panel at 90 deg while you are screwing the other panel together. This is where, having the adjacent sides on the bracing already predrilled comes in handy. Place the Bottom panel at 90 deg. flush against one of the side panels. Ensure the panels are held at 90 deg. angles and simply screw the panels together. Remember to apply liberal amounts of glue beforehand to both mating surfaces. See Figure 6.
Figure 6. Screwing the panels together.
This was then repeated with the other Top and Side Panel. Then screw and glue the two sub-assemblies together. When assembled, the cabinet was very accurate (getting the panels cut properly also helps!) and the cabinet was almost square (measure between the top and bottom opposite corners for squareness, should be the same distance) So with a little tweaking I got the cabinet set up right. With the cabinet assembled and fixed, it was left to set overnight. See Figure 7.
Figure 7. Assembling the Panels.

Back to Top
BRACING THE CABINET.
Having the cabinet shell completed. I now want to reinforce the Cab using Internal Bracing. Bracing and Panel damping are critical in any enclosure but more so in a large Bass enclosure, if a panel vibrates it's absorbing energy - which means you reducing the efficiency of the speaker cabinet, so one needs to try and reduce these losses. For the bass enclosure I especially wanted to strengthen the front baffle (where the driver is mounted) both above and below the driver cutout. As the 15" driver cutout will weaken the front baffle panel considerable. I also wanted to connect the Front and Rear Panels together, again to help eliminate/reduce resonances and vibrations.
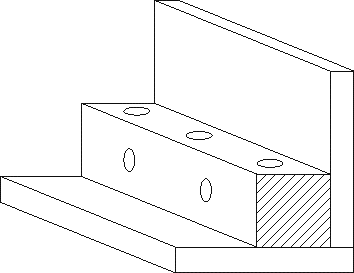
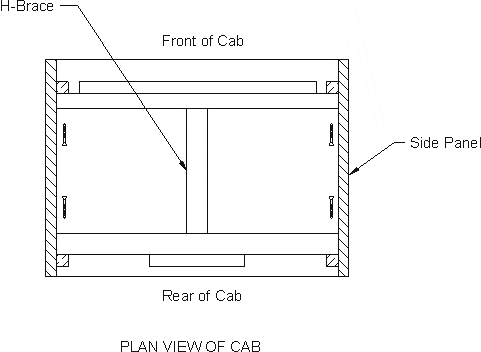
To achieve this I created a type of Brace, in the shape of a 'H'. I called it a H-Brace. See
Figure 9. There are lot's of ways of creating braces, and a lot probably easier than mine. I designed this type as I was limited to tools and material. It also worked out fine and was easy to build although It took a bit of time to complete, due to predrilling & waiting for the glue to set.I first cut two pieces of 25 x 35mm high grade pine (B & D) the width (Internal) of the enclosure. Two more short 20 x 20mm Battens (A & C) were then cut which will be attached to the onto the Front and Rear H-Brace. The reason for this, is that these battens supports will make up the 20mm to the front baffle & rear panel as the H-Brace will be Glued and screwed to back of the internal Butt joint braces. I then measured & cut support piece (E) of 25mm x 35mm Pine to fit between the front & rear supports (B & D). See Figure 8.
Here's a step by step guide to build the H-Brace. See Figure 8. for details.
Glue and screw 20x20mm Batten A to Support B (B is set on edge).
Repeat for C & D
When set. Pre-drill and countersink Support A/B at rear face - for later attachment to Front Baffle.
Glue and screw Batten A/B to Support E.
Glue and screw Batten C/D to support E.
Allow to set. See Figure 9.
Figure 8. Exploded assembly view of the H-brace.

Figure 9. The Assembled H-Brace.

Figure 10. 3-D View of the Assembled Brace

The H-brace when fully set was then positioned to be just under the Driver. The H-Brace was then glued and screwed into the cabinet. See Figure 11.
Figure 11. A sectioned plan view of the fitted H-Brace in the cab.
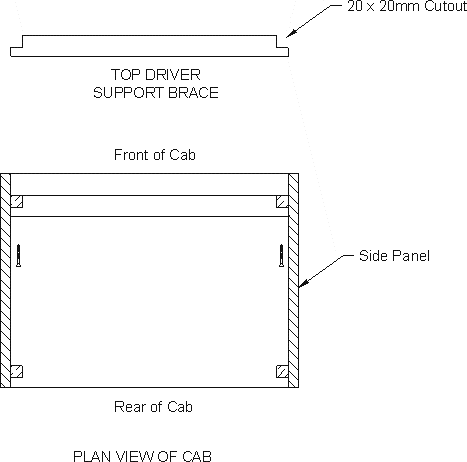
This time for the Brace support above the Driver, I wanted to keep the brace small (the more bracing the less volume in the enclosure also the weight increases!) so I simply cut a length of 25mm x 35mm pine the width of the box. This would be screwed directly onto the front baffle and internal batten butt joint braces. I cut out a 20mm x 20mm square at either end of the brace. This would allow the brace to sit flush against the Front Baffle. This brace was then placed about 1.5" over the top of where the Driver would sit, it was then Glued and screwed into place. See Figure 12
.
Figure 12. A sectioned plan view of the fitted top brace in the cab.
Layout, Cutting & Fitting the Front Baffle & Rear Panel.
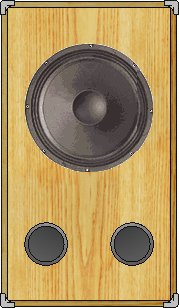
The Speaker Cabinet has now taken shape. The speaker driver cut-out and Port holes now need to be cut out on the front baffle, as well as the cut-out for the jack socket plate on the rear panel, this is also a good time to do the cut-outs for the handles. To do this I used a Jig-saw. Yip, it's noisy and makes a lot of dust but it's quick and simple. I measured & marked up all my cut-outs according to the manufactures specifications. Positioning the Ports on the front baffle is not critical, you can mount them on the back if you want to! Although it's not recommended to position the ports too close to an opposite wall especially if the port lengths are going to be very long. I positioned the 15" driver cut out about 3/4 ways up. After cutting, I gave the cutouts a quick sanding and brush down to remove any loose particles. I then mounted the front baffle by gluing and screwing it to the cabinet batting and braces, this is where an electric screwdriver comes in handy! . PS: again use plenty of glue to get a nice seal. See Figure 13. for the lay out drawing.
Figure 13. The Layout of the Speaker Cabinet.
Back to Top
This was the perhaps slowest part of the project as it takes time to complete the enclosure properly. Since I didn't have a router, which would have really finished off the box edges to a nice rounded professional look. instead I just skimmed off material at the corners at about 45 deg. angle with a small saw (to allow the chrome protective corners to fit on snugly). I then sanded and somewhat rounded all the Box edges with rough sandpaper and smoothed them down with finer paper.
I wanted the overall finish to look natural, not too dark nor light. The plywood was a little light in colour so I used a light oak dye on the outside panels to darken the wood. I then applied two coats (leave one dry overnight before applying the other) which were applied with a sponge. Make sure to get a decent painting sponge otherwise a cheap sponge will breakdown and leave tiny pieces of sponge all over the surface of your precious speaker box!!
For the varnish finish I bought a 1.5 liter can of 'Yacht Varnish' to enhance & protect the surface. I choose this varnish as it's tough and also has an attractive yellow tint in the varnish which enhances the overall finish. It also claims to have flexing properties to stop it peeling - this may be good for a boat but for a speaker who knows? time will tell...
Before varnishing the box, I sanded down the Cab with a fine grade paper. I then applied a light coat of varnish and allowed it to dry overnight. The next day I sanded down the Cab again with the finest grade paper I could get, again I applied a light coat of varnish and allowed it to dry. I repeated this process one more time. I applied in total 3 coats, which achieved the perfect finish, glossy and deep. Three coats are sufficient for my purposes.
Adding the Components
After the Final Coat of Varnish had dried, the final stage of the project was to add the hardware. I screwed the two heavy duty metal handles into the cut outs on the side panels also the eight 2-edge chrome plated corners to give some protection against corner knocks. Next came the driver which was fitted and bolted down securely and sealed using the silicon seal strip provided with the driver. Additional holes were then drilled for the clamps which hold down the protective Driver Grill. I bought the speaker driver clamping kits from Maplin, these ensure the speaker does not become loose as they allow you to really tighten the driver and grill into the box.
The ports were then inserted into the cutouts. I used a little bit of silicon around the edge and pressed the ports home.
To keep the Cab from sliding around the stage I screwed in 4 rubber feet on the base of the Cab and I also placed four on one side, in case I want to lay the cab on it's side in a gig. I will be fitting small compact casters on the base or side once I located something suitable.
The jack socket recess plate was screwed into the rear Panel. The Speaker was wired up to the jack sockets using a heavy gauge speaker wire. I also allowed plenty of slack so if I need to take off the back cover at any stage I'll have enough cable length to move the back panel out of the way. I also stapled the speaker cable just after it comes from the Jack socket (to the rear panel) and from the speaker (to the H-Brace) to stop any accidental strain on the cable when ever the rear panel is off.
Speaker Wiring
Wiring one speaker is easy, just keep the positives (hot wire) and negatives (ground wire) Together. However when you have two speakers you have more options on how to wire them up. Check out this link for all your wiring and power matching requirements.
http://www.celestion.com/pro/wiring.htm
I use heavy gauge speaker wire. I also allowed plenty of slack so if I need to take off the back cover at any stage I'll have enough cable length to move the back panel out of the way. I also stapled the speaker cable just after it comes from the Jack socket to the brace to stop any accidental strain on the cable whenever the rear panel is off.
Enclosure Absorbents
These have two main purposes, one to damp panel vibrations and secondly to damp internal air resonances. So effectly this stops unwanted waveforms from canceling and interfering with you sound. Again like the cabinet material there are all different types of acoustic wadding available. Namely fiberglass, BAF wadding as well as hi-tech materials. I purchased a simple polyester acoustic damping material, from Maplin Electronics. It's simply called Acoustic Wadding, it's a very light mixed polyester fiber about 3/4" thick. This material was easily available and is not very expensive.
I glued one layer thick of wadding inside the box on all walls, except on the Front baffle (The panel where the driver is mounted). I used two layers on the rear panel. Make sure any Wadding used does not block the port tubes or is located too close, in case it blocks or gets blown through the ports!!
Lining the enclosure is usually one of the last procedures in Cabinet Building, basically you are fine tuning the enclosure. You can play around and add more of less wadding until you are happy with the sound from your enclosure. Although do not go overboard, especially since vented enclosure only need the minimum of wadding (used mainly on the rear panel). If you have a sealed enclosure you can almost fill the enclosure with wadding!
When I plugged the speaker into the amp and tested the enclosure, I was absolutely amazed at the smooth response and the very clear, clean STUDIO quality bass. I plugged back in the old Marshall 4 x 12" to compare the sound, yes, the Marshall was louder but it's sound was very muffled and fuzzy. This new cab outstripped it in every way! Overall the new cabinets sound is very clean and bright with lots of punch. What more can I say?
Figure 14. Cross Sectional View of Finished Cabinet.
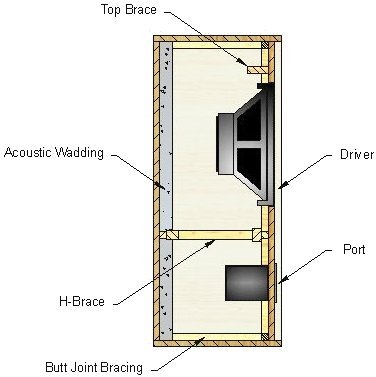
Note: Only rear wall acoustic wadding shown.
Bass Cabinet Statistics:
|
Gross Cabinet Volume: |
124Lts |
|
Net Volume: |
114 Lts |
|
Port Tuned Frequency: |
44 Hz |
|
F3 (-3dB): |
55Hz |
|
Port Area: |
176 cm Sq. (2 ports) |
|
Port lengths: |
13.4cm |
|
Speaker efficiency: |
100db @ 1M |
|
Power Rating: |
100W |
Figure 15. Computer Simulation of Vented Enclosure

Conclusions and Final costs:
The cabinet is far superior to my old Marshall cab. The Marshall was rattling and buzzing (I guess after 25 years they do start to fall apart!) It also gives me the punch, clarity and that low E that I wanted. It looks very professional with a great sound. It just proved to me that good speaker enclosure design really works and can be build by a non professional.
If I used the same enclosure and inserted the 15" Peavey Black widow, I would get a much better bass response and lower F3 point and a much higher power handing, 350W instead of 100W. I may at some stage in the future invest in one and exchange the Eminence.
While the Cab is still relatively large and heavy to lug around. It's a lot more manageable and tidy that my old Marshall. So there will be more space in the trailer at the next gig.
I've already completed a 2 x 12" enclosure using two Celestion speakers. This enclosure it still relatively heavy and holds a tight punch. Hopefully in the near future I´ll be able to put the page up. It's ideal for small gigs and practice.
Figure 16. Total Speaker Project Cost (£ Irish).
|
Part Description |
Cost |
|
|
1 |
Sheet 8' x 4' of 18mm plywood. Cut to required dimensions |
£22 |
|
4 |
Lengths of 1.2m, 20 x 20mm batten |
£4 |
|
1 |
Length of Pine, 1.8m (Braces) |
£3.60 |
|
1 |
Eminence Speaker EM15-100 (note: previously purchased) |
£70 |
|
1 |
15" Steel Protective Grill and hardware |
£7:50 |
|
2 |
10cm Port Tubes |
£3 |
|
1 |
Jack Socket recess plate & Sockets |
£8 |
|
5m |
Acoustic Wadding (I actually had way more than I needed) |
£20 |
|
8 |
Chrome Corners |
£8 |
|
2 |
Heavy Duty Handles |
£8 |
|
8 |
Rubber Feet |
£4 |
|
1 |
Carpenter Glue |
£5 |
|
- |
Miscellaneous Hardware, sandpaper, screws etc |
£20 |
|
1 |
1.5Lt, Yacht Varnish |
£7.50 |
|
Total project Cost: £190 Irish Pounds |
Useful Links
Manufacture & Electronic Suppliers
|
|
|
|
|
Hardware Suppliers |
UK Speakers |
Black Widow Speakers |
UK Speakers |
|
|
|
|
|
|
American Speakers |
Electronic Suppliers |
UK Electronic suppliers |
|
Here are some Speaker building Page Links: there are hundreds of thousands of pages out there. Surf around and get what you need, good luck!
|
A very interesting article about building your own light weight speaker bottom. |
||
|
Kbapps online speaker enclosure calculators. |
||
|
PowerSurge - Speaker building info. |
||
|
Speakermania - A tribute to loudspeakers |
||
|
My other project, a 15" Ported Bass cabinet |
http://www.oocities.org/SunsetStrip/Bistro/3491/speaker.html |
|
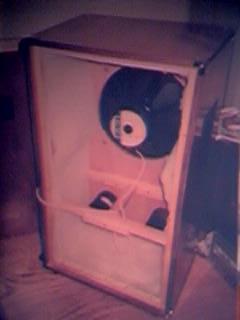
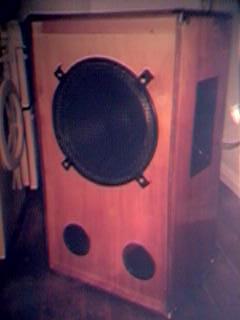
Sorry for poor quality only had a webcam to take 'em with!
|
|
|
Contact & Feedback Information
E- mail address:
neibeas@hotmail.comhomepage Web address:
http://www.oocities.org/neilbeas/If you have any questions or queries on the above project, please feel free to contact me. I have kept the webpage format of this speakerbuilding page to a one page article format. I may change this format if downloading time is deemed too slow.
I will be updating the site in the near future with photos of the actual enclosure.
copyright: neilb 2000

That's all folks!
or