| Monkeys Bum |
 |
 |
|
|
|
|
|
| The bouldering here is on sandstone boulders and is worth a visit. |
| How to get there |
| Access to this boulder is the same as for Monkeys Bum Crag. From the East Derwent highway about 5km along from the Bowen Bridge the road crosses a creek just before it sweeps around to the left. Park on the right in the area provided. Go up the valley. The Gnarly spider boulder is on the right side of a grasy flat a third of the way along the walk to Monkey's Bum (the climbing crag - see craglets). |
| Guide Compiled by Mick Berry and Stu Bowling |
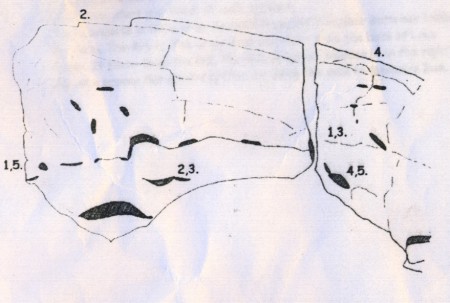
| The Gnarly Spider Boulder, Front |
| 1 V3/4 Gnarly Spider - Start at holds near left arete. Traverse right along lip past small holds then slopers to pull into crack to finish. 2 V? Sit start on hold under roof. Up to large sloping hold then up past more slopers to finish. 3 V4 Start as for 2 then finish as for 1. 4 V1 Sit start on large hold with feet down and right. Up right to layaways then straight up staying right of crack. 5 V4 Start as for 4. Up and left into 1. Reverse 1. |
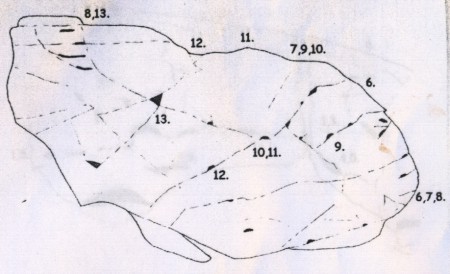
| The Gnarly Spider Boulder, Side |
| 6 V2 Start at pocket just left of arete. Up and left to layaway then straight up to finish. 7 V2/3 As for 6 to layaway and edge then up and left to finisih as for 9. 8 V? Start as for 6. Traverse left to finish as for 13. 9 V1/2 Start at holds above head height left of 6. Up to good hold then straight up to finish past jug. 10 V2 Start at holds in middle of wall left of 9. Up and right to follow thin crack to finish as for 9. 11 V? Start at same hold as 10. Using pocket on 12 dyno for the top. 12 V2 Start at hold at face height left of 10 13 V1/2 Start at large triangular hold. Up and left on edges to finish under roof. Problems 6, 7 and 8 can be done as extensions to 5, the reverse of Gnarly Spider at consective grades of V5, V5 and V5/6 |
 |
 |