-

ADRIENNE'S FAN

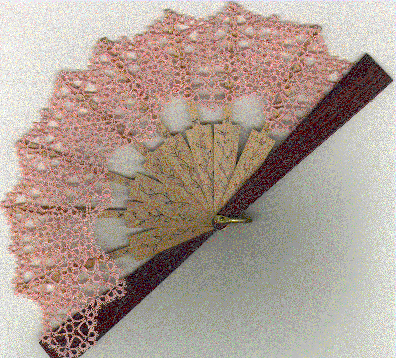
The fan shown was made and designed by Adrienne Quinlan. She has given permission for me to post her pattern for all to see. I have used scaled down pictures for purposes of page loading time, so a lot of the clarity is lost. You can click on this picture to see a more clearly detailed view and/or click here and download a zipped file (437kb) that contains a complete detailed view of the fan cloth and/or click here and download a zipped file (662kb) that contains a complete detailed view of the fancloth mounted on the fan.


Tatted Fan.

I got one of the Springetts 4.5 inch wooden fans when they attended the Lace fair in Norfolk (UK) in the Autumn of 1996 and gave myself the treat over Christmas of designing and making the tatted fabric for it.

The fan.

When folded it's 4.5 inches long and .5 inch wide at the top ( widest part ). The end panel wood has a lovely grain in a darkish colour. It has 8 sticks of pale wood. These are the same shape as the covers for about the first 2 inches and then cut to a stick shape for the rest of their length (for attaching the body). It has a brass loop at the pivot point.

Information on one source for fans

The Springetts Fans come in 2 sizes, Miniature (the size I used) which are just over 4in long with 8 Fansticks and the larger ones at 7 in with 12 sticks.

The prices are as follows (all plus P&P)

Miniature plastic (cream, white, tortoiseshell ) with gold decoration = UKP 4
Miniature in pale wood = UKP 14.25
With Dark outer covers (the one I brought) = UKP 15.25
Large pale wood = UKP 17.75
With Dark outer covers = UKP 18.75

They also have lace patterns with Prickings, Pleating plans etc. for UKP 0.75. To help in Mounting the fans they have a small book call Mounting Lace Fans and a Video on the subject.

Their address is
Christine and David Sprigett
21 Hillmorton Rd
Rugby
Warwickshire
CV22 5DF
UK

Phone +44 (0)1788 544691 Fax +44(0)1788551757

All the usual about the supplier - just a satisfied customer.

About The Body.

I used nearly the whole of a ball of DMC 80 in a peachy pink (one of my friends described it as the colour of old lingerie). I based the fabric on a Hexagon shapes (A) which are about 1in across. 15 of these are made up into 5 triples ( 2 at the top and 1 fitting in-between and below them). These are laid in a semicircle with 4 smaller (B) shapes joining them together at the middle/bottom and a little bit of something ( C) joining them at the top. The top points of the triples are positioned almost at the at the top of the sticks.

I have added a bit of painted decoration to the wider part of the sticks as they look very plain. But was very conserved that I didn't spoil it. I have marked it as I do my x-stitch with my initials and the year.

It will open and close but all the holes in the tatting make it a bit of a failure as a fan (grin).

Adrienne adrienne.quinlan@bbsrc.ac.uk


The Pattern

Material: 1 ball DMC80
Tatting shuttle
Fan

Abbreviations

C = Chain
CR = Close Ring
MP = mock picot... make a ds leaving a space equal in size to the other picots. Do not turn the first half of the ds, second half of the ds ia as normal. You have climbed out of the ring and are in position to start the next chain or ring.
R = Ring
RW = Reverse work
TRG = The triple ring group is worked as follows R 4-(2-)*4,2 CR **R 4+ to last picot on previous ring, (2-)*4, CR **twice RW (note join the 1st picot to the last ring of previouse group if there is one)
- = Picot
+ = Joining Picot
(..)*n = Do what is in the brackets N number of times

SHAPE A

Hexagon
Centre R (3-)*5, 3 MP
(C9,RW, TRG,RW, C9 ,+ to next picot on centre ring,C9)*6
Join the last ring to the first, C9 finish at centre ring
This makes the basic hexagon.

hexagon
To join the next hexagon
Working pattern of Hexagon, join as follows
Join the 2nd picot ( 2nd ring of group) to the 2nd picot (2nd ring in a group of the previous hexagon).
Join next 2nd picot ( 3nd ring of group) to opposite 2nd picot on next ring (previous hexagon)..
Join next 4th picot to opposite 4th picot on next ring (previous hexagon).
Join next 2nd picot to opposite 2nd picot on next ring (previous hexagon).

To Join the Third Hexagon
Working pattern of Hexagon, join as follows
Join the 2nd picot ( 2nd ring of group) to the 2nd picot (2nd ring in a right hand corner group of the 1st hexagon).
Join next 2nd picot ( 3nd ring of group) to opposite 2nd picot on next ring (1st hexagon)..
Join next 4th picot to opposite 4th picot on next ring (1st hexagon).
Join next 2nd picot to opposite 2nd picot on next ring (1st hexagon).
Now join the 4th picot of CURRENT ring to opposite 4th picot on next ring (2nd hexagon).
THIS JOINS THE INNER CORNER OF THE 2 PREVIOUS HEXAGONS.
Join next 2nd picot ( 3nd ring of group) to opposite 2nd picot on next ring (2nd hexagon)..
Join next 4th picot to opposite 4th picot on next ring (2nd hexagon).
Join next 2nd picot to opposite 2nd picot on next ring (2nd hexagon).


Work 5 groups of these 3 Hexagons.
Closer view here.


Now work 4 shapes B and C joining them to the triple hexagons as you go.

SHAPE B

Is worked as the hexagons apart from the following
Centre R is (2-)*4, 3 MP
Chain is C4


Work a group of 4 rings at bottom point rather than 3.


Join the first group to the inner corner of 2 hexagon.
Use the next group to join two sets of Hexagons together -
the 2nd ring in the group is worked as follows:-
Join 2nd picot to opposite 2nd picot on next ring.
Now join the 4th picot of CURRENT ring to opposite 4th picot
on next ring (new hexagon group).

Join the next group to the inner corner of 2 hexagon

The 4 Ring group is joined as follows:-
(Join next 4th picot to opposite 4th picot on next ring
Join next 2nd picot to opposite 2nd picot on next ring)twice

SHAPE C


This is used to infill the small space left on the outer edge of the Fan.
Start with the single ring, at the junction of hexagons and shape B.

R 4 + to 4th picot of 3rd free ring on left hand side, 2 + to 2nd picot on next ring, 2 - 2 + to 4th picot on next ring
(also next hexagon), 2+ join to 2nd picot on next ring
C 4

Work group as follows
Join next 2nd picot to 4th picot on next ring of hexagon.
Now join the 4th picot of CURRENT ring to 2nd picot on opposite ring.
Work next ring without joining to any external rings
Join next 2nd picot to 4th picot on next ring of hexagon.
Now join the 4th picot of CURRENT ring to 2nd picot on next ring.
CR and fasten off to top of C4

Attaching to Fan.

The fan sticks are attached to the fabric just off the point of the top hexagons in the direction of the shape C. When stitching the sticks in place I found that I needed to add some extra holes.

Leaving an end of the thread free I stitched through from the back using the top hole in the stick caught a thread from the fabric and then returned through the same whole and so on down the stick, I then returned up the stick in the same manner and used a weavers knot to secured the two ends.

The end sticks of the fan may not have any holes to stitch the fabric to, ( as in my case ) so I sewed some matching ribbon to the fabric and stuck this to the end pieces. The Fan will open and fold (but not to often) and it does move a little air when you use it.


[ Main page | Patterns ]