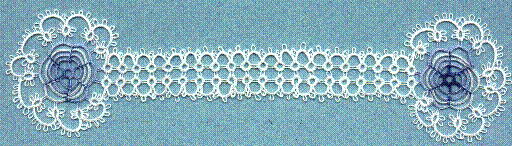
Julie Myers' Rosette Bookmark
Shared with Arachne members by Julie Myers. You are welcome to share this pattern so long as the designer is given credit
FOR EACH ROSETTE:
Wind on to the shuttle 2 1/2 yds(tatting thread amount) of rosette thread. Do
Not Cut Thread.
R 2-2-2-2-2-2.
Tie shuttle and chain threads together leaving the height of a
picot free. Including this there will be six picots.
The picots(-) in the chains of the rosette should be only large enough to
allow a join. They are not decorative, but functional. To begin with a picot
do not bring your first half stitch up to the work. Leave space as you would
for a picot. Finish the stitch and draw it up as you would a picot.
Rnd 2 CH -4+(lock join to next - of ring) repeat around ring.
Rnd 3 CH -8+ repeat around ring.
Rnd 4 CH -12+ repeat around ring.
Rnd 5 CH 5-6-5+ (these are decorative picots) repeat around ring until final
join. Instead of this join cut the threads to 3 in.(6 cm). Draw shuttle
thread through where the final join would be and tie threads in a square knot.
Finish off the ends in your favorite way i.e. a drop of fray check and cut,
whip stitch thread ends down with matching thread...
Make as many rosettes as needed (see end of pattern for variations).
OUTER EDGE
Fill shuttle full. The fuller the shuttle the longer you can make your
bookmark. Do Not Cut Thread.
R 3-3-3-3 CL RW.
*CH 3-2-2-3 RW. R 3+(last - of prev. ring.)3-3-3 CL RW.
Repeat from * 20 times or to your desired length.
CH 6 RW.
R 2-2-2+(to - on Rosette)2-2-2 CL RW.
Note: It is better to attach to a left hand picot on a chain, work around the rosette and come off the right hand picot on that chain. This gives the bookmark a more aesthetic look than if
you start on a right hand picot of one and work around to the left hand of the one adjacent to it. That will cause the bookmark to be divided down the center.
**CH 2-2-2-2-2-2 RW.
R 2-2-2+(to next - on rosette)2-2-2 CL RW.
Repeat from ** around rosette.
CH 6 RW.
R 3-3+(join to middle - in last R of first R CH sequence)3-3 CL RW.
#CH 3-2-2-2-2-3 RW.
R 3+(to last - of prev ring)3+(to middle - of next to last R of R CH
sequence)3-3 CL RW. Repeat from # to length of 1st R CH sequence.
At this point you have many options.
1) Add a second rosette to this end by beginning at the 1st CH 6 RW. and
continuing around the rosette. Then trim the ends to 3 in(6cm), draw the
shuttle thread through at the base of the 1st R CH set, then tie them in a
square knot and finish ends in desired fashion.
2) Don't add a rosette. Tie the ends in a square knot and finish them your
favorite way. For a tassel: after tying knot trim threads to 6 in(12cm).
Measure another length of thread 12in(24cm) and draw one end through at the
joint of the first R CH sequence. Even ends up and tie a square knot. Bring
all threads together and tie in a loose overhand knot about an inch from the
end of the book mark. (More threads can be inserted the same way. The thread
from the rosette can be included.)
3) Don't add a rosette, but continue as follows: CH 6-2-2-2-2-2-6 RW. R
2-2+(to last - of last R)2-2 CL RW. CH 6 RW. R 2-2+(to 1st - of 1st R) CL
RW. CH 6-2-2-2-2-2-6. Then trim the ends to 3 in(6cm), draw the shuttle
thread through at the base of the 1st R CH set, then tie them in a square knot
and finish ends in desired fashion.
4) Create a cross bookmark (make sure your shuttle is extra full!): When
doing the first R CH sequence leave off 5 repeats. Turn the corner by
replacing one CH with CH 6.
Then do 5 repeats of the R CH sequence and put on 1st rosette. Continue on as
for a regular bookmark until end of 5 R CH sequence then CH 6 again.
Do another 5 repeats of the R CH sequence and put on 2nd rosette. Continue on
as for a regular bookmark until end of 5 R CH sequence then CH 6 again.
Repeat one more time adding your third rosette. Then finish working down the
original R CH sequence to the end. Here either add a fourth rosette or finish
as either 2 or 3 above.
ANOTHER VARIATION:
I made a doily using the rosette as the center and did the Mignonette stitch
attaching to the picots. About every fourth round out you need to attach
twice to each loop (or make much longer spaces between rings) or the doily
will turn into a bowl.
A good starching after a gentle wash when your finished and you have something
which looks a little like a spider web or a North American Indian dream catcher.
[ Main page |
Patterns ]