Red Clover Bookmark by Eliz Davis
Red Clover Bookmark by Eliz Davis
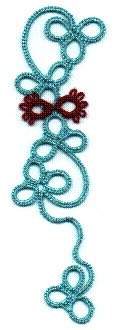 A split ring pattern requiring two shuttles.
Cebelia, size 30, green
Size 16 pearl cotton, fuchsia (small amount)
Using green thread:
(first clover)
Shuttle #1 - R 20ds, p, 4ds, cl.
R 4ds, j to first r, 8ds, p, 8ds, p, 4ds, cl.
R 4ds, j to second r, 20ds, cl. RW
Chain 40ds. RW
The next two clovers contain split rings.
(2nd. clover)
Shuttle #1 - R 12ds, j to center p of center ring in
1st clover, 8ds, p, 4ds, cl. RW
Shuttle #2 - R 20ds, p, 4ds, cl. RW
SPLIT RING:
Shuttle #1 - 4ds, j to 2nd p of 1st ring in this clover,
5ds, small p, 3ds.
Shuttle #2 - 4 LHK, j to p of 2nd ring made in this clover,
5 LHK, small p, 3 LHK.
Close split ring.
(3rd. clover)
SPLIT RING:
Shuttle #1 - 3ds, small p, 5ds, p, 4ds.
Shuttle #2 - 3 LHK, small p, 5 LHK, p, 4 LHK.
Close split ring.
Shuttle #1 - R 4ds, j to last p made with shuttle #1 in split ring,
20ds, cl. RW
Shuttle #2 - R 4ds, j to last p made with shuttle #2 in split
ring, 8ds, p, 12ds, cl. RW
Chain 40ds. RW
(4th. clover)
Shuttle #2 - R 20ds, p, 4ds, cl.
R 4ds, j to last ring, 8ds, join to free picot of last
clover, 8ds, p, 4ds, cl.
R 4ds, j to last p of last ring, 20ds, cl. DO NOT RW.
Chain 50 ds with Shuttle #2. (Shuttle #1 is core thread) RW.
(5th. clover)
Shuttle #2 - R 20ds, p, 4ds, cl.
R 4ds, j to last ring, 16ds, p, 4ds, cl.
R 4ds, j to free p of last ring, 20ds, cl.
Finish all ends. Allow tail chain to twist.
Using fuchsia pearl cotton for blossoms:
R 6ds, 5p sep by 2ds, 6ds,cl.
R 6ds, 5p sep by 2ds, 6ds, cl.
Use loose ends to tie blossoms to center where the two split rings meet.
Finish ends.
Shirlee asked:
> How did you learn to design? That is something I hope to try someday :-)
I started by playing with the designs of others. If I made a
mistake early in a pattern, I just changed the pattern to accomodate the
"mistake" (now a design element). From there I began to rewrite
someone else's design for a new use. I took a camisole
pattern I liked and figured out how to make a bookmark that had the
same appearance as a portion of the original pattern. I made
bookmarks from edgings designing my own ends. I designed corners for
edging patterns using a mirror at an angle. I then took a break and
just let my brain work on it all for a few months. I began to get
ideas that were entirely my own. I started sketching them out on a
piece of paper. From there I pick up my shuttle and work out the
details, going back to fill in those details (like counts) on the
sketch. From that I write or draw up the final pattern.
My friend and tatting teacher had long insisted she had no desire to
design. After seeing some of my efforts and reading the chapter on
designing using templates in (I think it was) Practical Tatting, she
has been sitting down with templates and graph paper to design. She
works hers out completely on graph paper before tatting. She has a
completed pattern before she ever picks up her shuttle. She has done
a bookmark and is now working on a teapot.
[ Main page |
Patterns ]