|
|
|
|
|
|
|
|
|
|
|
|
|
|
|
|
|
|
|
|
|
|
|
|
|
|
|
|
|
|
|
|
|
|
|
|
|
|
|
|
|
|
|
|
|
|
|
|
|
|
|
|
|
|
|
|
|
|
|
|
|
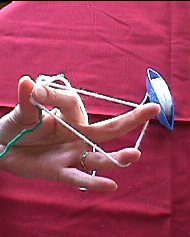
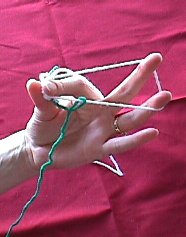
| Figure 1 : We start as if to make a regular ring. I have two different colors I am working with. This is to make it very visible as to NO flip of the knot. The two colors have been tied together. The knot is being held between the thumb and index finger. The green thread is referred to as the second shuttle thread (S2). This is what we will use to do the "split" side of the ring. The shuttle thread (S1 or white thread) goes from between the thumb and index finger, over the index finger and middle fingers and then back to between the thumb and index finger. The area of your thumb and index finger is sometimes called the "pinch". These instructions assume you already know how to do a regular ring. | 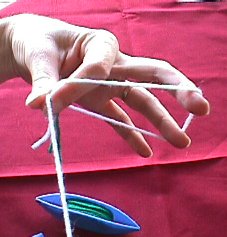 Figure 1 |
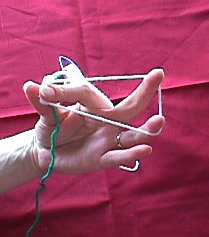
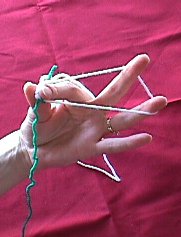
| Figure 2 : I have done about 6 ds with the white thread just as you would
with a regular ring. Now look at the setup. There is essentially a "top"
and "bottom" working thread. The first part of the split ring is done over the
"top" working thread as usual. The second part of the split ring is done over
the "bottom" working thread. |
Figure 2 |
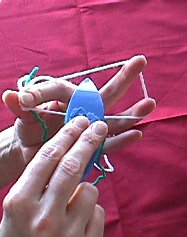
| Figure 3 : Now I have taken the white (S1) shuttle and set it aside on the table to my left. I have also rotated my hand so that my fingertips are pointing up towards the ceiling. Take a look at the previous picture and then this one again to see the rotation. It may feel a little awkward working over the "bottom" working thread (close to your palm), but it does get easier after a few times. |
Figure 3 |
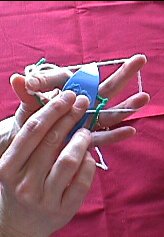
| Figure 4 : Keep the ring tightly spread around your fingers. The stitches on this part of the ring are Not transfered. You make the stitches in reverse order, 2nd half of the ds then first half of the ds. The most important part is Not to transfer the stitch. Really you are just making loops around the bottom ring thread. These unturned stitches will slide on the ring thread. |
Figure 4 |
| Figure 5 : With the green shuttle (S2) we do the second half of the ds first. For the second half we create the arch of shuttle (green) thread so it is below the plain of the working (white) thread. You don't actually have to do anything special. It just hangs there like we need it. Now slide the shuttle over the white thread as shown. The white thread should just slide between your thumb and the shuttle without having to move your thumb at all. |
Figure 5 |
| Figure 6 : Now slide the shuttle under the white thread as shown. The white thread should just slide between your index or middle finger and the shuttle without having to move your finger at all. |
Figure 6 |
| Figure 7 : Pull the shuttle back as pictured. You have created the second half of the double stitch. Notice that the green thread is looped around the white thread. Do not transfer the knot. |
Figure 7 |
| Figure 8 : Keep the ring tightly spread around your fingers and pull on the green thread to snug the knot up close to the first white ds you made. |
Figure 8 |
| Figure 9 : Now we do the first half of the ds. Hold the shuttle thread up above the plain of the white thread with your middle finger, while holding the shuttle between you thumb and index finger as shown. Now slide the shuttle under the white thread as shown. The white thread should just slide between your index finger and the shuttle without having to move your index finger at all. |
Figure 9 |
| Figure 10 : Now bring the shuttle back over the white thread. The white thread should just slide between your thumb and the shuttle without having to move your thumb at all. Notice with this movement that the shuttle is coming back through the arch you have created above the plain of the white thread. |
Figure 10 |
| Figure 11 : Pull the shuttle back as pictured. Notice that the green thread is looped around the white thread. Do not transfer the knot. |
Figure 11 |
| Figure 12 : Keep the ring tightly spread around your fingers and pull on the green thread to snug the knot up close to the previous half (second half) of ds made. |
Figure 12 |
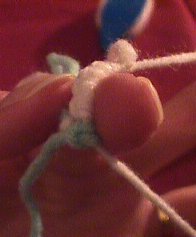
| Figure 13 : Here is a close up so you can see your first split side ds made. Notice it is green. We did not transfer or "flip" the knot on the split side of the ring. |
Figure 13 |
| Figure 14 : I have now done about 6 ds on the split side of the ring and I am ready to close the split ring. |
Figure 14 |
| Figure 15 : Set down the green thread shuttle (S2) and pick up the white thread shuttle (S1). |
Figure 15 |
| Figure 16 : Pull the ring closed as you would with a normal ring. |
Figure 16 |
| Figure 17 : Here is your first split ring. Half white, half green.
The pattern notation for this split ring could be written like this: SR 6/6 SR=split ring and the numbers before the slash are the normal ring instructions and the numbers after the slash are the split side instructions. Click here for more info and links. |
Figure 17 |