If this is the first time, select don't ask again and choose the second choice which does not use the wizard. Remember to save your work often.Add your pictures to the video:
Use the File pull down menu and selecting "Insert Media File to Timeline" then "Insert Image ...". Select all the pictures you want for this particular movie. Multiple pictures can be selected by clicking on the first image and then holding down the shift key and clicking on the last image. Then hit OK. Thumbnails of the pictures will show up in the timeline at the bottom of the screen. The order of the pictures can be adjusted by clicking on an image and then dragging it to a new position.Set the duration of the pictures:
click the first picture then scroll over to the last picture and clicking the last picture with the shift key down. Then, select the Clip pull down menu and select "Change Image/Color Duration ...". select 10 seconds.Add transitions between each photo:
Click the Effect tab at the top of the screen then click the down arrow under VideoStudio 9 at the top right of the screen and select F/X. Click on Crossfade then drag it to the box between picture 1 and 2 on the timeline at the bottom of the screen. Repeat this for each picture. I have not found a way to do this for all pictures. It is painful. The default time of 1 second for the cross fade works pretty well.Fix rotated pictures:
Clicking on a desired picture and then click either the rotate 90 left or rotate 90 right buttons at the top left of the screen.Adjust pictures that are too dim or too bright:

Click on a picture to select it then click on the Color Correction button below the rotate buttons at the top left. A set of sliders show up. Slide the Gamma slider (1) to the right to increase the brightness or to the left to decrease. Gamma correction provides clean math for adjusting brightness without saturating the image. Click the << button (2) under Attribute when finished.Add pan and zoom to each image:

Click on an image in the timeline at the bottom of the screen and then click on the Pan & Zoom button. Then click on Customize. The image on the left is the source image. The image on the right is the output. Grab and drag the yellow squares(2) to size the image and grab and drag the red cross (1) to move the center of the image. This will be the starting point of the pan and zoom.Add music to the video:
Next, Set the ending point by selecting the End Tab (3). Usually this is the entire picture. Either use the Red X and yellow handles or click the center button (4) and fill in the zoom ratio by hand by setting it to 100. Also, so that the final picture can be seen for a bit before the next picture is faded in, set the Pause amount to 30. Click OK when finished. The result can be seen by clicking the play button on the video player above the timeline. Repeat this procedure for all pictures.

Use the File pull down menu and selecting "Insert Media File to Timeline" then "Insert Audio" then "To Music Track...". This will bring up a file selector that will allow you to select an MP3 or WAV file. The file selector also lets you play the selection before hitting the OK button. Just click the play button at the bottom of the dialog box. The timeline display will change and show the pictures with the audio track.Preview the Result:Use the zoom slider (1) to zoom out far enough to see the end of the audio. Move your mouse over the yellow line (2) until it turns into a double arrow pointing left and right. Click on the yellow bar and move it to the left until it lines up with your last clip. It will snap into position.
Make the music fade away at the end by clicking the fade (1) button at the top left of the screen.


A preview of the final product can be seen by clicking on the word Project (1) then clicking on the play button (2). You may need to click the rewind button (3) to start from the beginning.Generate the final video:

Click the Share tab at the top of the screen then click the Create Video File button on the left hand side of the screen. This will pull down a menu with options. Select the last one which is named "Custom ...". Browse to a directory to place the result and enter the name for the output file (1). For example, video1.mpg. Now adjust the rendering parameters by clicking on the Options ... button (2).Repeat:
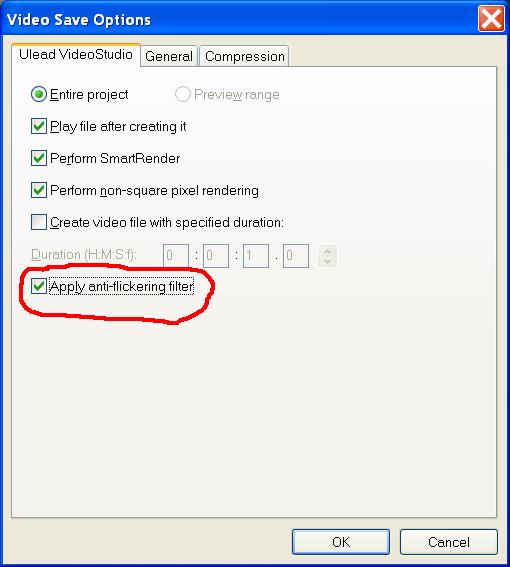
This will bring up a dialog box with a few tabs to choose from. On the first tab, named "Ulead Video Studio" select the Apply anti-flickering filter option.
Click the "Compression tab at the top of the Video Save Options window to change to the last page. Move the slider (1) to the right to raise the quality up to 80 and change the audio format to MPEG audio (2) to reduce the size of the output file. Now, click the OK button to finish up with the options.
This will close the options dialog and return to the Create Video File dialog that was show at the start of this section. Click the Save button (3) to generate the video. It can take between 10 minutes and an hour depending on the speed of your machine and the number of pictures.
Remember to save the source of this movie by saving the Video Studio project when you quit the program.


Repeat the entire process for each set of pictures that you want to be displayed as a separate show.