Disclaimer--The following text is based on a text by Gary Glover. Due to space restrictions I have edited some material out , but I have also added my own information. This segment is to give credit to Gary and to tell that this text is not all of his work. If you want his complete text either contact me or Gary himself
"I'm sorry, that particular part is no longer made.", "We stopped making that item five years ago.", "Sir, If you don't stop pestering us, I am going to call the police!" Those seem to be the most common sentences I have heard while on the "Quest". The endless hours of rooting through dank and stinky Salvation Armies and Good Will's, the strange looks from my friends and family, all because I want to build my own, wisecracking Tom Servo.
All of these parts are available. All you have to do is contact me and I will make a trade with you myself or connect you with one of my fellow bot buddies that produce parts. For the most part all of the parts are available for Servo, but it is recommended that you find the snack dispenser on your own due to the fact that I only know 1 person with spare heads and he has a limited supply.
Head -- A gumball machine (surprise!) made by Carousel Industries and distributed by LEAF, Inc. of Lake Forest, Ill.; the name for it is "Executive Snack Dispenser." Although it comes in red, the head and torso are painted to keep the same consistency in color. His beak is spray-painted silver after the manual dispenser handle is removed. Also, there is an added extension (made from the lid of another snack dispenser) between the top of his beak and the bottom of his globe.
Torso -- The barrel is a "Money Lover's Barrel Bank" -- a very difficult item to find. Chest is a toy engine block. Both items are now made from a mold. Shoulders -- Eveready flashlight heads. The rest of the flashlight is used for Gypsy. (See other page)
Arms -- Arm assembly from a "Mr. Moonie" doll. Once all the rage, it is now fairly difficult to find. This doll would drop its pants and "moon" people when a rubber bladder was squeezed. The entire assembly, including the rubber bladder, is kept intact when installed into the barrel. The Mr. Moonie doll is in production again(probably due to the demand of MiSTies everywhere). The doll also is found under many different knock- off names. Instead of finding the doll a part is available that is of nicer quality and easier to use, it has groves like that of a screw so that the spring can be easily attached to the shoulder.
Hands -- Doll hands. Another rare set of items that are now made from a mold.
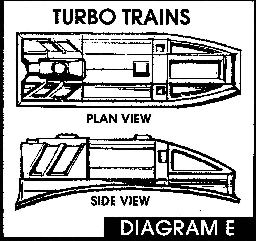
Hoverskirt -- A plastic Halloween "Boo Bowl." The base is made of foam tubing. Black decorations are made from plastic that has been vacu-formed around a toy train.
Hoverskirt decoration items -- Vacuum-formed,Tyco Turbo Train Engines. (No longer made,check Hobby/Train Stores for collectors). The newer Servo's have had a curve molded into Turbo Train vacuum-form to allow for slope of the Hoverskirt. (Late Season 6 and 7)
Shoulders -- Eveready flashlight heads. Called "Eveready Float ing Lantern", Model number 108WB. Still available at Home Base, Ace Hardware or Eveready Lighting Products, (800-383-7323) These should be vacuum-formed out of .060 plastic.
Bearing -- Goes between head and barrel to make Tom's head turn 360 degrees. Called a "Lazy Susan Turntable Bearing", 3 inch size. Made by En-Pak, of Ferndale, MI. Found at most hardware stores.
Springs -- Not Slinky Jrs. They are far too flexible. Custom springs are made for Tom from high tensile wire.
Paint -- Tom is Primed and finely sanded before Testor's Modelmaster, Burgundy Red metallic #2905 is sprayed over head, barrel, and engine block. Turbo Trains are sprayed a satin black as well as foam tubing around base.
Lets begin by giving you an idea on what tools you might need. Starting with Servo's head, (you'll need two of these gumball machines) the Executive Snack Dispenser. A coping saw or X-Acto razor saw, a drill, some 3/4 inch pvc pipe and connectors. Some epoxy, modeling cement and a small screw eye. A Dremmel type tool isn't necessary, but it makes life so much easier!
Before we begin, all methods and modeling techniques are suggestions. I will in NO WAY be held responsible if you cut off your finger or poke your eye out during these Bot Building chapters. I strongly recommend you wear goggles, asbestos kitchen gloves and one of those suits Dustin Hoffman wore in that virus movie with the monkey.
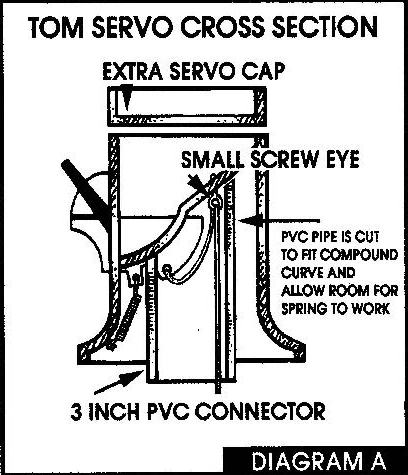
Begin by drilling a small hole into the black base of the Snack Dispenser. Get a screwdriver into the hole and pry off the black base. It comes off easily. You now want to mount the center puppeteering rod into Tom's head. It will support the weight of the body as well as have the string that controls his mouth running through the same pvc pipe.
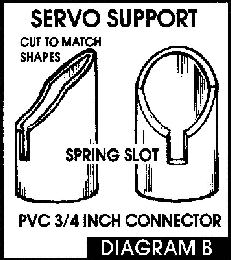
The center pipe is made from a 2 or 3 inch tall, 3/4 inch pvc connector. I suggest using a cardboard tube to practice cutting the exact compound curves that will match up to inside Tom's skull. (see Diagram A) I found an old center from a roll of wrapping paper to be of the same diameter as the 3/4 inch pvc connector. Take your time, try to be as precise as possible.
Continued trial and error gets the pattern made in the card board tube. Once satisfied with the fit, transfer the shape to the pvc connector. Clamp the pipe tightly in a bench vise and use the coping saw to rough out your cut. Sand all edges smooth. A 1/4 inch by 1/2 inch slot is cut into the pipe to facilitate the internal spring's unhampered movement for Tom's mouth to work. (see Diagram B)
We must now remove the globe from the gumball machine. Try one of these proven methods: Using a blow dryer, heat and squeeze repeatedly around it's base as the glue should loosen from the warmth. Wrap the globe in a dish towel and whack repeatedly onto a towel covered surface. Or wrap the lower third of the globe in masking tape and use the coping or X-Acto razor saw to remove the globe closely to it's base. care must be taken to avoid scaring his clear noggin. Once Tom's clear head/dome is removed, store it in a safe place.
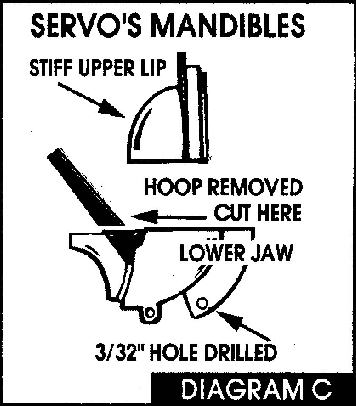
Let's attach the controlling string for Servo's mouth. Three things need to be accomplished first, 1: disassemble Tom's head and mouth. 2: remove black plastic dispenser "hoop" from lower mouth part. (see Diagram C) and 3: drill two very small diameter holes. A 3/32 inch hole or slightly larger to attach the string to the lower mouth, and a 1/16 inch hole into the underside of Tom's brain pan. Refer to Diagram A for placement. This 1/16 inch hole will be used to thread a very small (Picture framing) "screw eye". Use a pair of needle nose pliers or your own bony little digits to screw this into place. Remember, the screw eye must be inside the pvc mounting tube to work correctly. Look to Diagram A. While everything is in pieces, this is a perfect time to spray paint those hard to get at spots. The insides of the mouth are painted flat black. Once those are dry, (and I know how hard it is to not touch painted objects to see if they are indeed dry!) use masking or drafting tape to mask off the black areas. Work carefully and make sure both the top and bottom of his inner mouth are covered. Spray the "beak" top and bottom with silver spray paint. Don't worry about over spray on the sides. Some schools of thought say that Tom's red finish will be more metallic and shiny if a base coat of silver is applied first. Remember to also spray the inside of the extra Executive Snack Dispenser lid, as well as the inside and outside of what will become Servo's top lid. Using Metal Flake spray paint takes some patience as it is better to apply it in several lighter coats. (Not one giant, runny,sticky covering) Allow at least 4 hours to dry, more if you can stand it!
Once everything is dry, reassemble and glue the inverted lid to the Servo head. Use standard model cement, but use it sparingly. You can even glue his globe back in place, and again use standard model cement. Get some really strong string or mono-filement fishing line. 50 or 60 pound test works perfectly. Remember to make sure your knots are strong and tight, because once it's all glued in place, it's nearly impossible to re- thread that mouth.
Your finished and operational Tom Servo should look like this. (see Diagram D) The globe and extra lid glued in place with four or five coats of Metal flake paint applied and the complementary headache from four or five coats of Metal flake spray paint. Put the complete head assembly away for now. Quit playing with it and showing all of your friends. They will be far more impressed when you show them your completed Servo later. Let's work on the Hoverskirt area for now.
You will need to make a master copy of the Tyco Turbo Train for vacuum forming the Hoverskirt things. Have you ever used RTV silicones? Ok, this is going to be fun! RTV stands for Room Temperature Vulcanizing. First find some. Micro Marc Hobby catalog (number to follow) or Theatrical Make-Up supply houses carry this. It is an invaluable tool for mold and part making. It will come with instructions and a catalyst to set off the hardening process. You can make exact replicas of anything. Find a container big enough to accommodate the train engine with about 3/8ths of an inch around the outsides. I suggest building your own container out of heavy cardboard. Follow the instructions with the RTV and pour to surround the engine. The engine is inverted so the wheels are facing you, in an upside down manner. Make the pour almost completely cover the engine. 24 hours later, you can remove the cardboard container and remove the engine. Pull the hardened silicon away from the train, and an exact copy has been left in the RTV.
Pour Hydrocal Plaster, (harder and more like concrete) into the space left by the Turbo Train. As each Plaster "Master" dries, remove and make more. At least three are needed. You will only have to vacuum form them twice to get six total. Depending upon your modeling level you can form the curve on the base of the "Master" train to match the curve on the plastic Hoverskirt bowl. These should all be vacuum formed with .030 styrene plastic. See Diagram E. Make sense?
You need to get access to a vacuum-forming machine. Start with the yellow pages under "Plastics, forming". Most shops will allow you put your forms in on a small run, or in a corner of a big run. If you find someone extra nice, they will charge you a nominal fee to form the small parts you do need. The correct Tom Servo also has his shoulders vacuum formed, so try to get both done at once, if you visit a commercial plastics forming dealer or shop.
Because the Turbo trains and the Lantern shoulders need to be formed with different weight plastics, you could also try finding a large Hobby / Radio Control Airplane dealer in your area or region. These groups often vacuum-form various wing and canopy parts for replacement needs. They could steer you in the best direction. You might even consider buying or building one of your own. Machines list for $59.00 and up to thousands of dollars. Check the ad sections in Model Building magazines or catalogs. Once you have the trains formed, use some short scissors or an X-Acto knife and a steady hand to trim out the parts. They are sprayed a satin or semi gloss black.
The Hoverskirt it self is interesting as there are many options. It originally seems to be about 11 1/4 to 11 3/4 inches in diameter, about 4 1/2 high and a top diameter of roughly 5 inches. I don't know of anyone who has found the original "Boo Bowl", but many other replicas exist that work very well. I have found a white salad bowl by Decor. Master Modeler Ed Miarecki say's that if you go to a Micheal's Craft store, check out in the catering , service section and there is an exact replica to the original, only it's black. Check Mom's old Tupperware as a bowl they made one in the late Eighties will work too.
Get out the pipe insulation foam and run a new X-Acto blade lightly around the pre- scored cut. Place around your bowl for a dry fit. Cut close to where they meet, but not too accurately, mark where they meet, give some room for play. Remove the closed cell foam from the bowl and reshape on the table in a circle. Place one edge on top of the other, squish both pieces flat with an straight edge, and cut through both at the same time. This should give a very clean cut that will match up together. If not, keep trying as the stuff only costs a dollar for a five foot length. Glue together at the seam. Spray the foam the same flat or satin black as the Turbo Trains ( This is optional as I have seen many seasons where Tom's foam ring is just grey). Shove the foam ring back onto the bowl. Try placing the trains one at a time on the skirt in a pattern of equal spacing. Look at lots of stills, postcards and posters from the MST fan club. They are your best sources of reference for the Robots. If your VCR has a good freeze frame, take some time and really look through those Poopie and scrap book video tapes!
Hot glue, modeling cement or small bolts and nuts are used to attach the vacuum formed pieces ( Ed Miarecki, professional special effects expert say's, "I always use mechanical fasteners, they don't fail like some glues". Listen to Ed, he knows his stuff) Leave a very small gap between the bottom of each train and foam ring. Next chapter we will work on shoulders, arms and hands.
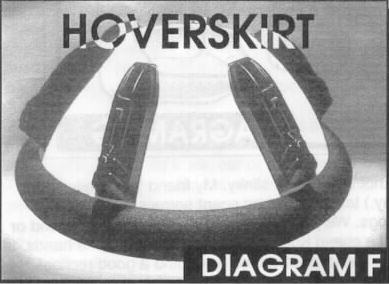
Take a look at the latest photo (see Diagram F) and make sure things resemble the example. Things are beginning to look pretty good, eh? Alright, lets continue our assembly process with the hands. Check those old dolls in grandma's closet or attic. I have been told the original set was from a clown figure. Refer to photos and posters and get the closest match you can. Place the dolls hands in a vice and use a sharp hack saw or razor saw to remove from said toy. Don't worry, it won't need them! A small observation for all of you. Did you ever see the Twilight Zone episode with Telly Salvalis and the Talking Tina doll? I got a little weirded out as I was cutting the hands off of the doll. That's all I am saying. Spray them white and somehow fill in the opening if they are hollow.
Your next search and locate project is to find and purchase a Mr. Moonie Doll, sometimes also called a Seymour Buns. It used to be popular to have this figure suction cupped to your car window. At the appropriate time, when you squeezed the bulb, it would drop it's pants and "moon" your fellow drivers. As I say, it " WAS" popular before people shot one another for bad lane changes! That is exactly what you need today, a toy that offends and enrages other drivers. Grab that bad boy and tear off the arms. (fun, I know!) Inside each shoulder arm thing, is a hollow plastic tube which will make up the upper part of Tom's arm. It should be the same diameter as the wrist of the clown. Look to the Diagram G1 for clarity. Look at Diagram G2 for the alternate �Moonie Arm� with the conveniant screw teeth.
Diagram G1 also shows you the location for one of the most elusive and curious parts of the Robot Tom Servo, the springs for arms. One thing I know for sure is that they are not, I said not, slinky Jr's! They are all the wrong diameter and far too flimsy to work like the originals. The springs for the real Tom seem to be composed of a high tensile steel, circular in makeup and not flat like the slinky. I did find a cheap Korean slinky that almost fit the hands. It was only off by a 1/4 or 1/8 of an inch. Keep me informed if you find a good replica! The springs appear to have five or six wraps or coils around the wrist, about 1 3/4 to 2 inches of spring and again five or six coils around the tube that makes up Tom's arm. The springs can be glued or attached with mechanical fastener's to the wrist and arm.
The Mr. Moonie arms need to have a small disc attached to one end. Plastic,.060 or .090 thick in a circular or tear drop shaped manner. The original Tom (During season 2 through 4) seems to still have the clear "bladder" assembly from the Moonie Doll. His arms would spring up and down when Kevin gripped the bulb. Look for pictures in the Colossal Episode guide or the Scrapbook tape. The Patrick Swayze Christmas segment, shows Kevin in the puppet trench working Tom Servo with bladder in hand.
By now you should have worked out the vacuum forming process and you need two copies of the Eveready flashlight hood. A small platform of plastic should be glued to the underside of the flashlight hood to make a "shelf" inside the vacuum formed shoulder. This gives you a nice, flat surface to attach the Moonie arm. This whole group of items are secured to the barrel torso by screws or pop rivets. Some have even suggest cutting a matching curve on the lower edge of the shoulder piece to matching the barrel's diameter. That would make it hug the barrel a little closer.
Speaking of barrels, and I was, we need to discus some options. I am sure there are still a few Money Lover Barrel Banks still in existence, but good luck in finding the buggers! Rumor has it that they came from Mexico, filled with rice and beans. It is roughly 8 1/2 or 9 inches tall, deeply woodgrained with hoops and rivets on the hoops. It has a circular logo right about where Tom's engine block sits. The logo read "Money Lover's Barrel Bank". I have heard about and own one of the numerous substitutes available. The ever popular large size Barrel Of Monkeys, s giant stuffed St. Bernard's plastic booze barrel, a Dog 'n Suds root beer barrel or even a plaster bank that is almost the exact spitting image of the real thing will work.
It's really time for the final assembly and detail work. The main component left for any true and accurate Tom Servo is the Engine block.
I think scratch building is the only way to finish up this last part. Now if you're like me, and I know I am, you will have some sheet styrene lying around. If not, a trip to a local hobby shop will secure you with some 8x10 sheets of .060 styrene and white plastic tubing. Spend some time studying the photos and posters and tapes and come up with a simple shape you can follow. Diagram H should help with basics. The eight pipes coming from the center of the engine block can be made with small sizes of tubing. Take care to cut all the pieces in a miter box or in a vice to get as straight of a cut as possible. Use modeling putty to help fill in any gaps or holes.
The engine block is a series of straight sides and top. The styrene can be scored and snapped on the edge easily. Sanding before gluing helps it bond to each side or top. Use small half round strips of plastic as the trim pieces. Some models of self assembly shelves and desks have tiny, disc shaped screw head covers that will work for the raised items on the engine sides. The finished block is primed and sanded and sprayed the Burgundy metal flake paint. Now is a great time to paint your barrel red as well.
The barrel is attached from the bottom of the barrel to the top half of the Hoverskirt. I used "L" brackets and nuts with bolts. A large (2") hole is placed through the center of the skirt to mount the control rod that supports the body and head as well as controlling the mouth. The upper part of the barrel has the lazy Susan bearing attached with small screws or your glue gun. The rod we first mounted into Tom's cranium will now be glued together with an 12" length of 3/4 inch PVC pipe. Thread the string through the pipe first, and find out where the bearing will rest. Tom's head needs to be secured to the bearing by forcing the edges of the trimmed 3" bearing up and into the gap left in Tom's head by the removal of the base plate. I have heard that Epoxy putty will work for this too. Tom's head should freely spin on the bearing as well as the barrel. I used a small 1/4 inch thick ring of PVC pipe to attache the string that controls the mouth. I can fit my finger into the ring and use it to control Tom's Wise cracking mouth. Trim the length of pipe so your Servo sits flat upon his Hoverskirt. Cut a slit in the bottom 1/2 inch of the PVC and hang the finger ring through it. Place a 3/4 inch PVC cap on the bottom of the pole to clean things up.
Take a look at the last instruction, Diagram I and it's exploded view of Tom Servo and all his parts. Remember that I can provide you with parts that you need or connect you with someone else that also has the parts.
Now pack this cool item of pop culture into a suitcase and find me at the next Convention.
 Back
to main page
Back
to main page
E-mail:
pmgilbe1@students.wisc.edu