|
|
COUNTRY ANGEL made with PI
by VickiG
|
|


|
@COUNTRY ANGEL
by VickiG
PI VERSION: 8 or XL
LEVEL: Intermediate
MAIN TOOLS: Path Drawing Tool,
Easy Palette for presets, Editing Tool
Transform Tool, Retouch/Blur.
DOWNLOADS: Shaders presets. I can't remember
where I got them, but they were from someone
in our PIRC group! LOL. You can download
them HERE.
INSTRUCTIONS:
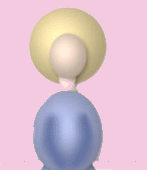
- Open new white canvas 500Wx450H.
- Path Drawing Tool - elipse - use skin color
from shader preset - draw a shape approx 46x56.
- Path Drawing Tool - Rounded Rectangle - skin color from presets,
draw shape approx 22x35 and go up to editing and click, go to edit
point and click on the plus (+) sign and add a node on each side
of the neck, click back on the pick point, then click on each node and
bring in just a tad to form a curve on the neck on each side.
Right click on neck, arrange, send to back.
- Path Drawing Tool - elipse - draw a shape approx
100x119.I used a country blue, use whatever color you like.
Grab your paintbrush tool - a shade darker than the dress color
size-15; trans-25; softedge-50; click on mode then paint a dark
line down both sides for the arms as shown. Then get your Retouch
Tool/blur-and blur in with the dress.
- Path Drawing Tool - shape - rounded rectangle -
draw a shape approx 140x215, same color as top, go to Transfor
Tool - Perspective and narrow the top and widen the bottom to
your satisfaction. Right click, arrange, send to back. Move up
to waistline as shown. Use same method as arms to make some dark
creases in skirt. I then went up to editing and clicked on middle
line, right click, convert to curve, to make the curve in the skirt.
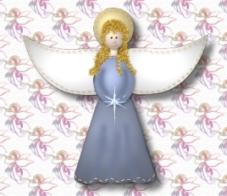
- Path Drawing Tool - Custom Shape - Brush Tip 1 -
white color - draw a shape approx 245x121 - Right click and
duplicate, Transform Tool - Rotate and Flip - Flip horizontally
and place on the other side. Ctrl and click on both wings and
merge as single object, right click, arrange, and send to back.
- Path Drawing Tool - circle shape- gold color -
draw a shape approx 95x95 for halo. Place up by head, right
click and arrange and send to back.
Right now if you want, you can ctrl click, select all objects
of the face and neck only and merge as single object.
- Now for the face features. All I did was use Path Drawing
Tool - color black for eyes - shape circle - size approx 5x5, right
click and duplicate and put on other side. Same for nose, only
use skin color, size approx 6x6. I erased part of the top half
so it wouldn't look like a doll nose. And for the mouth, I used
a heart shape, really small, light pink in color and placed it.
- Path Drawing Tool - Custom Shape - Star 3 - gold color
draw a shape approx 50x80 and place in middle so it appears
as tho the hands are holding it. I used Material Attribute
Gallery - Metallic - Gold 5 - for the color.
- Now for the hair - Path Drawing Tool - Custom Shape
Half Circle - color - any you want for her hair - draw a shape
approx 30x25 and place on head for bangs. Use the Rectangle shape
and make one as long as you want her hair, use the Transform Tool
Perspective, to narrow the top and widen the bottom, then right
click arrange and send to back. Make sure bangs are brought up
to front and hair is behind down the back.
Now you can right click, select all objects and merge as single.
- Now, all that is left is the stitching. I know there is probably
better ways to do this, but I did it this way. Whichever you are
comfortable with and if you know an easier way, please tell me!!
Using Path Drawing Tool - Line and Arrow - spline - color pink -
width 1 - style - dash lines - stitch around halo, wings,
neckline and skirt bottom.
Here's another one I did using hair stamps for the hair.
There you have it!! Add any kind of design you want on her hair.
I just added a Christmasy background and you're set.
HAVE FUN!!! - YOU'RE DONE!!! Hope you enjoyed this tutorial!
|
Copyright @TG Designs
All Rights Reserved


|
|
|
|