|
|
BEADED ORNAMENT made with PI
by VickiG
|
|


|
@BEADED ORNAMENT
by VickiG
PI VERSION: 8
LEVEL: Intermediate
MAIN TOOLS: Path Drawing Tool, Easy Palette
(for presets & fills), your favorite jewels.
DOWNLOADS: None unless you have a favorite place to get jewels and beads.
INSTRUCTIONS:
- Open new white canvas 350Wx350H.
- Path Drawing Tool - line and arrow - width- 1 - draw a line in center of your canvas approx 230 in length. Right click and duplicate this line -
go to transform tool - back to center line and copy and rotate this line 60 degrees clockwise. Duplicate this one again and copy and rotate 60 degrees
counterclockwise.
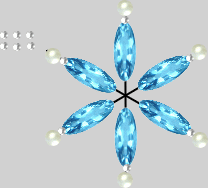
- Using your favorite jewel or bead, duplicate it 6 times, resizing it to your liking and place one on each of the stems near the center as shown in the illustration.
- Path Drawing Tool - 3d mode - circle - draw a shape approx 7x7 and fill with your favorite preset. (I used silver from the Material Attribute Gallery).
Duplicate this shape 11 more times. Place one shape on each of the stems as shown, leaving the remaining 6 for finishing off.
- Path Drawing Tool - shape - circle - 3d mode - color of your choice - draw a shape approx 15x15 and fill with your favorite preset. (I used a pearl preset.) Right click and duplicate this shape
6 times and place one on each of the 6 stems as shown.
- Now place the remaining 6 small beads after the larger ones as shown in the illustration.
The great thing about this ornament is all the different effects and looks you can get from using different flls and gems, which makes each ornament unique!
- Okay, now time for the center. Duplicate your larger round bead and place in the center of the petal, duplicating as many times as needed to make your center. (I used about 6 beads.)
- Right click, select all objects, merge as single object.
There you have it!! Your first beaded ornament. These look so lovely on a tree because if using glass beads, they reflect the Christmas lights!
HAVE FUN!!! - YOU'RE DONE!!! All you have to do now is add a hanger and hang it on your tree. I hope you enjoyed this tut!
|
Copyright @TG Designs
All Rights Reserved


|
|
|
|