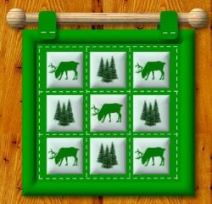
@QUILTED COUNTRY WALL HANGING
by VickiG
PI VERSION: 8 and above
LEVEL: Intermediate
MAIN TOOLS: Path Drawing Tool,
Line & Arrow Tool, Attribute Toolbar
Retouch Tool, Easy Palette (for presets)
Transform Tool (for sizing and rotation)
IMPORTANT: If you want to use the same
tree that I used, you must complete Pickers
Angel "Happy Tree" tutorial which can be seen
HERE. If not, you can use whatever
type of tree or design you desire.
DOWNLOADS: Wood presets I used are from Deb Hardisty
and can be downloaded HERE.
Animal Shapes can be downloaded from Merleretta's site
which is HERE
INSTRUCTIONS:
- Open new white canvas 450wx450h
- Path Drawing Tool-shape rectangle - 3d -
color dark green -draw a shape approx 365 x 350
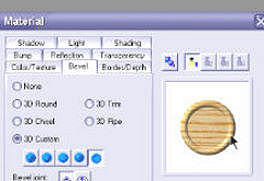
Go to your Material Button on Attribute Toolbar -
Bevel tab - 3d Custom-5th square shown - Go to
Border/Depth tab and change to 30 for both. Okay.
- Next - Path Drawing Tool - shape square
3d mode - pale green color - draw a shape approx
84x84. Go again to Attribute Toolbar - Bevel tab
3d Custome - 5th square over - then to Bevel tab
Change to 43x15. Right click on square, convert from
text/path to image - go to tool bar - retouch tool
blur - shape 30 - soft edge 5 - blur the corners
slightly to take off the rough edges.
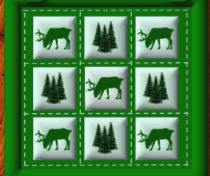
- Duplicate this square once. Take your picture
of your elk, place in middle of square (right click
and arrange - bring to front if needed) and go to
your Transform Tool and resize as needed. Take the
trees you made or whatever other kind of tree you
want and place in middle of the second square resizing
again as needed. When you are done with this, right
right click on each square and picture and merge as
single object. Duplicate your squares as many as
needed and place on larger dark green square as shown.
When placed to your satisfaction, right click and
select all objects, right click and merge as single
object.
- Go to your Path Drawing Tool - use Line
and Arrow - width 1 - style - dashed line - go around
outside edges of quilt and between quilt blobcks for a
"quilted look".
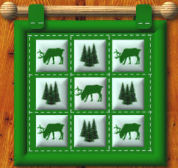
- Next make a tab - Path Drawing Tool - rounded
rectangle - 2d mode - dark green color - make a shape
approx 37x59. Duplicate this once and place at top of
quilt block as shown. Add some stitching to these too.
- Time for the wood dowel. Path Drawing Tool
rounded rectangle - 3d mode - your choice of wood preset
I used one of Deb's which can be downloaded above. Draw a
shape approx 420x42. Apply wood preset.
- Path Drawing Tool - circle - 3d mode - same wood
preset as dowel - draw a shape approx 44x44 and place on
end of dowel as shown. Duplicate this and place on other
end of dowel. Click on each of the circles and the dowel
and right click, merge as single object. Place at top of
tabs and right click, arrange and send to back.
YOUR'RE DONE!