|
|
COUNTRY SANTA made with PI
by VickiG
|
|


|
@COUNTRY SANTA
by VickiG
PI VERSION: 8 or above
LEVEL: Intermediate
MAIN TOOLS: Path Drawing Tool,
Easy Palette for presets, Airbrush,
Transform Tool, Retouch/Blur and Burn.
DOWNLOADS: Shaders presets. I can't remember
where I got them, but they were from someone
in our PIRC group! LOL. You can download
them HERE.
INSTRUCTIONS:
- Open new white canvas 250Wx400H.
- Path Drawing Tool - custom shape- A08 -
color red - draw a shape approx 85x135. Use Transform
Tool - perspective - to narrow the top and the bottom.
Path Drawing Tool - Elipse - offwhite color - draw a brim
for the hat and right click on it, choose "wrap" and then
"bend" and when the box pops up, change bending amount to
35 and baseline to 0. Place brim as shown.
- Path Drawing Tool - Circle - skin color from presets,
draw shape approx 100x100 and right click arrange, send to back
as shown in the illustration.
- Path Drawing Tool - circle - draw a shape approx
21x17 with same skin preset and place on face for nose.
- Path Drawing Tool - shape - circle - black eye preset -
draw a shape approx 6x6, right click duplicate and place on other
side of face for the eyes.
- Path Drawing Tool - Elipse - draw a shape approx 20x7
white in color - and use the same method as the brim of the hat
to bend it for eyebrow. Right click and duplicate and place the
eyebrows above the eyes. Resize if necessary.
- Path Drawing Tool - custom shape - brush tip 1 - white -
and draw a shape approx 90x65. Transform Tool - rotate right 90
degrees, right click duplicate, transform tool - rotate and flip,
flip horizontally and place both pieces under nose for moustache.
(Right click on nose, arrange and bring to front.)
- Now for the beard. Using Path Drawing Tool - custom shape -
flower 4 -white color - draw shape approx 95x80. Right click and
duplicate this piece 2 more times. Arrange with the middle one in back.
Ctrl - click on these 3 objects and right click, merge as single object.
Now using Tranform Tool - lock "unlocked" resize sides and length til
you get a shape that you like. When you are satisfied, right click and
arrange - send to back - and place on face as shown. Then using Retouch
Tool - blur - blur out the lines of the shapes so it just looks like
shadowing. If you want, you can also freehand draw a shape for beard.
- Path Drawing Tool - shape circle - white color, draw a "ball"
for the top of his hat.
- Now using Airbrush Tool - size 30 - color - light pink -
transparency - 20 - soft edge - 50 - mode clicked on your attributes
toolbar - spot in some rosy cheeks.
- Now, all that is left is the stitching. I know there is probably
better ways to do this, but I did it this way. Whichever you are
comfortable with and if you know an easier way, please tell me!!
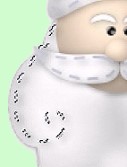
Using Path Drawing Tool - Line and Arrow - spline - color gray -
width 1 - style - dash lines - stitch around brim of hat, moustache
and beard using curlies on the beard as shown. I also used the burn
tool to darken the stitches in the places where they didn't show up
very well,conveting first from text/path to image.
- Right click, select all objects, merge as single object.
There you have it!! Add any kind of design you want on his hat.
I just added a Christmasy background and you're set.
HAVE FUN!!! - YOU'RE DONE!!! Hope you enjoyed this tutorial!
|
Copyright @TG Designs
All Rights Reserved


|
|
|
|