|
|
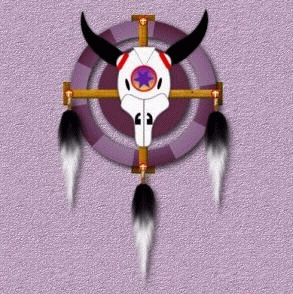
MEDICINE WHEEL made with PI
by VickiG
|
|


|
@MEDICINE WHEEL
by VickiG
PI VERSION: 8
LEVEL: Intermediate
MAIN TOOLS: Path Drawing Tool,
Easy Palette (for presets),
Transform Tool (for sizing and rotation)
DOWNLOAD: Feathers I used were supplied
by Rosie
You can download the feathers HERE.
INSTRUCTIONS:
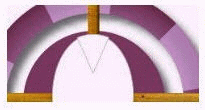
- Open new white canvas 500wx600h
- Outline drawing tool - circle-2d mode -
border 15 - draw a shape approximately 250x250.
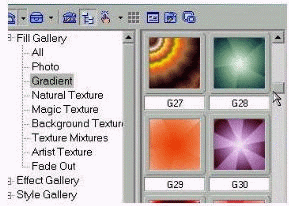
- Go to your easy palette - fill gallery -
gradient - I chose G30-double click this to apply to your image.
- Path drawing tool - shape - circle - 2d - drawn an inner
circle
approximately 175x175. Choose the darker shade of your
purple
for this inner wheel - right click, select all, right click,
merge as single object.
- Path drawing tool - 3d mode - border 7 - rectangle - draw a
shape
approximately 300x13 and go to your easy palette and choose
a wood fill,
or any other fill you desire. I chose a chestnut. Border
of this piece should
be around 5. Right click on wood piece,
duplicate, transform tool, rotate
90 degrees. Now we are going to
make the little back wood pieces
that connect to the long ones.
- Path drawing tool -3d mode - border 7 - rectangle - draw a shape
approximately
30x40 and fill with your wood. Right click and duplicate
this piece 3 more times and
place at the edges of each of the long
wood pieces as illustrated. (you will have to use
the transform tool
flip right 90 degrees for the side pieces). Now hold your ctrl key
and
click on each of those small pieces, right click, arrange
and send to back.
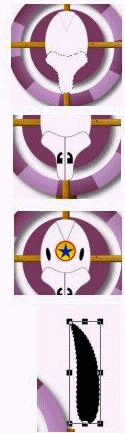
- Now we are ready for the skull. Path drawing tool - shape - elipse -
2d mode - color white
or a very pale gray - draw a shape
approximately 100x150 - keep selected and go to
paintbrush tool -
size 1 - color - dark gray - go to effects - all - paint on edges.
- Path drawing tool - shape - custom - 2d mode - same color
as skull - find pie 2 -
draw a shape approximately 85x40 - transform
tool - rotate 90 degrees right -
use same paint on edges - then
move up to the top of the skull as illustrated.
- Path drawing tool - shape custom - 2d mode - same color as skull -
find round shape and draw the shape approximate 160x100 - transform
tool - slip vertically - apply same paint on edges and place toward
bottom of skull as illustrated.
- Line and Arrow tool - dark gray in color - straight line -
width 1 - draw a straight line as illustrated on the bottom portion
of the skull.
- Nostrils - Use your test tool - color black - 2d - bold - size 75 -
arial font - make a comma - transform tool - flip vertically - place
on right side of skull on bottom portion. Right click - duplicate -
transform tool - flip horizontally - place on left side of skull.
- Now for the eyes - Path drawing tool - shape elipse - 2d mode - color
black - draw a shape approximately 7x25 - transform tool - rotate by
degree - rotate counterclockwise 10 degrees - right click - duplicate -
transform tool - flip horizontally and place on right side.
- Middle Design - Path drawing tool - shape circle - 2d mode - any
color you want (I chose a gradient gold) - draw shape 40x40. To make the
outer ring - go to your paintbrush - any color - (I chose red) - shape
circle - size 5 - go to effects - all - paint on edges. Place a design
in the middle. I(chose a star).
- The Horns - Path drawing tool - custom shape - Brush Tip 1 - color
black - 2d mode - draw a shape approximately 165x17 - use transform tool -
flip vertically then resize with only bringing it in to make the shape
a little thinner. Transform tool - rotate by degree - rotate 45 degrees
clockwise - right click - duplicate - transform tool - flip horizontally.
Put these two shapes aside for the moment. Go back to Path drawing tool -
shape circle - same color as skull - 2d mode - draw a shape approximately
30x30 - apply same paint on edges as rest of skull - (size 1 - dark gray)
then right click - duplicate - place one on each side of skull as illustrated -
right click and send to back. For the red decoration I chose Path drawing
tool - rounded rectangle - 2d mode - draw shape 10x35 - transform tool -
rotate until it fits across the horns as shown. Right click - duplicate -
transform tool - flip horizontally and place on other side of skull. Now
right click, select all objects, right click and merge as single object.
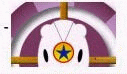
- Feathers - I chose some of Rosie's feathers again (she has such great
feathers!) and use the transform tool to resize the feathers to desired
length. Now, right click and duplicate the feather 2 more times and place
on the wood posts as illustrated. Now you can add any ornament you want
over your feathers - beads - jewels or some design. I chose a simple design
of a red outlined circle with a white cross in the middle.
HAVE FUN!!! - YOU'RE DONE!!!
|
Copyright @TG Designs
All rights reserved.


|
|
|
|