
Installing Toyota’s Electric Locker into a 1st Generation 4Runner
(Rough Draft!)
By: Mike Carter
Last Update: 04/09/2002
Introduction
This article details my experience of installing a Toyota electric locking differential into the rear axle of my 1st Generation 4Runner. Due to physical differences between Toyota’s locking differential and their standard open differential, the axle housing must be modified in order to install it.
In this article I’ll describe what you will need to do to install one of these lockers in your truck or 4Runner. In a nutshell, you’ll need to do some grinding on the axle housing to create/enlarge some notches, widen the gasket ring by laying down a small weld bead, and drill & tap some new stud holes.
Additionally, you’ll need to wire it up and build some sort of control circuit to engage and disengage the locker.
There are some other articles on the web covering this topic which I found to be very useful (see my links section below).
Contents:
Why Choose Toyota’s Electric Locking Differential?
Back to Top
I’m not going to discuss what differentials are and the various types of traction-adding differentials. For more information, visit the following links.
http://reality.sgi.com/rogerb_engr/4x4/TrueTrac.html
http://home.off-road.com/~bibelheimer/diffs/diff_info.html
http://reality.sgi.com/georgec_melbourne/george_couyant/diffs/diffs.html
The Toyota locking differential is a manual locking differential, meaning that you can lock and unlock it at will. This design appealed to me because it offers all the benefits of an open diff (good road manners, better turning radius on tight trails, less "walking" in certain situations), yet it switches to a full spool when needed.
The Toyota electric locker works by locking one of the side gears to the ring gear, thus effectively converting the diff into a spool. It uses small electric motor to move an actuator arm that does the locking. Downey offers a kit that replaces the electric actuator with a cable-operated mechanism.
Toyota isn’t the only company that makes a manual locking differential. ARB makes a similar product that operates off of air pressure rather than an electric motor. I have heard good things about the ARB locker, however I choose the Toyota one for several reasons. First of all, it is a complete, brand-new 3rd member already setup and ready to go. The ARB installs into an existing 3rd member. Second, the ARB locker requires a compressed air source to operate, the Toyota locker just needs 12volts. Finally, the Toyota locker only needs electricity to change between locked and unlocked states. Once it is locked, it stays locked until you unlock it. This seems like a safer design if the wires (or air hose) were to get damaged while in a precarious position.
Another advantage is that Toyota based their locker on their V6 differential which is stronger than the differentials found on their 4 cylinder trucks. It uses four pinion gears instead of two, and has a stronger housing.
However, the ARB does have some advantages. The main advantage is that (or so I’ve been told) that it engages as soon as you active it, whereas the Toyota one won’t actually lock until the splines in the mechanism are aligned properly. Sometimes this may require driving a short distance. Because of this, it is necessary to engage the Toyota locker before you attempt an obstacle where it is required. If you get stuck and the locker is not engaged, it may not be easy to get it to engage. I have been able to lock it without moving by spinning the rear tires, but I doubt it is good for the unit or drive train to do this.
Another nice thing about the ARB is that you will have an air source to air up your tires. True, it won’t be the fastest air compressor around, but it will do the trick.
All things considered, however, I would still choose the Toyota locker over the ARB. The ARB's air actuator just seems too problem-prone to me.
Late model 4Runners and Tacoma’s that come factory-equipped with the locker have some "safety features". It will only lock when you are in 4-low, and you have to be going less than 5 mph(?) to engage/disengage it. However, these features are built in to the controller and not the locker itself. Since I retrofitted this locker and built my own controller, I do not have these restrictions. I have used my locker in 2-HI at high trail speeds.
As mentioned above, the Toyota locker is sold as a complete 3rd member. You can order it from Toyota in several different gear ratios: The ones that I am aware of are 4.10, 4.30, and 4.56. If you want different gearing, you’ll have to re-gear it. You may want to check out Inchworm http://www.inchwormgear.com for some other options, including a high pinion.
Ordering the parts
Back to Top
You can order the locker from a Toyota dealer or Inchworm Gear. You may also be able to find one used in a junkyard, however this task apparently is akin to finding the Holy Grail. I have not heard of anyone who has actually found one in a junkyard, but I am sure it has happened.
Toyota sells these lockers as a replacement part for the vehicles that come with them. The part number I used was for a 1997 4Runner. Toyota calls it a "differential carrier". The list price is just shy of $1000! Fortunately, many dealers offer discounts, some as much as 25%. I purchased mine through Penn Toyota in New York http://www.off-road.com/vendor/4x4/penntoyota.htm (Ask for Rob). Shipping to CA was about $35. Another dealer who offers discounts is Jay Marks Toyota in Texas.
I ordered the version with 4.56 gearing. They actually had to special order it from Japan, so it took a few weeks for me to receive it.
General Information
Back to Top
Now that we’ve covered some background material, let’s look at what it will take to install. First off, let me say that I am not a machinist nor am I a mechanic. I am mechanically-inclined and have been doing a "little of this and a little of that" on my vehicles over the last several years. If you are an experienced machinist, then you can probably do these modifications in your sleep. If you have trouble hanging a picture straight, then you will probably want to have someone else do this work for you.
As for myself, I am fortunate enough (or unfortunate depending on your point of view) to fall somewhere between these two extremes, so I dove right into this project. I made some frustrating errors along the way, but I was successful in the end. Depending on your skill-level and how much spare time you have, this project could take anywhere from half-a-day to several days.
As a disclaimer, let me state that this article describes how I went about doing this project. I wrote this several weeks after the fact, so I may have forgotten some details. However, I have tried to be as thorough as possible. Also, my methods worked fine for me, but they may not be the best for you. It is your responsibility to make this determination. I offer this information strictly for the purpose of general information and nothing more. Isn't our litigious society great? ;-)
To control the locker, you will need to build a control mechanism. Here are some of the parts that I used:
I got these parts from my local electronics store.
Toyota factory service manual. It is well worth the price! Check on eBay, I have found some there for around $40 - $50
Installing the Locker
Back to Top
Remove the axles from the Axle Housing
Remove the 3rd member
Remove the axle housing
Modifying the Axle Housing
Back to Top
To make life easier, I removed all the studs from the axle housing. They are held in with thread lock. To remove them, thread two nuts onto the stud, tighten the nuts against each other, then use the lower nut to unscrew the stud. You don’t actually have to remove all the studs, but it makes it easier to clean the gasket ring and do the modifications.
Use the new gasket for the differential to mark where you need to grind the gasket ring. I had two of these because one of the ones I ordered got mangled in shipping. I laid the torn one on the gasket ring and used it as a template to spray-paint where to grind.
The gasket is not symmetrical. Be sure to determine the proper orientation! One of the new holes will be located halfway off the edge gasket ring (which is why you need to weld a bead to widen the ring). I believe that this one is on the upper half of the axle housing (closest to where the breather valve screws in). But be sure that you check for proper orientation before you start.
Grinding
I used a 4" angle grinder. I the gasket ring is subject to deformation if it gets too hot. I don’t know the grinder could get it hot enough to be a problem, but I just did a little bit at a time to be safe.
Bolt clearance
Once you are done grinding the notches in the gasket ring, you should be able to insert the carrier into the axle housing. Note that the diff must be locked when you install or remove it from the axle housing (see below). Try inserting it into the axle housing to see if it fits.
The head of one of the bolts on the carrier will hit the back of the diff housing preventing the carrier from fully seating. Allow this bolt to scratch the back of the housing to mark where it hits. You will need to make a dent in the housing where it hits. I used a cold chisel and a framing hammer to do this, but it was pretty tough to bend the metal. It worked, but not too well. I was afraid that the cold punch was going to crack the housing. You’ll definitely be better off with a heavier hammer and a brass punch.
After I dented it out a bit, I put some tape over the area so I could see if the bolt was still hitting. You could also grind the head of the bolt down a bit.
Welding
YOu will need to lay down a small weld bead to widen the gasket ring where the new stud holes hangs off the edge of the ring. At first I managed to drill and tap this hole without welding by installing the 3rd member and drilling straight down the stud hole. However, this proved to be a very flimsy solution and would have been difficult to properly seal.
Since I didn't have a welder at the time, I ended up paying a local welder to lay a bead down to widen the gasket ring. Also, on my first attempt at drilling the stud holes, one was a bit off center, so I also had the welder fill that hole in so I could re-drill it.
One note here. The guy that did the welding mentioned to me when he was done that the weld would be much stronger than the original steel. He wasn’t kidding... it was almost impossible to drill through one of the welds! I ended up having to buy one of those cobalt drill bits to drill through it.
Be sure not to get the gasket ring too hot while welding. It may warp if it does. Having a small bead put down to widen out the area for the stud hole won't be a problem. However, you may also want to widen the gasket ring where the large notch is ground to help make a better seal. I didn’t do this, but mine seems to leak a little bit from this area.
Another item to pay attention to is you need to keep the gasket ring as flat as possible. Don't let it get damaged while grinding the weld down.
I would suggest leaving the weld bead sticking up a bit, and then use a good quality metal file to level things out. Take your time with this so you don't have problems with leaking oil. You will also want to file down the edges of your new stud holes once you get the drilled and tapped.
Drilling & taping
This was the most difficult part for me. It took a couple of tries to get it right. I’d definitely recommend a drill press. I didn’t have one at first, so I tried to use a hand-held drill.
My first attempt ended up with studs that were off-center and not quite perpendicular to the gasket ring. The two shorter studs were usable, but if the long studs are off even a little bit, you are in trouble.
The hardest part is centering the holes. If they are even slightly off, the carrier will not fit snugly against the gasket ring. Therefore, you need a way to mark the exact center of the stud holes so you can drill in the proper place. Using the gasket as a template didn’t work for me.
Here is what worked for me: I installed the carrier assembly and bolted it down using the 8 original studs that fit it (so it wouldn’t wiggle). I removed the electric actuator assembly to gain some more clearance. If you do this, be careful not to move the actuator arm inside the differential while it is separated from the electric motor.
Next, I found a drill bit that is almost exactly the same diameter as the inner-diameter of the stud holes in the carrier (22/64" I believe). Using this larger bit, I drilled straight down through the stud holes to mark the gasket ring. I drilled down until the larger drill bit had made a cone-shaped crater in the gasket ring so that it would help guide the smaller drill bit I actually used to drill the hole.
Once the center positions of all four of the new stud holes were marked in this fashion, I used the 17/64" drill bit to drill the holes. Don’t do this! There are two problems here. First, I counted on the 4" long stud hole to keep the drill bit perpendicular to the gasket ring, but since the 17/64" is considerably smaller than the stud hole, it ended up drilling at an angle, so the stud was not perpendicular to the gasket ring. Second, the 17/64" drill was large enough to "walk" in the crater I drilled with the larger drill bit and so it still ended up slightly off center. In the end, I drilled one of the long stud holes in the carrier out to slightly larger diameter to make everything fit. I only drilled about 3/4 of the way from the bottom of the hole to the top.
To avoid these problems, I suggest that you remove the carrier after marking the center of where the stud needs to go with the large drill bit. Then, use a small drill bit to drill a pilot hole. Use a drill press to do this and make sure that you get it perpendicular to the gasket ring. Once you get a pilot hole drilled, drill it out to 17/64".
Or, if you aren’t concerned about perfection, just eyeball everything, enlarge the holes in the carrier if needed, and use a bunch of that blue silicon gasket stuff to seal it. ;)
Once you have drilled the new stud holes, use a 8mm x 1.25 and tap some threads in them.
Installing the Carrier
I decided to bolt the carrier to the axle housing before I put it back on the 4Runner. First I thoroughly cleaned all the metal shavings and grinder dust out. Be sure to get it really clean.
After cleaning, I installed all the studs using thread lock to hold them in place. Actually, I didn’t use thread lock on the long studs because I wanted to be able to unscrew them to facilitate removing the carrier in the future should the need arise.
I didn’t do anything with the 2 unused stud holes. I thought about filling them in with something, but saw no need to do that. The gasket does a good job of sealing them off.
Since my gasket ring was damaged a bit by the welder’s grinding efforts, I used some silicone sealer to help seal things up. I used the blue stuff, but you should probably use the red high-temp stuff as the diff can get quite hot.
Install the lock washers and nuts onto the 11 studs, and torque them down to 18ft/lbs. One of them was not easy to get a torque wrench on, so just tightened it with a box wrench.
Electric Mechanism
Back to Top
Before I permanently mounted it in the axle housing, I wanted to see the locking mechanism work. Plus, it needs to be locked to fit in the housing. Mine came locked, but I don’t know if they all do, especially if you get a used one.
I noted that the mechanism used a DC motor. The unit locks or unlocks depending on the polarity of the current going to the motor. I simply attached some multi-meter probes to a 12v power supply and touched them to the pins on the connector to run the motor.
I was playing with this when I ran into a fairly serious problem. What I was doing was touching the probes to the pins until the mechanism had fully locked or unlocked. Once it reached the extreme end of its physical travel, the motor would stall and I would quickly remove the probe to prevent burning the motor out.
After a few times of this the motor got stuck! What had happened is that the mechanism reached its mechanical limit and the motor stopped while the brushes were in an intermediate phase between two poles. At this stage, the motor is shorted out and won't move in either direction. I removed the mechanism, but wasn’t able to easily turn the motor's drive gear. Plus I was wary of turning the gear too far because there are limit switches in the gear mechanism that indicate when the locker is locked or unlocked. These switches are what actually supposed control the motor. Since these switches are in the gear mechanism and not in the locker, I was afraid of changing the relation between the drive gear and the itself locker, thus throwing off the limit switches. Maybe it doesn’t matter, but I didn’t want to take any chances.
So I decided to disassemble the mechanism. I removed the metal shield and then removed the round motor cover. This turned out to actually be the stator itself. When I pulled it off, the rotor was right there in plain sight. Sure enough, the brushes were shorting out. I turned the rotor slightly and put the cover back on. However the magnets in the cover pulled the rotor crooked when I put it back on. So I pulled the cover back off. This time the rotor came out with it (due to the magnets) and the brushes and springs shot out! Also, there are ball bearings on either end of the shaft and the lower one fell out.
Needless to say, it was a challenge to put it back together. I fashioned little metal clips that I could use to hold the brushes in place while I put the rotor back in. The lower ball bearing kept falling out, so I stuck it in the bottom receptacle for the shaft and everything seemed to fit. Once I got the rotor back in, I removed the clips holding the brushes in and put the housing back on. The housing has three screws, and there are protrusions by two of them that fit into holes in the casing. So, be sure to get in on right.
Thankfully, it still worked after all of this. So take my advice and don’t get the motor stuck so you don’t have to take it apart!
If you want to see the unit work before you put it together, and you haven’t built your control circuit yet, there is an easy way to do it. You’ll need a medium size alligator clip and two multi-meter probes attached to a 12v power supply (or battery). The power supply I used was rated at 5amps. Of course, you can use your truck’s battery. I’ll start the section on the control circuit looking at a simple way of running the locking mechanism and then build on that.
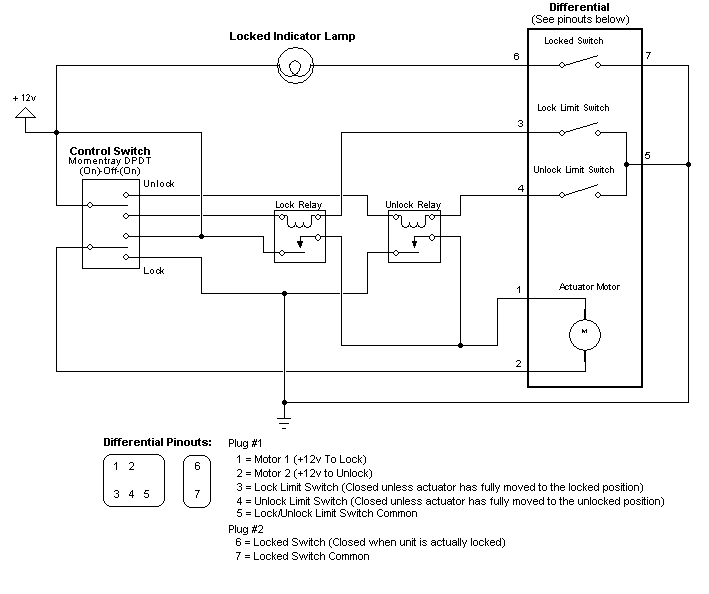
There are two connectors on the locker. There is a smaller 2-pin connector which connects to a switch that closes when the locker is actually locked, and a larger 5-pin connector which connects to the actuator motor and limit switches.
Pins 1 and 2 go to the motor. Applying +12v to pin 1 and ground pin 2 locks the unit. Reversing the polarity unlocks it.
Pins 3, 4, and 5 go to a limit switch, and are used to stop the motor before the mechanism reaches its mechanical limits. Pin 3 is connected to pin 5 unless the unit is locked. Likewise, Pin 4 is connected to pin 5 unless the unit is unlocked. Notice that while the unit is in transition between states, both pins 3 and 4 connect to pin 5.
So to lock the unit, put the alligator clip across pin 3 and pin 1. Apply +12v to pin 5 and ground pin 2. While the unit is transitioning from the unlocked to the locked state, pin 3 is connected to pin 5, and so pin 1 receives +12v. Once the unit determines that it has moved far enough to be locked, pin 3 becomes disconnected from pin 5, pin 1 no longer receives +12v and so the motor stops.
Likewise, to unlock the unit, simply put the alligator clip across pins 2 & 4 and apply +12v to pin 5 and ground pin 1. Once the unit is unlocked, the connection between pins 4 & 5 is broken, and pin 2 no longer receives +12v.
Using the limit switch will prevent the unit from reaching its mechanical limits and will avoid the problems I encountered.
The question has been raised as to whether the limit switch can handle the current drawn by the electric motor. That being unknown, the proper way to build a control circuit would be to use relays or transistors to handle the motor’s current.
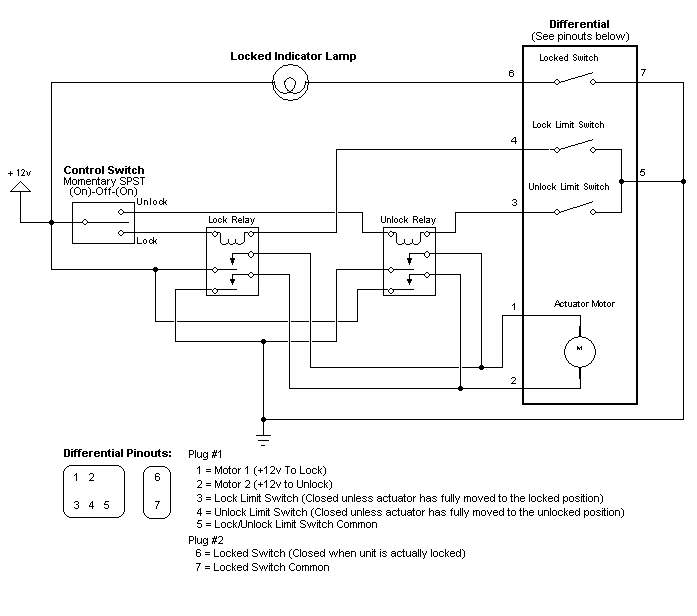
I have come up with a couple of different control circuits. The first one is a simple circuit which uses SPST relays rather than DPDT relays. This allows you to use the easy-to-find automotive-type relays, such as the Bosch-style relays. The second circuit uses DPDT relays which can be found at most electronic stores. This approach reduces the number of wires running to the control switch and is essentially the same as the circuits described in some of the other locker-install articles.
In addition, I have designed a sub-circuit that lights an indicator lamp while the actuator is between the locked and unlocked states. The purpose of this is so that you can tell when to let up on the switch. It will also let you know if the actuator has somehow gotten stuck, or if the switch was accidentally bumped and the unit is halfway between locked and un-locked states.
Rather than using a momentary-contact switch, I could have used a regular toggle switch. However, in the event that the actuator mechanism got jammed, I wanted to be able to let up on the switch to avoid burning out the motor.
Locker Control Circuit #1:
Locker Control Circuit #2:
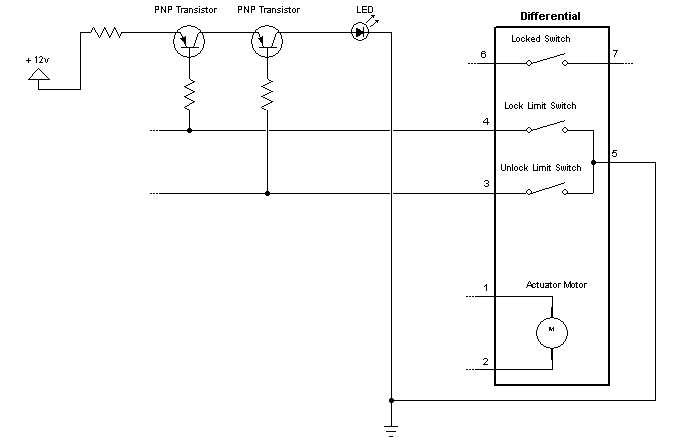
Status Circuit #1:
The schematic below shows an optional sub-circuit that can be added to either of the two locker control circuits above. This sub-circuit uses transistors to drive an LED which lights up whenever the actuator mechanism is in between its locked and unlocked states.
I am still experimenting with this circuit. Currently, I am using 10k ohm resistors between the transistor bases and the lock limit switches. However, I am getting some leakage through the "off" transistor, so I think that I need to use higher valued resistors. It may also be a good idea to use diodes to protect the transistors from transient spikes when the relays switch off. I believe that I used a 500 ohm resistor to limit the current getting to the LED. I will post updated info on this circuit when I finalize it.
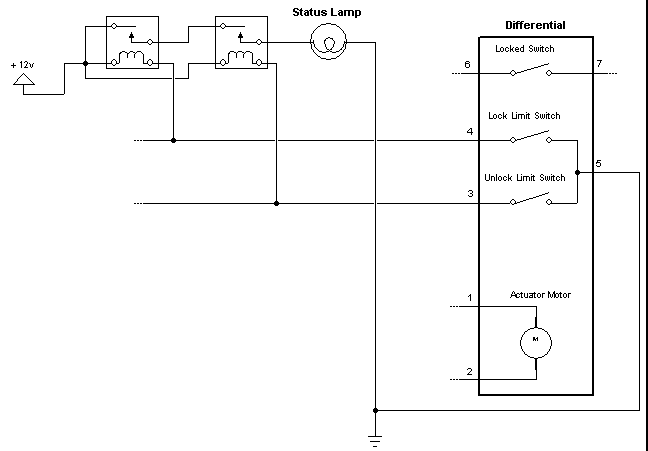
Status Circuit #2:
Rather than using transistors, the same thing can be accomplished using relays. The only consideration is that at least one relay or the other will always be on whenever power is being applied to the circuit. Thus, you should use relays designed to handle continuous duty. If you choose to use this relay-based status circuit, you should consider using an ignition-switched 12v power source so that it isn't drawing power when your vehicle is off, and to give the relays a break.
In any case, you may want to put a on-off switch on the power source for the control box just so it doesn't accidentally get activated.
Here are a couple of pictures of my finished controller:


The diff and axle housing will get very hot while the gears are breaking in.
If you paint your diff and axle housing, be sure to use high-temperature paint.
I used regular gear oil at first, and then switched to synthetic gear oil which seemed to help it run cooler.
Part Numbers (un-confirmed):
Locker w/4.56 gears - 41110-3D010
Locker w/4.30 gears - 41110-3D080
Locker w/4.10 gears - 41110-3D030
Links to more information
Back to Top
Here are some other people's webpages on this topic. Karl Bellve's was most informative!
http://molmed.ummed.edu/~kdb/locker/locker.html
http://www.off-road.com/~wsmuir/locker/rl.html
http://www.oocities.org/Baja/Ravine/4494/diffinstall.html