U s i n g E d i t o r s
These are the types of resources found in themes
clr#
frme
layo
plut
ppat
pxm#
scen
tdat
tic#
tinf
(This page assumes that you already know what is on the "About the Resources" Page.)
c l r #
Resorcerer and the Theme Templates
OR
Resurrection and the Resurrection Theme Templates
This resource is so extremely simple that it would be pointless to try to explain.
ResEdit
You must edit the raw hex with ResEdit. This one is very simple to edit the Hex of.

Classic DSX Theme
- The BLUE area is always 0000.
- The MAGENTA area is the number of colors there are in the list. You should leave this alone unless you are adding colors to the resource that aren't already there.
- The RED area is the first color. The GREEN and PURPLE areas are the second and third colors. The rest of the whole resource (BROWN) is like that; every 3 groups of hex numbers is a color. If there are too many colors, just ignore the extras.
- To find the hex value of a color, open up the color picker somehow with your color in it. Select the Web Color option. Uncheck "Snap to Web Color" and click the sample of the original color in the top, right corner. Then just remember the 3 hex values. Enter the first hex value into the first group of numbers twice (so it fills the whole group), the 2nd value into the 2nd group twice, and the 3rd value into the 3rd group twice. There 'ya go.
The colors represent these text colors, in order:
- Dialog
- Dialog (inactive)
- Alert
- Alert (inactive)
- Modeless Dialog
- Modeless Dialog (inactive)
- Window Header
- Window Header (inactive)
- Placard
- Placard (inactive)
- Placard (pressed)
- Push Button
- Push Button (inactive)
- Push Button (pressed)
- Bevel Button
- Bevel Button (inactive)
- Bevel Button (pressed)
- Popup Button
- Popup Button (inactive)
- Popup Button (pressed)
- Icon Label
- List View
- Document Window Title
- Document Window Title (inactive)
- Modal Window Title
- Modal Window Title (inactive)
- Utility Window Title
- Utility Window Title (inactive)
- Drawer Window Title
- Drawer Window Title (inactive)
- Menu Title
- Menu Title (selected)
- Menu Title (disabled)
- Menu Item
- Menu Item (selected)
- Menu Item (disabled)
- Popup Label
- Popup Label (inactive)
- Tab Front
- Tab Non-Front
- Tab Non-Front (pressed)
- Tab Front (inactive)
- Tab Non-Front (inactive)
- Icon label (selected)
- Sticky Bevel Button
- Sticky Bevel Button (inactive)
- Notification Alert
- Notification Alert (inactive)
f r m e
Theme Machine
You edit these resources by selecting them from the User Frames and Required Frames menus. Have the user brushes window open, click the brush you want to use, and click an area of the Frame to fill it in with that brush. To make an area transparent, apply the same brush to an area twice. The colored pencils do not work; they all act as the black pencil, which is aligned top-left. You must use Resorcerer and the Theme Templates to change alignments.
Resorcerer and the Theme Templates
OR
Resurrection and the Resurrection Theme Templates
In Resorcerer, each frame is represented by an item entry. They are extremely hard to edit this way, but there are many added options, such as adding the frames between 0 and 1 and 0 and -1, which are often just gaps in Theme Machine. You can also choose the alignment of the brushes in comparison to the frame's boundaries. There are a few other options that I haven't experimented with, too.
l a y o
Resorcerer and the Theme Templates
OR
Resurrection and the Resurrection Theme Templates
This template makes it so easy that it doesn't need an explanation.
ResEdit
In ResEdit, you must edit the layo resources through hex because it is not powerful enough to drive the Resorcerer layo template. This is a replacement, of sorts, for the template. The example contains 2 coordinate entries and 2 item entries.
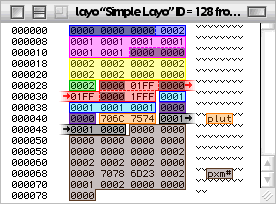
Classic Sosumi Theme
The BLUE area at the very top starts out with 3 groups of numbers that are always all zeros. The last group of numbers tells how many coordinate entries there are. REMEMBER TO ALWAYS HAVE THIS RIGHT.
The MAGENTA and YELLOW areas are the 2 separate coordinate entries. Each consists of 8 groups of hex numbers.
- Group 1: Coordinate Type (Use 0000 for Standard, 0001 for Variable, and 0002 for Average.)
- Group 2: Offset from Reference (next)
- Group 3: Reference (Can be the number of another coordinate, FFFF for Default Top, FFFE for Default Left, FFFD for Default Bottom, or FFFC for Default Right.)
- Group 4: Backup Coordinate Type (Use 0000 to skip backup coordinate, 0001 for Constrain-to, 0002 for Collapse-to, 0003 for Snap-to, and 0004 for something I can't figure out)
- Group 5: Offset from 2nd Reference (next)
- Group 6: 2nd Reference (Can be the number of another coordinate, FFFF for Default Top, FFFE for Default Left, FFFD for Default Bottom, or FFFC for Default Right.)
- Group 7: always 0000
- Group 8: always 0000
The GREEN area tells how many item entries there are. REMEMBER TO ALWAYS HAVE THIS RIGHT TOO.
The RED area sets the characteristics of the item entry.
- The first group of numbers is always supposed to be 0000.
- The second must be converted to and from binary (bin) and hexadecimal (hex) to be edited. When converted to binary, 1 means ON, and 0 means OFF. From left to right, the digits represent:
- (presumed empty)
- (presumed empty)
- (presumed empty)
- (presumed empty)
- (presumed empty)
- Visible only if indeterminate progress bar is active
- Visible only if indeterminate progress bar is on frame 4/4
- Visible only if window IS collapsed
OR
Visible only if menu is closed
OR
Visible only if indeterminate progress bar is on frame 3/4
- Visible only if window has title text
OR
Visible only if indeterminate progress bar is on frame 2/4
- Visible only if window can collapse with widget
OR
Visible only if indeterminate progress bar is on frame 1/4
- Visible only if window can close with widget
OR
Visible only if this item is being used
- Visible only if window can zoom vertically with widget
OR
Visible only if menu can scroll up
- Visible only if window can zoom horizontally with widget
OR
Visible only if this item is active
OR
Visible only if menu can scroll down
- Visible only if menu item has sub-menu
OR
The image reference is the focus
OR
Visible only if text is connected
- Visible only if window has grow box on left side
OR
Visible only if menu is against the bottom or top of the screen
- Visible only if window has grow box
OR
Visible only if this item is inactive
- The third group of numbers is always supposed to be 0000.
- The fourth group of numbers is close to the exact opposite of the second group of numbers. It is edited the same way.
- (presumed empty)
- (presumed empty)
- (presumed empty)
- (presumed empty)
- (presumed empty)
- Invisible if indeterminate progress bar is active
- Invisible if indeterminate progress bar is on frame 4/4
- Invisible if window or IS collapsed
OR
Invisible if menu is closed
OR
Invisible if indeterminate progress bar is on frame 3/4
- Invisible if window has title text
OR
Invisible if indeterminate progress bar is on frame 2/4
- Invisible if window can collapse
OR
Invisible if indeterminate progress bar is on frame 1/4
- Invisible if window can close with widget
OR
Invisible if this item is being used
- Invisible if window can vertically zoom
OR
Invisible if menu can scroll up
- Invisible if window can horizontally zoom
OR
Invisible if this item is active
OR
Invisible if menu can scroll down
- Invisible if menu has a sub-menu,
OR
Invisible if text is connected
- This item can be manipulated my moving the mouse without un-clicking
- This item is active (not "Invisible if")
- The fifth group of numbers is always supposed to be 0000.
- The sixth group of numbers is yet again edited through binary.
- (presumed empty)
- (presumed empty)
- This item is a left grow box
- This item is a right grow box
- This item is a modal dialog grow box
- This item is a drawer window grow box
- This item is the place for applications to insert content, having no image reference (coordinates are all default)
- THIS ITEM IS VISIBLE (must be ON if there is an image reference you want to see)
- This item has collapse widget characteristics
- This item has grow box (not zoom widget) characteristics
- This item is a draggable part of a window
- (presumed reserved for an unreleased widget)
- This item has zoom widget characteristics
- This item has close widget characteristics
- This item is text, having no image reference
- This item has title bar characteristics
The CYAN area tells the item which coordinates to use for its boundaries. You can put in the number of a coordinate entry from above (first entry is 0001, second entry is 0002, etc.) or put in FFFF for Default Top, FFFE for Default Left, FFFD for Default Bottom, or FFFC for Default Right.
The DARK PURPLE is always 0000 0000
The ORANGE area tells the type of image resource you are referring to in ASCII text. In other words, type it over in the right column. If you are refering to a "frme" resource, those brilliant guys down at Apple misspelled it, so you need to too. Enter "fram" for frame resources. Also, if you have an item entry that does not need an image (such as text), enter "NULL". Your other options are "pxm#" and "plut"
The BLACK area tells info about the image resource.
- The first group of numbers is the hex version of the ID number of the image.
- The second group of numbers is the image alignment. For "frme" images, always put in 0001. For items without images, put in 0000. For "pxm#" and "plut" resources, put in 1 for Top-Left alignment, 2 for Top-Right, 3 for Bottom-Left, and 4 for Bottom-Right.
- The third group of numbers is the pixmap image number to use. This is 0-based, so if you wanted the 5th image in a pixmap, you would enter 0004. It's just always one less.
The BROWN area at the bottom is a second item entry.
The resource abruptly stops after the last item entry. Just remember to update the item count and coordinate count areas if you ever add or delete items or coordinates.
p l u t
Resorcerer and the Theme Templates
OR
Resurrection and the Resurrection Theme Templates
Editing plut resources this way is so easy that it hardly needs an explanation. You double-click solid colors to change them. The solid color can be overtaken by a ppat resoruce if you enter the ppat's ID number. If you don't want to use a ppat, enter 0 where it asks for a ppat ID and it will use the solid color. Added note: Sometimes the solid colors are still used even if there is a ppat in the "Required Brushes" plut, which ID 386.
Theme Machine
The plut resources are refered to as "Brushes" in Theme Machine. To edit a brush, double-click it. Paste in an image to assign or replace that brush's ppat. Theme Machine automatically creates the ppat resource and updates the tdat resource, things that need to be done manually in Resorcerer. Theme Machine makes a mess inside the theme, though, and you loose the labels you may have on the ppat resources. The ppat's IDs also change to seemingly random numbers. If there is any sort of previous problem, such as a plut with an assigned ppat that DOESN'T EXIST, or the existing ppat NOT HAVING A tdat ENTRY, Theme Machine will almost certainly "unexpectedly" quit every time on the same brush.
ResEdit
You must edit raw hex in ResEdit. Ben (a fellow themer, not me) generously contributed this hack to this website. Because of his superior HTML skills, I have decided to leave it in it's original state on this page.
p p a t
GraphicConverter
Make sure the image you want has dimensions that are powers of 2, starting out with 4. You can just leave the extra space blank. Bring the image to GraphicConverter and minimize the color table. Then hit "Save As..." and choose "ppat" from the format pop-up menu. Once saved, open the saved file up in ResEdit or anything else like it. Copy the ppat resource over the old one that's in your theme. Done.
Theme Machine
Double-click a brush from a brush window, click the pattern, hit paste, and then click OK. You really should save for each updated brush because Theme Machine has a very high risk of crashing when doing this. When it crashes, it is not severe so you can just open it back up and continue.
ResEdit or Resorcerer or Resurrection
Open up the desired ppat and pixel-edit away. You can't just paste in high qualit images, though, because they will conform to the preset color table. It is usually easier to use GraphicConverter.
p x m #
Theme Machine
Open the Pixmap editor from the Pixmap menu. Click on a pixmap in the left column and then paste on your new stuff. You must close the whole window and click Save to make the changes stick. Then you must eventually select "Save" from the File menu to actually save the changes you made. Theme Machine also has a few quality issues with pixmaps. I recommend clicking the 32-bit radio button on the bottom left corner.
Pixie
To use Pixie, which I prefer over Theme Machine, you must first line up all your images that you want in a specific pxm#, one right after another, in a graphics app like Photoshop. Then put the mask exactly on the left side. If there is a mask for each image, put all of the masks, in order, on the left of the images. (Only a few things work with a mask for each image, for example the chasing arrows.) Please note that using Pixie requires you to have ALL of the images for that pxm#, not just the ones you want to replace.
Next you select the whole thing in your graphics app perfectly, hit copy, and then open Pixie. Type in the number of images you have, the number of masks (usually 1), the bit depth (always use 32 for the best quality), and the clut ID (it's irrelevant if you use 32-bit, so just put in a number. I use 0 to minimize confusion.)
From here, open up the saved file from pixie in ResEdit or Resorcerer and copy the pxm# resource over the old one on your theme.
s c e n
Resorcerer and the theme templates
Extremely similar to editing the tinf resource. They are easily confused.
Appearance Control Panel
This automatically generates one of these resources when you click "Save Theme" under the Themes tab. It saves it to the "Ensemble Themes" file in the Themes folder in the Appearance Folder in the System folder. Open it up in ResEdit, copy the scen and PICT resources and paste it over the old ones in your theme. If the PICT image does not have the same ID, don't change the ID of the new one. Just paste the new one in and delete the old one.
t d a t
Resorcerer and the Theme Templates
OR
Resurrection and the Resurrection Theme Templates
Enter the type of resource and then it's ID number into bit the primary and variant ID references.
ResEdit
You must edit the raw hex if you are going to use ResEdit. This one is REALLY simple to do.
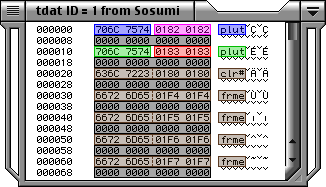
DSG Theme 2
- The type of resource you're entering goes in the BLUE area. It's a little easier if you type it in the right column.
- The ID number of the resource you're entering is first converted to hex, then entered 2 times in a row to fill up the Magenta area.
- The GRAY area is always 4 groups of 0000s.
- Enter new entries at any place. Also, even though not necessary, try to remove the entries of parts that you have removed from the theme. All of the entries in Sosumi are in perfect order, by the way.
t i c #
Resorcerer and the Theme Templates
OR
Resurrection and the Resurrection Theme Templates
This is very straightforward.
ResEdit
You must edit the raw hex if you are going to use ResEdit. This one is quite simple to do.
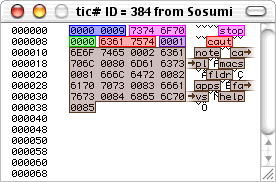
The Legendary AquaMaX Theme
- The BLUE area is the number of entries. This is very important to keep updated.
- The Magenta area is the icon's signature in ASCII text. Edit it in the right column.
- The GREEN area is the icon's ID in hex form.
- This is just repeated all the way down for all the icons you could ever want.
t i n f
Resorcerer and the Theme Templates
Only one note: there are a lot of extra things scattered about that don't appear to mean anything.
Theme Machine
The big window that automatically opens is the tinf editor. You can not enter negative numbers into this editor, though, which would be very useful for the menu offsets.
Contact the webmaster.
(Sorry about the bad eMail link for so long)