Dedicated to Really Cheap Audio Enthusiasts
I started by running the Vifa's Thiel-Small (TS) parameters through WIn ISD, a shareware speaker design program. Because the woofer has a very high qts (0.70) the recommended enclosure is almost infinite. However, the Vas is relatively small on this woofer, so a smaller than "optimal" enclosure gives acceptable results.
I wanted the amplifier to be non-visible so as to discourage unauthorized removal of my equipment. I therefore decided to build it as part of the enclosure. I extended the top sides and bottom past the
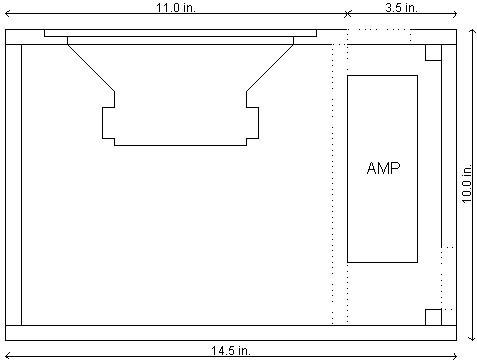
As seen in the drawing at left, the two openings are directly above the amp and below the amp's lower right corner, shown as the dashed-line regions. These are 2.25" wide by 10" long, with semicircular ends.
The enclosure is 0.5" MDF, with gross internal volume of 900 cubic inches, or 0.52 cubic feet or 14.7 liters. The driver
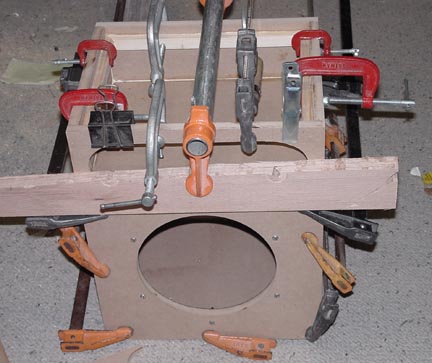
At left you can see the number of clamps used. If you have them by all means use every single one.
One of the problem areas for all speaker builders is T-Nuts. I think of it as a sort of love / hate relationship. The T-Nut allows us to place a sturdy machine type thread into a material (MDF) which does not hold screws on its own very well.
The problem with T-Nuts in MDF is that they like to pop out as we are putting in the last screw on the driver. This is caused by MDF's lack of grip on the prongs, and is exarcebated by the contaminates which sometimes gets on the T-Nut's threads.
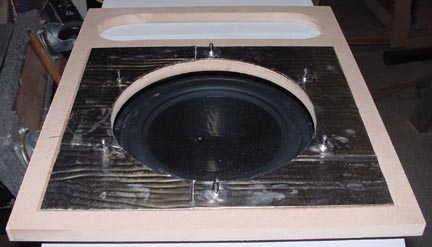
In this project I used polyeurethane glue underneath each T-Nut, and used the #8 stainless steel screws to pull the prongs into the MDF.
I then masked the areas on the baffle where there would be glue later, and sprayed a light coat of contact adhesive. After this dried to a light tack, I placed Peel-n-Seal roofing tape onto the back of the baffle. I put small slits in the foil where each screw came out of the foil. In addition to helping to retain the T-Nut the Peel-n-Seal will help seal the screw threads.