As The Tone God I am not limited to just playing with effects. One of the many other things I dabble with is winding pickups. This should not be considered a "How To" but more of a "How I do it". I would not consider this a complete guide. Do a lot of research on the topic before getting involved. I have not read any books on winding pickups or fully know how manufactures make their pickups. This is what I've learned through trials and MANY errors. I'm sure there will be plenty of "opinions" on what I do compared to others.
A pickup is nothing particularly special. Its just a spool with a bunch of wire wrapped around it. The trouble is that it is an odd shaped spool with thousands of turns using wire that is only slightly thicker then human hair. While you can do it purely by hand to have reasonable resulting coils in a decent amount time and with consistent results you will need some equipment.
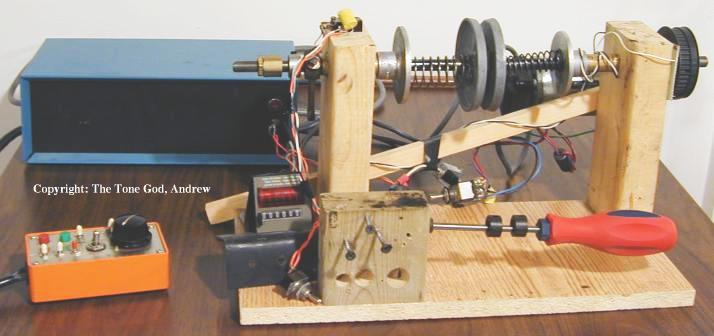
This is my homemade coil winder (Figure 1). Notice I don't call it a pickup winder. It is designed to handle many different types of coils. I wind inductors, chokes, transformers, and other things with it as well as pickups. If I intended to use it only for pickup winding I would have made several design optimizations for that purpose.
Its nothing special or fancy. I built it out of stuff I had lying around the workshops. I think I only spent $5 on it (for the counter). If I were to build it from scratch I could probably do it for less the $100 CDN. The blue box houses the power supply for the motor and other electronics. The orange box is the controller.

The spool is mounted between the two metal mounting plates. Springs push the mounting plates together. There is some foam tape on the inside of the mounting plates to deal with surface anomalies that may be on the spools/bobbins (i.e. pole pieces) that prevent the mounting plates from getting a good grip on the spool.
To guide the wire I use screw driver with a couple of drill guides mounted on the shaft. The guides are set to guide the wire to the ends of the spool to make sure I don't run the wire beyond the edges of the spool. High tech stuff eh ?
On the left is the counter. It counts the number of rotations the winder has completed. There is another counter with a red cover above the main counter display. When I open the cover I can set the number of windings I want to perform. When the counter hits this preset number the counter will automatically stop the winder.
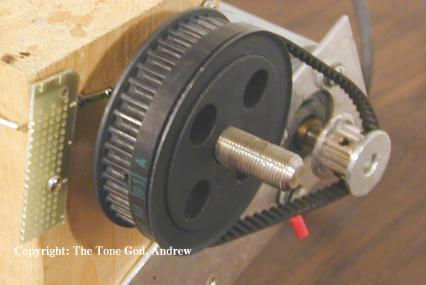
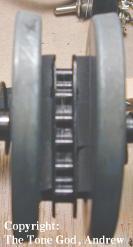
This is the drive system for the winder (Figure 3). The motor drives a wheel mounted to the winder's shaft via a belt. Behind the wheel mounted to the wood is the counter sensor. More on that later.

The control panel (Figure 4) allows me to control the speed of the winder, use the auto-stop or manual (no auto-stop) mode, and other functions. I usually keep the control one hand while the other hand guides the wire. If something bad happens I can stop it quickly.

One method to perform the rotation counting is to use a lever switch (Figure 5). On the winder shaft is an arm that swings around hitting the switch upon the completion of a full rotation. This is fine for slow low count operations but the limitations of this system show themselves very quickly.
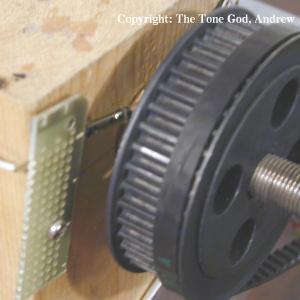 Figure 6 |
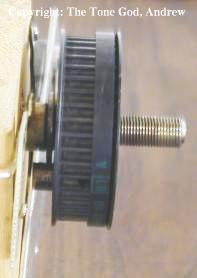 Figure 7 |
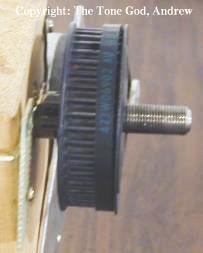 Figure 8 |
To handle the higher speeds and counts I installed a magnetic reed switch (Figure 6). I hacked the switch out of brunt out relay. Inside the drive wheel is a magnet (Figure 7) that passes over the switch causing the reeds to close incrementing the counter (Figure 8). Its works fairly well.
Now on to the main event.
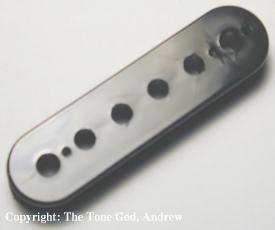 Figure 9 |
 Figure 10 |
 Figure 11 |
Starting with a clean pickup bobbin (Figure 9) I check it over for burs and other possible obstructions that could interfere with the wire during the winding process. If there are any problems I file them down. Before I mount the spool in the winder I loop some wire around through the pole piece holes (Figure 10) or wrap a length of wire around the pole pieces. This wire becomes the inner connection of the pickup. I use double sided tape to hold the wire in place during winding so it doesn't break during winding (Figure 11). The double sided tape has another purpose.
I mount the coil in the winder (Figure 12). To prevent the coil from becoming dislodged due to the force of winding I attach the coil to the winder using double sided tape. If the coil is mounted way off the winder's center of rotation the coil may shake the winder making it hard to get a good winding. It may even fly out of the winder thus making even more difficult to wind. ;-) Now the coil is ready to be wound.

The wire used in pickups usually comes on large spools that weight quite a bit. Thicker wire can pull on the spool to unravel more wire. The wire use in pickups is very thin and cannot handle much force before breaking therefore the wire cannot pull on the spool to unwind. The best way I found to the feed wire is by mounting the spool vertically (Figure 13). The wire can then unwind from the spool without having to carry the weight the spool. I just make sure there are no burs on the edge of the spool that the wire can get caught on and break.
I usually run a screw driver with a long shaft through the spool of wire and place the handle between my legs to hold the spool vertical. I run the wire through my fingers making sure the wire stays tight so no lumps or looseness occurs during winding.
I move the wire back and forth between the wire guides as to not go beyond the sides of the bobbin. I like to move the wire at a decent pace. The temptation is to move the wire slowly but this increases the chances of creating an uneven wound coil with more windings in one area. It is better to move back and forth quickly. Think of it like spraying with paint. If you move the sprayer slowly you will get drips and uneven finish. It is better to use quick sweeping strokes.
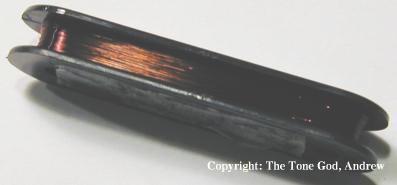
Here is the completed coil (Figure 14). It usually takes me about five or so minutes to wind a coil. After the winding is complete I pull out the inner and outer wires to perform a continuity check. This will let me know if the coil has a break or if something unusual is happening. I can also find out what the DC resistance is of the coil to give me an idea of the output. If it is a humbucker coil I'm winding I make sure that it closely matches the readings of the other coil. If the coils are too far apart I figure out which one is wrong and rewind the pickup.
If the reading is within tolerances I tape both wires up and move on with the next step, sealing the pickup. The reason you have to seal the coil is to prevent the windings vibrating under high volume conditions otherwise the coil will feedback and squeal badly. By sealing the windings so they cannot move prevents the feedback from occurring. How you seal the coil is up to you.
The traditional way to seal a coil is to "pot" it which is soaking the coil in hot wax. The wax cools and becomes solid thus holding the wire from vibrating. I break with tradition by not using wax. I prefer to use spray lacquer, varnish, or enamel. I have nothing particular against wax. I've just been happier with using lacquer. It does the same thing wax does; starts as a liquid, soaks into the windings, then solidifies. Some pickup manufactures seal their coils using sprays instead of wax.
Attention has to be paid as to what kind of plastic the bobbin is made and what type of insulation is used on the wire. The solvents used in some spray products may damage the plastic or insulation. I test the spray on an unimportant part of the coil like the bottom end of the bobbin where there is no physical connection. I tape the coil's top and bottom and spray both sides of the coil. I do this two or three times depending on how much wire movement occurs after the spray has had some time to harden.
After I seal the pickup I take another reading of pickup looking for any major change from the reading I took after winding. Any large difference may mean that something has broken inside the coil during drying. If all is good I attach the hook up wire to the inner and outer coil wires. This is the wire that will stick out of the coil that later hooks up to the final wire that sticks out of the finished pickup to be connected to the guitar's controls. I check the coil for continuity again through the hook up wire to make sure that everything is ok and the hook up wire is connected properly to the coil.

After making and checking the pickup connections the coil should be taped to protect the windings. There are many different ways to tape a pickup. To serve my laziness best I use a bunch of overlapping wraps of tape with each layer insulating the hookup wires (Figure 15). I take one last reading of the coil to make sure its fine. If everything checks out the pickup is assembled, installed, and tested.
Thats how I wind my pickups. Winding a pickup is not complicated but there are a number steps you have to following to help avoid possible problems. After you get the hang of it you can start playing around tweaking your pickups for your own tastes. I hope you have found this interesting.
Your Tone God,
Andrew