|
Knowing
your Flower!
I remember back when I was young and learned about plants in grade school.
I remember learning that plants had roots, stems, trunks, leaves and flowers.
My concept was at a grade school level. During Junior High and High
School I learned a bit more about the functions of some more particular
things like roots hairs, ovaries, and seeds. Then during college
I learned just what these plant parts meant to the plant. Now, since
I am engaged in hybridizing plants I have learned hot to apply these parts
of the plants for my benefit in a successful cross. During this lesson
you will learn the more complex parts about your plant, focusing on the
beautiful flowers. Take notes on parts that you feel will help you
the most. Grab a plant that has old and new blooms on it so you can
see for yourself what you are learning. Choose a few flowers that
you will be willing to dissect. This lesson has a flower dissection
laboratory. I hope you enjoy this lesson as much as I have enjoyed
writing it for you. There are a couple of flower dissections in this
lesson. Be prepared to cut off a few flowers. (It might take some
mental preparation).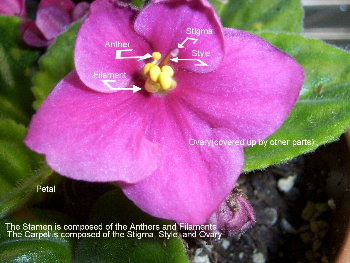
A special thanks to Rhapsodie Rita for donating her beauty for this lesson.
To the side you will see her demon- strating four different flower parts.
The anther, filament, stigma and style are the first four parts you will
learn. CLICK PHOTO ABOVE TO VIEW LARGER.
The stamen is the male portion of
a flower. It contains both the anthers and the filaments. The
filament is pretty basic to understand so we will discuss it first.
It is the stem that holds up the anthers (the yellowish balls). The
anthers are the real topic of discussing the stamen. In order to
hybridize we need to be able to take pollen that is produced in the anthers
and transfer it to the seed parent. In order to do this we need to
know when the pollen is mature. FOLLOW DISECTION DIRECTIONS FOR STAMEN
(see assignment, left); after you have finished the first dissection return
to the next paragraph.
Part of the difficulty in hybridizing an African Violet is knowing the
right time to transfer the pollen. We have only discussed pollen
and not the other half (Stigma)…for now let’s continue discussing the pollen.
Some varieties have a different anther splitting time. This makes
your project even more challenging, yet the opportunity to know your plant
better will excel. It is easiest to pollinate when the anthers are
easily releasing pollen. This is usually about a day after the anther
has split. Keep a journal of some sort with the varieties that you
plan to cross, and record daily when your anthers so in fact split.
Some will actually split before the flowers open so take this into account
as well. After about a week of daily log keeping on your anthers,
you will have a good idea about the habits of each variety in regards to
its anthers and pollen release.
What is pollen? You might think of pollen as a small seed.
The life story of pollen is pretty exciting. After being released
from the anther it needs to land on the stigma where it will germinate.
It then will grow a “root” down into the style and ultimately fertilize
an egg cell in the ovary by transferring genetic information. That
is a non-technical explanation of pollen. Now for the technical information.
Pollen is the microgametophyte of a flower. It is a small dust like
grain that contains the male genetic information required for reproduction
and ultimately seed formation. The “root” that grows down the style
is called the “pollen-tubule”. The pollen itself is made up of two
or three cells, all surrounded by a cell wall. One cell is a vegetative
cell—and this is the one that germinates and grows the tube, then the other
cells are transported down this tube into the ovary. These cells
that are transported are called reproductive cells; they have the genetic
information and the ability to transfer it to the egg cell. Pollen
tubes grow at an extremely rapid rate—up to 1 cm/hour has been recorded.
In order for a successful germination and growth of the pollen insure that
your plants do not have a calcium deficiency (more on that in a later lesson).
We will not discuss the actual pollination is this lesson. You might
have thought that I would—ha ha—but you must wait! You can’t pollinate
until you know a little more about your plant.
Now we need to discuss the stigma, ovary and the style, they are the parts
that form the Carpel, or the female part of the plant. The stigma
is found at the tip of the style. The stigma is a slightly enlarged
end. The style is simply the stem that hooks the stigma to the ovary.
I am going to explain the carpel in relation to an airport. The stigma
is the landing strip, the style is the transporter to the building, and
the ovary is the Airport lobby. The stigma has the responsibility
to catch and hold onto the pollen when it lands. There is a fluid
which is produced on the stigma which aids in pollen germination.
This is visible. FOLLOW THE CARPEL DISSECTION (see assignment, left).
Now that you have observed your collection I hope that you were able to
see flowers at varying ages in their reproductive life cycle. If
not—post any questions you may have in the forum and we can help you.
Understanding the ovary is a very important part of hybridizing.
The ovary cells will expand, swell, and divide immensely when seed production
is underway. The health of the ovary will insure your success in
producing seed. (Ways of achieving this will be discussed in another lesson).
This lesson is to familiarize you with the reproductive parts of the flower
or the anatomy. I have discussed some of the physiology to help you
along in this lesson.
For the next part of this lesson we are going to examine the peduncle of
the plant. The peduncle is the flower stem. The peduncle is
an important sign of knowing the health of your flower. Firm, thick
peduncles will assure you that your flower on that peduncle is a healthy
one. Observe the peduncles on your plants, many varieties have thick
peduncles; some have thin and leggy peduncles. Get to know your plants
a little better yet again by identifying the behavior of the peduncles
on your plants. Later one, when you do hybridize, we will be watching
for signs that our peduncles can demonstrate if our pollination was a success.
We discussed peduncles in another lesson, but I wanted to reiterate the
peduncle again. Also, examine the number of flowers per stem on the
peduncle yet again. Notice if any of the flowers are larger or healthier
on the peduncle. If so which ones are they? Lets say I have
a variety that has 4 flowers per peduncle; I have noticed that the lower
two exhibit a larger ovary then the upper two relative to being the same
age. When hybridizing I would want to use the lower two flowers instead
of the top two as they are getting more energy from the plant. Observe
if this is true in some of your varieties. How can the peduncle help
you determine the health of your flower, made from observations in your
own collection?
This is the end of this lesson. Please observe the reproductive parts
of your African Violet and report what you have seen in you own collection.
Many others will learn from what information you provide. If you
have any questions feel free to post to the forum.
|
 Introduction Introduction |
| Lesson
One |
| Lesson
Two |
| Lesson
Three |
| Class
Discussion |
Lesson
Three Assignment:
STAMEN DISSECTION PROTOCOL
Pick a flower that is a few days away from
opening up from a single flower (DO NOT USE DOUBLE OR SEMI-DOUBLES FOR
THIS DISSECTION). Yes, I want you to remove it from the plant (you
are learning so it’s OK!). The reason why I do not want you to use
a double in this dissection is many doubles lack the male parts of the
flower; they have turned these male parts into additional petals.
On some flowers you can see the filament and the anther have turned into
a weird petal. You can also look at semi doubles and see this a little
better as a slightly extra credit portion of the dissection. You
will carefully pull off the flower petal one at a time to expose the inner
most flower parts. You will be able to see the male and female parts
inside the petals. You need to examine the anthers on this flower.
These anthers are not ready to release their pollen and have not yet split.
Compare them with an open flower (you don’t have to pick the open flower).
The purpose of this first dissection is to show you a comparison between
a ripe anther and an immature anther. Once you have been able to
see a notable difference between the two set your dissected flower aside
until another dissection later on.
Question: Describe the shape difference between an immature
anther and a mature anther. In your own words describe how you can
tell when it has split to release its pollen. Why can’t we use doubles
as a pollen parent? How can we use doubles as a pollen parent? (I
will answer this one for you—Sometimes we can get a single flower on a
double plant—you can effectively use this pollen. It is fertile in
most cases and still holds the genes for a double plant! This means
you can in fact cross a double with a double. But—it is difficult
to find a single flower on a double plant. The anther must be a completely
developed one in order to use it. The fact that this only happens
occasionally is the reason why you often hear “You can’t use a double as
a pollen parent”—In plants, never says never!)
CARPEL
DISSECTION
Now that you already have a flower that is torn
apart (from the first dissection) —carefully remove the male parts, or the
Stamens. You should be left with just the female parts or the Carpel
of the flower. Carefully examine the shapes, and different parts
of the carpel. Identify the Stigma (This is the very point of the
style; it is round and slightly open and wide). If you have a magnifying
glass, examine the stigma and notice its shape. Since we have been
playing with this flower, I would doubt if any of this fluid remains on
the stigma. Now I want you to look over your entire AV collection
and see if you can find a stigma that is shiny and filled with liquid like
substance. This is the fluid you will want to look for, in order
to help assure a good pollen transfer. Now I want you to look at
the base of the style, this enlarged area contains the ovary. This
is where seed production will occur if the pollination is successful.
You will want to be able to recognize and enlarged ovary (this signifies
that the pollination was a success). Look at the ovary and examine
its size and shape. Look inside some more flowers in your collection
and see if the ovary size and shape differs among flowers of about the
same age. It will be important to know each variety and how its ovary
looks, this will assure that you know when pollination has taken place,
and when seed production has began.
Question:
What does a stigma, which is ready for fertilization, look like?
How can you tell if a stigma is past due (will not accept fertilization
any longer)? (I would like an explanation of what you are observing
on your plants—on how the stigmas age—like drying up—changing color—etc
etc etc—this will vary depending on the variety)
|
|