A
cure for 'Series 1 envy'
I've always wanted those nifty
glass covers over the headlamps like the series 1 folks. Being a cheap bastard
who didn't want to buy a new series 1 bonnet, I made my own covers from Lexan.
The following details their construction. I started the molds many years ago
(before the net became popular) and didn't take pictures of their construction.
While restoring my E, I drilled out
the rivets holding in the headlamp socket then re-installed the socket INSIDE
of the bonnet. This worked just fine on my
series 1 1/2 and required no cutting of metal.
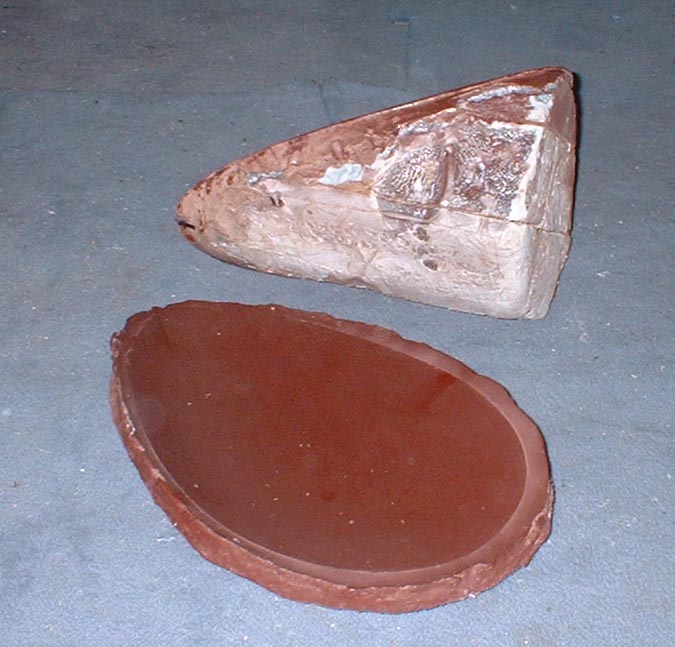
The molds where constructed by
removing all headlight hardware from the socket
and stuffing in something to hold the basic shape. One was done with styrofoam
blocks,
the other with layers of cardboard. I'd recommend cardboard since it accepts
glue much
better.
Leave a good inch or so for 'filling'. I used plaster of paris and fiberglass
tape
to build up the mold. The tape is the type used in gyproc (wallboard) work.
It has an open
mesh and adhesive on one side. Build up layers of plaster and fiberglass working
to smooth it into shape following the contours of the surrounding bodywork.
I used medium grit sandpaper to smooth it when it was almost even with the
bodywork. At this point I
took it to an automotive bodyshop who applied several thick layers of a high
build epoxy primer. I let this cure for several days then sanded it progressivly
smoother until I hit 600 grit paper. A few heavy coats of non-abrasive wax
finished the job.
Front
view of male half of mold.
To
build the female half I re-installed the male half in the socket then smoothed
two
layers of plastic foodwrap over the mold and surrounding bodywork. I taped a
cardboard 'dam' an inch outside the socket. As with the male mold, the female
half was built in the same manner until it was an inch and a half in thickness.
Once removed, sand it smooth and apply the same epoxy treatment.
Other points: Use a few l-o-n-g woodscrews through the holes in the rear of
the socket to
secure the male mold while under construction. Leave each layer to dry completely.
While plaster of paris shrinks very little, it's best to wait a couple of days
between layers (depending on the temperature).
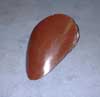
Side
view of male mold. This one is built on several layers of styrofoam glued together.
Male
and female molds.
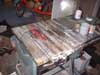
Molds
in action
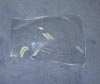
The
result. This was my first try. The plastic got too hot and bubbled.
With
both molds ready, you can do some thermo-forming. If you're a plastic modeler
and have done any vacu-forming, you're ahead of the game. I used 3/16 plexiglass
for my covers. Pre-heat your oven to 275 degrees farenheit. Place something
non-combustable on the middle rack to hold the plastic around the edges. I used
a square pan about 2 inches deep. Place the plastic in the oven and watch it
closely. When it sags in the middle (7 minutes?), turn it over. You did wear
oven mitts right?! When it sags again, remove it and place it on the female
mold. Place the male mold over it and press down...hard. Hold for ten minutes
(no kidding). The plastic will hold the heat a long time and the mold acts as
an insulator. I placed my female mold on a pillow on a chair then simply sat
on it.
Once
your cover has cooled, it must be cut from the surrounding plastic. This entails
cutting away everything that doesn't fit in the socket. Cutting by hand with
any type of saw is hopelessly slow since the blade heats up and melts the plastic
which then welds itself to the blade. I used my table saw with a combination
blade. It worked perfectly with only a bit of chipping. I removed the guard
to allow better access to the uneven cover. Naturally I was VERY carefull around
the blade.
I've formed both Lexan and generic
plexiglass with good results. You'll have to make tests with your own oven
to find the right temperature. I find that putting large pans on the top and
bottom to shield the heat coils will help a great deal. Those who cook with
gas probably have a more even heat.
For final trimming I used a large
sanding disc with adhesive paper mounted in the table saw. Use the roughest
grit you can find and go easy so as not to overheat the plastic and melt it.
I hand file also works but is slow.