Headers

Exhaust Manifold

GS-R Integra

RS/LS Integra
'94+ Integra Headers
Preparation
- 8mm socket and wrench
- 10mm socket and wrench
- Extra long socket wrench or normal wrench with extension pipe
- Socket extension for your socket wrench
- Vise grip pliers (to hold the spring loaded pieces together if you're working by yourself)
- Bolt/nut "penetrant"
- Lockit compound
- Aftermarket header
- Aftermarket piping
- Supplied gaskets
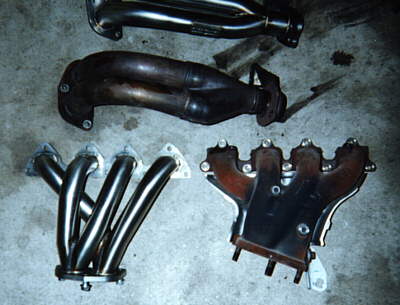
DC Stainless versus Stock Manifold
Removal
- On both disassembly and removal, it helps to get everything in place and partially loosened/tightened before doing final removal or assembly.
- Follow the diagrams to see which bolts and nuts need to be removed.
- Start by removing the heat shield.
- Next work on the pipe that connects the exhaust manifold to the catalytic converter.
- The actual exhaust manifold itself should be taken off last.
- Notice that the two bolts that attach the stock exhaust manifold to the bracket is torqued much tighter than the others. This is where the extra long socket wrench will come in handy.
- If you have an RS/LS be sure to disconnect the Oxygen Sensor from the pipe.
- Keep the metallic gasket that is in between the exhaust manifold and the engine. Clean the gasket with a rag and be careful since the gasket is sharp at some points. Replace the gasket if it is in really bad condition.
- You'll need an extension (and preferably a deep socket) to remove the nuts attaching the exhaust manifold to the engine.
- Remove the circular gasket that should be attached to the bottom pipe near the catalytic converter. You'll need to reuse this one too unless it is in bad condition.
Installation
- Use Lockit compound on all threads. Be sure to use a compound which can be loosened with hand tools (read the package).
- Install the new headers first onto the engine. Don't forget to put on the clean gasket. Note that Acura recommends using new self locking nuts at this point. Most people consider it optional, especially since they cost $1.50 each.
- You won't be using the stock heat shield anymore.
- Place the Honda ring gaskets, which should be supplied by the headers manufacturer, onto the indicated position of the downpipe in the diagram.
- Also place the other circular gasket back onto the new downpipe.
- To attach the downpipe to the catalytic converter, you'll have to use your fingers to press against the spring loaded bolts or utilize vise grips to hold the pieces together while using a piece of cloth to protect the header.
- Double check all nuts and bolts to be sure that they are tight. You can even torque them to spec if you have a torque wrench. This is especially preferable on the manifold studs connecting the header to the head.
- Clean the headers with a rag containing a little bit of grease remover. This is to ensure that no grease is on the headers so that they will not stain due to the intense heat. For ceramic headers, be careful not to stain them at all as they are difficult to clean. Using a pair of mechanics gloves may be your best bet.
- Start your car up and check for exhaust leaks.
- Recheck the nuts after a week.
JG Dynamics Test of Honda Civic Headers
Mugen
From: Barnabas Chan (BCHAN@gamewager.awacentre.awa.com.au)I recently purchase and install a Mugen Header onto my Integra GSR and it is great. The header is of one piece stainless steel design and is very light and strong. It is design specially for the B18C (1.8 VTEC) engine. The tubes are 60mm(2.5inch) in diameter which match very nicely with my 60mm diameter RSR exhaust tube and in turn I also get a larger catalytic converter also have both openings at 60mm diameter. When the header is heated the first time it turns golden and looks terrific especially with the Mugen label printed on top of one of the tube.
The craftsmanship of the header is excellent and there is also a medium size heat shield installed with it.
Power? I got much better mid range response then before and the difference it makes to my high range response is amazing compared to when I was using stock header with stock catalytic converter and RSR Invidia exhaust. The engine revs much faster to the 8100rpm redline especially when beyond 6000rpm. I haven't lighten my flywheel or change my clutch or change the computer chip yet.
The fact is from my experience changing the exhaust will decrease the the lower and mid range power than stock and the exhaust will only give a high range advantage (beyond 6000rpm). Unless you actually match the header and the catalytic converter with the rear exhaust there is not much advantage in upgrading just a single piece of component.
Pacesetter
From: Impact PartsAdvanced Engine Management tested Pacesetter street headers and the DC Sports with very similar results. The Integra Web Page may be able to do a full review of this product in the near future.
Also, Pacesetter will be offering MONEY at the 1996 Battle of the Imports.
Winner - $200 in Brackets 1,2,3,4
Runner up - $100 in Brackets 1,2; $50 in Bracket 3,4
$50 for each low qualifier in Bracket 1,2.
MUST HAVES - Pacesetter header, Pacesetter sticker on car.
DC Headers vs. Stock
Henry and I compared our cars again, after Henry installed stainless steel DC headers. Henry now has the Trust Airinx filter with fresh air tube, Trust Exhaust, and DC stainless steel headers. I now have the Trust Airinx filter with fresh air tube, stock exhaust, and stock exhaust manifold. Henry has 3/4 tank gas, 45 series tires on 16 inch wheels (about .4% shorter than stock), and had his valve adjustment done about 3500 miles ago. I had about 3/4 tank gas, 55 series tires on 15 inch wheels and had a valve adjustment done about 25 miles ago. So basically we are now pretty even except for the Trust exhaust and DC headers.We did the same street launch going 5-7 mph in first gear. I took off first again. I shot up to second gear quickly with Henry shifting a split second after me. We were dead even. He was a little behind my side view mirror. 8000 rpm in second gear, I shift to third quickly with lift throttle and then floor it again. Henry does the same thing a split second later also. Right after the shift to third, we are doing about 65-70 mph. All of the sudden I can see Henry starting to pull ahead. He shoots past me almost like I was standing still! I estimate he was going about 10 mph faster than me as he passed my front bumper. Seems like the headers helped quite nicely.
Analysis: Again, I was able to hold Henry off all the way to redline in second gear. At the lower gears, the stock Integra is able to have sufficient torque to keep up. However, once in third gear, Henry's torque and HP advantage is able to show. There is a big jump going from 2nd to 3rd gear in ratios: 1.900 to 1.360. Shifts to other gears are only increased by .3 compared to the .6 increase when going from 2nd to 3rd.
GS-R Ratios (:1)        RS,LS
1st     3.230           3.230
2nd     1.900           1.900
3rd     1.360           1.269
4th     1.034           0.966
5th     0.787           0.714
Final   4.400           3.000
Anyways, it seems like the my stock GS-R doesn't handle the decrease in ratio (numerically) as well as Henry's. In third, Henry pulled several car lengths ahead of me. I can tell that he was accelerating at a faster rate than I was, that's for sure. In fourth, I was hopelessly behind him. I haven't driven his car yet, but I suspect that his "throttle response" has improved even more.
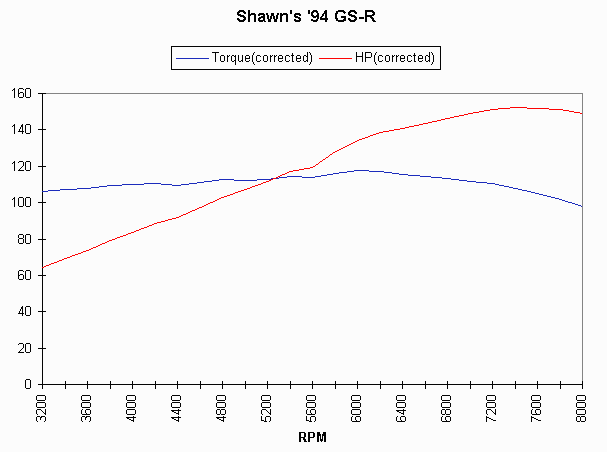
Shawn's Dyno After DC Header's Install
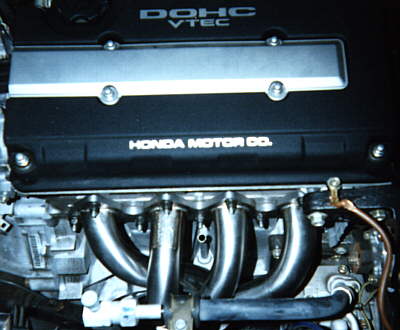
DC Stainless Installed
After 2 Days
From: Shawn Church (Shawn_P_Church@ccm.ch.intel.com)
Went out to my car yesterday to check the oil, and my headers have cracked at the 1-4 swedge! Looks like the weld is cracked clean through because I can see some exhaust blowby stains.
I got a hold of Charlie Contreras, one of the owners. He was surprised to hear this as well. He asked me to send the headers in and they would inspect them and either replace them or reweld and recoat them - as long as they determined it to be defective workmanship. That makes me a bit nervous, but this guy sounded like he prides himself on quality - so no DC slams yet, I don't know who I'd buy headers from besides them. I can't imagine how it could be anything but a defective weld as that portion of the header can't be overtorqued or anything. If anything is going to break, it going to be the ring welds connecting the collectors to the joining plates.
Headers came in Friday afternoon. Quality looks good, they even recoated the headers for me. From the time they received the headers, it only took them a week to get 'em back.
Now this is only one situation where the DC ceramic headers has cracked. The point is to show that if there was a defective part, DC will promptly fix the problem. Ed.
Header Wrap
From: Hendrik Susanto (hs036@csufresno.edu)I just installed some on my GS-R's DC SS header and thought I'd share my experience. I only wrapped the upper portion of the header though, the lower portion to be done in future. Installation was straight forward but time consuming. Also, the insulating material has fiberglass materials in it so it kinda irritates the skin a little. You might want to wear some gloves before installation.
After the job was complete, engine bay heat was noticeably reduced. But the weirdest thing is that a couple of my friends told me that my exhaust(Trust) seems to be a lot quieter, much to my liking. Could this be due to the insulator itself? Any ideas? Something to do with keeping the heat within the header and better gas flow with the hotter gas?
Smoking Header Wrap
From: Howder Lee (lee_h@cs.odu.edu)I recently purchased the Exhaust Insulating Wrap from a performance shop in town. Having only read the step-by-step instructions, I went ahead and wrap my aftermarket one-piece header. Upon completion, the wrapped header was left to dry. After the newly-wrapped header was installed, I turned on the engine and in less than 2 minutes, white smoke was evaporating from the headers like a bat-out-of-hell!!! I started to panic and removed the wrap after the engine had cooled off. All of this happened during the weekend so I couldn't call the shop to ask them why it smoked. When I called the shop first thing in the morning, they told me that the box said it's suppose to smoke for 5 minutes. I was like -- "Oh shoot!!" I told them I had taken the wrap off and smoke was never to be seen. The shop wouldn't exchange another for me so I called the manufacturer and the person said it's supposed to smoke as long as 20-30 minutes. The smoking allows the wrap to be cured (as quoted from the person I spoke to). Since my wrap wasn't completely cured, I was able to wrap it back again.
So a word of precaution for people out there! It's suppose to smoke for 30 minutes so DON'T PANIC like I did! In addition, you need 6 hose clamps of size 1/3/4 and one hose clamp that's a size bigger for the pipe at the end. If anybody has any questions please email me about your experience.