Vario Silence Electric Helicopter:
-
INTRODUCTION
I considered buying an Eco 8 or 16. But having owned a high quality helicopter already, I knew I wouldn't be happy with the quality. Vario was the logical choice. The quality of the kit is very high. All the parts fit well and there is no need to adjust any thing to make things fit.
I would have considered a Mikado helicopter, but they are not being imported to the U.S. at this time. They have a 30, 20, and 16 cell helicopters.
THE KIT
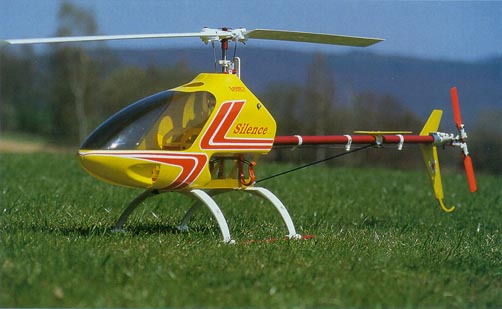
Like I said before, the parts are all of excellent quality and finish. The sides are made of graphite. The swashplate is metal and anodized in red. The mainshaft is hollow and made of hardend steel.
The tail rotor is driven by wire. In the past, I've heard that tube drives are best, so I'm a little skeptical whether the tail will hold well in flight.
I like belt drives for their ease of set up. They are inconvenient, however, when you want to remove the tail.
This kit uses 120 degree CCPM. The 2 servos on the sides fit onto the side frame via "plastic" servo mounts which put the servos at 45 degrees. There are no holes in the mounts to install the servos. You either have to tap a hole (use 2.5 mm) or drill through the mounts and use a nylon lock washer to hold the servo in place. I chose the last option, and it works very well.
The main rotor is somewhat unique in that there is no flybar. I like not having a flybar to worry about while working on the model in the shop, but I've heard nothing good about flying flybarless helis. Flybarless helis are known to have a difficult time changing direction - you have to emphasize your elevator and aileron movements.
I know of 2 people that have opted for Vario's Delta rotor head. This rotor head costs over $200.00, so I think that'll I stick with the stock Stabilis head for now.
Having not flown it yet, I'll give the rotor head the benefit of the doubt.
MOTOR/CONTROLLER INSTALLATION
I am using a brushless motor in place of the standard brushed motor. In theory, brushless motors are maintenance free and should last forever. I think that the extra expense is worth it especially if you can pick a gently used motor like I did.
Motor Specifications (Per Aveox website):
1817/3Y
Specs:
Turns 3
Magnet/rotor length 1.7”
Continuous/Peak current 25A/49A
Kv 433
Kt.3.122
R..060
Io 1.2
Weight 20.2oz
Dimensions 3.43”x1.79”
Recommend Cell Count 20-36
Recommended Prop (cells) 12x6 (27)
Most Efficient Current 19A@30V
The controller is Aveox's H260. It can handle up to 32 cells. It is designed specifically for brushless motors. Using a brushed motor controller would damage the brushless motor, controller or both. I had to cut the shrink wrap back a little to move the dip switches to take off the brake and reverse the motor.
I like this controller because, it is designed to work only when a radio signal is being received. Not only that, it emits a audible tone just before it begins to work. I've heard of some controllers that will spin the rotor as soon as the batteries are plugged in. With helis especially, this can be quite dangerous.
4/14/2000
I still need to install the motor. The motor mount is for a Graupner Ultra 2700h, but I am using an Aveox 1817/3y. I plan to use a balsa spacer to make the 3 hole motor mount fit the 4 hole Aveox motor.
I also still need to reverse the Aveox motor. The motor as delivered is optimized to work forward, but the Silence's setup only allows it to be mounted so it runs in reverse.
4/18/2000
I finally mounted the motor in the mount for the Ultra 2000/7. I just cut a square piece of metal and epoxied it to the original mount. I drilled new holes through both the new and old mounts and used longer screws.
With the help of people on the newsgroup (rec.models.rc.air & heli), I was able to use a resistor from Radio Shack to reverse the motor to its correct setting (5 Amps more than nuetral) . It was not without some drama though as the resistor I used was not designed for the amps I was using. The resistor started smoking. If you try this, use a .01 ohm 5 watt resistor. This is the type that Aveox sells for this purpose.
BATTERY PACK
I'm using 2, 16 cell, zapped, 2400 mah packs with Dean's connectors. Many people on the newsgroup prefer Astroflight connectors with high voltages like I'm using, but I wasn't aware of this at the time of the purchase.
I like the Dean's connector's because they prevent you from getting the polarity reversed. It doe's take some force however to disconnect them when they are connected. Sometimes I have to use pliers to do so.
The packs that I have are not in the orientation that fits the Silence's mounts. My packs are constructed end-to-end and square. I'll have to improvise a way to mount these in the heli because of this.
Diversity Models in San Diego says that the battery packs are much more efficient end-to-end as compared to side-by-side.
I am using the Robbe Infinity II charger to maintain my batteries. This charger can charge up to 30 cells at up to 5 Amps. It has automatic quick charging which makes battery managment much easier.
If money were not object, I would have gone with the top-of-the-line Schulze charger. It retails for about $700.00 U.S. It handles 36 cells and charges at up to 9 A.
4/18/2000
I purchased 2-30 amp auto fuses and fuse holders to protect the battery packs as recommended by Aveox. Many people don't use fuses, but they probably have more experience in electronics than I do. Thus, they can avoid the mistakes that I might not.
One important caution is to be careful how you connect and disconnect your packs from the charger. Always connect your pack last when installing it on charger (do main battery and charge connectors first). Always disconnect your packs first when removing them from charger. In this way, you avoid touching positive and negative plugs on charge connectors.
FLYING
4/18/2000
I powered the heli up on 1 pack just to get a feel for everything. On 16 cells, the mainrotor turns rather slowly. I'm a little concerned that the gear I am using is not right. I suppose the extra pack will make a big difference in rotor speed.
Note that I only breifly powered up because I didn't have the main blades installed yet. Running the motor under low load situations can't be good for the motor.
There was also a considerable amount of noise coming from the drive train. I may have to unassemble the drive train to find out what is causing the noise.
I've consulted someone about the noise to see if it is normal or not. Once I know, I'll know how to proceed.
4/23/2000
I found out that I didn't need to reverse motor. A lot of time was spent on this, but all is well that ends well.
After setting up the gyro and making sure the tail rotor is responding correctly I'm ready to start. I found the blades to be quite long for the tailpipe length. I removed my carbon tail blades and replaced them with plastic just in case.
I limited the pitch range using the transmitter. The head has a range of about 30 degrees. I limited it to 10 degrees (+7 to -3). I also tightened down the main blades to reduce boom strike possibilities
I love the sound of the electric helicopter. I didn't hear any of the gear noise at all. All you hear is the woosh of the blades. A major contrast to internal combustion helis.
The heli does take some time to respond to elevator and aileron stick movements. This combined with the amount of air the flat blades catch, makes it hard to contol in tight quarters (especially if it is breezy out).
With flybar helis, it is easer to move the heli on the ground to get it into the right orientation. With the silence, I had to move it where I wanted it to go. Once I take the heli to a large, open area, things should be a lot more fun.
I really like the fact that I didnt have to carry a lot of starting equipment. I had to carry the car battery, but I usually bring that any way for the IC heli's starter.
The word "float" describes more accurately what the silence does in flight. It doesn't respond quickly and instantly to control inputs, but it won't get out of control very easily either.
I have to stop flying early because the power keeps cutting in and out. The first time this happened, I attributed it to the receiver battery (2000mah, Nimh) and the battery fail safe function. I recharged them for half an hour, but then it happened again. I'm not sure whether I'm getting glitches or not.
Silence Photos
More Silence Photos
Still More Silence Photos
First Flight Photos
Silence Manual
FOR SALE $1,300 (over 2,100 invested)
Vario Silence Helicopter Pictured on this website includes Vario Xtreme carbon vertical and horizontal fins, carbon push rod (needs swashplate) - 575.00
Aveox 1817/3y motor - 600.00
Aveox H260 Controller - 200
2-16 cell 2400 mah packs - 350.00
Vario Viteese Fuselage Kit - 235.00
Miscellaneous Vario Silence Helicopter Parts - 200.00
For Sale Pictures
Email me if interested: sandpking@yahoo.com
ELECTRIC HELICOPTER LINKS:
-

Mikado Logo
Frank Fickel Various Helis
Electric Raptor
Eco 8
Eco Messages
Ulrich Rohr's Heli Page - In German, Some English
RCOnline Germany - In German
Eco 8 site
FMA Direct
Agusta Electric Heli Supersite-Great Links Page Too
German Piccolo Site
German Electric Heli site
Sean's Piccolo Site
Michael's Piccolo Site
Robin 280
The Future is Electric
Translation site

Back