
Print up your own decals
This TIPS & TRICKS article was taken from the January 1997 issue of We Compute. Thank you Mark Russell for this wonderful idea.
You can easily make decals to decorate model cars or planes, label the jacks and connectors on your equipment, or apply to hundreds of other items for identification, says reader Mark Russell of Toronto who came up with this simple but ingenious trick.
You need a laser or inkjet printer and the following supplies:
- Clear tape (with non-shiny finish if you're using an inkjet).
- Printing paper.
- Paper with a non-stick surface on one side, such as the shiny paper that mailing or disk labels come on.
- Scissors.
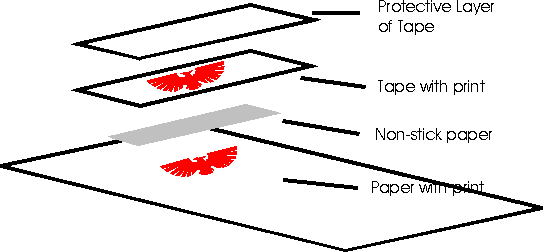
First print the message or graphic you want
onto a sheet of paper. Then cover the print with a
small piece of non-stick paper -- non-sticky surface facing up. Use a piece of tape larger than the
non-stick paper and apply it so that it covers the
non-stick paper and fastens to the printed paper
around it.
Place the whole works back in your printer, so
that it lines up the same as the original paper sheet.
Print again.
Now you should have the same message or
graphic printed on the tape.
If you used an inkjet, give it a few minutes to
dry. Then cover the print over with another piece
of tape. Remove bubbles by burnishing with your
fingernail.
With the scissors, cut the message or graphic to
size. It should fall off the printed paper and you
can peel off the non-stick paper.
Now your personal decal can be applied to
almost any hard surface.
Addendum:
I would like to add this tip to an excellent idea.
If you are using an inkjet that sprays a liquid ink(there are also thermal inkjets out there) onto the paper, use the draft mode to print on the tape. This will give better results because less ink is sprayed onto the tape causing less beading. However, you may have to print the image twice on the same piece of tape.
![]() Return to the Work Room
Return to the Work Room