 |
 |
 |
 |
 |
 |
 |
 |
 |
 |
 |
 |
 |
 |
|
|
|
|

|
|
|
|
|
|
|
|
|
|
|
|
|
|
|
|
|
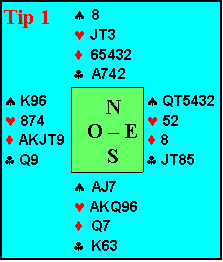
Tip 1 - Contract 4 © by South (Degree of difficulty = 5)
After West interfered 1 ¨, he leads now the Ace, the King and the Knave of diamonds while east throws a little spade on the second and third rounds. How should South plan his play?
By Hana:
AFTER GIVING 2 FIRST TRICKS OF DIAMOND
1) RUFF 3RD DIAMOND IN THE HAND WITH THE 6 IF WEST DOESN'T RUFF- WITH 9 IF HE DOES.
2) AS I HAVE 4 SPADES IN HAND AND DUMMY- AND OPS HAVE 9- I ASSUME THE DISTRIBUTION OF SPADES IS NOT 7-2 WHICH IS A VERY LOW PROBABILITY. ANYWAY THE CONTRACT DEPENDS ON THAT ASSUMPTION. SO EAST MUST HAVE AT LEAST ONE MORE SPADE AFTER HE DISCARDED 2 ON DIAMOND LEAD. SO I PLAY ACE OF SPADE
3) RUFF A SPADE WITH JACK
4) CLUB FROM DUMMY TO THE KING
5) RUFF ONE MORE SPADE WITH THE 10
6) 3 ROUNDS OF TRUMPS IF EAST RUFFED 3RD DIAMOND - OR 4 IF HE DIDNT.
7) CLUB FROM THE HAND TO ACE
GIVE ONE MORE CLUB LOSER AND PLAY LAST TRUMP.
Comments: although it is usual to draw trumps as early as possible, do not forget to develop some extra trick by taking two spades ruffs in the short trump hand. In fact a ruff in the short trump hand is pure profit!
|
|
|
|
|
|
 |
|
|
|
|
|
|
|
|
|
|
 |
|
|
|
|
|
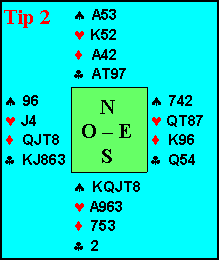
Tip 2 - Contract 4 ª by South (Degree of difficulty = 5)
West leads the Queen of diamonds. How should South plan his play?
By Mary:
West leads the Queen of diamonds. Since this is probably top of a sequence, and there is no way to set up the diamonds for winning a trick, South should take the first trick with the Ace of diamonds from the board.
From the board, South leads the Ace of clubs and plays the 2 of clubs from his hand. He then leads the 7 of clubs and trumps with the 8 of spades.
Lead the 3 of hearts to the King of hearts and return then small to the Ace of hearts. Play the small heart to the small heart on the board, losing the trick. If diamonds are led, lose two and then you have the rest of the tricks.
If diamonds are not led, you lose the diamonds at the end. Play the 9 of hearts from the hand and trump with the Ace.
From the board, lead the Ten of clubs and trump with the 10 of spades. Lead South's King of Spades, Queen of spades and then Jack of spades. Making 10 spades.
Comments: when there are losers in his own hand, declarer should consider whether ruffs can be taken at dummy before drawing trumps. In this hand, declarer can draw trumps one turn, leaving the Ace at dummy. Even if opps return trump when they take the heart trick, you'll still have the Ace at dummy to ruff at dummy the heart loser.
|
|
|
|
|
|
|
|
|
|
|
|
|
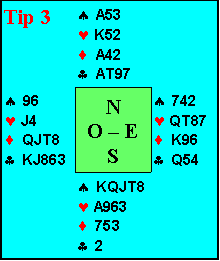
Tip 3 - Contract 4 ª by South (Degree of difficulty = 10)
This time West leads the 9 of spades. How should South plan his play?
By Hana:
TIP 3 (TIP 2 WITH A DIFFERENT LEAD):
1) LEAD OF 9 SPADE IS TAKEN IN THE HAND WITH THE 10
2) HEARTS - ACE AND KING ARE PLAYED AND 1 HEART IS GIVEN.
4) I PLAY ACE DIAMOND AND ACE CLUBS, RUFF A CLUB IN THE HAND
5) PLAY THE HEART AND RUFF WITH ACE OF SPADES
RUFF ANOTHER CLUB IN THE HAND
AND TAKE 2 LAST TRUMPS
Comments: indeed, there is not a great difference with tip 2. Only take care to move at once hearts in order to ruff the fourth loser in the suit, avoiding drawing a turn of trump, otherwise the opps would return trump and you wouldn't have more trumps at dummy to ruff the heart loser.
Did you notice that the contract is unmakeble with a trump lead if North has only two trumps?
Well, with the same points on the line and the trum lead, with the only difference that the Ace of hearts in in North who has also one more club, you will be asked to make the contract even if North has only 2 spades.
|
|
|
|
|
|
|
|
|
 |
|
|
|
|
|
|
 |
|
|
|
|
|
Tip 4 - Contract 2 ¨ by South (Degree of difficulty = 3)
West leads the 6 of hearts to East's Ace who returns in the suit; West takes two more hearts tricks, then switches to diamonds. How should South plan his play?
By Mary:
West leads the 6 of hearts to East's Ace who returns the suit; West takes two more heart tricks, then switches to diamonds. South should play the 4 of diamonds to the Ten of diamonds in his hand. Play the 4 of clubs to the Queen of clubs or Ace if King played. Play the Ace (or Queen) of clubs from the board to the 8 of clubs. Play the 2 of clubs from the board to the Jack of diamonds. South would lead the Queen of diamonds to the 9 of diamonds. Lead the 6 of diamonds to the King of diamonds (3/2 split). Play the 7 of clubs to the Ace of Diamonds. Play the 2 of spades to the Ace of spades. Play the 6 of spades to the 4 of spades, losing the trick.
Lose the final play of the 7 and 8 of spades. Taking 8 tricks.
Comments: when you take a finesse, you try to take advantage that a certain honour is "well" placed and in this example the King of clubs lies under the fork AQ of dummy. Let it be clear that the declares doesn't know if the finesse will work or not (50%).
|
|
|
|
|
|
|
|
|
|
 |
|
|
|
|
|
Tip 5 - Contract 3 NT by South (Degree of difficulty = 5)
West leads the 3 of hearts. South try the J © from dummy but East plays the Queen. How should South plan his play?
By Hana:
THERE ARE 8 SURE TRICKS IN THE HAND. THE EXTRA TRICK SHOULD BE DEVELOPED IN DIAMOND SUIT - USING DOUBLE FINESSE.
FIRST OF ALL I MUST DUCK TWICE HEART LEAD AND TAKE THE 3RD WITH THE ACE- TO AVOID HEART LEAD FROM EAST IF FINESSE DOESNT WORK. THE DOUBLE FINESSE IS PROTECTED BY THE ACE FROM THE WEST WHICH IS THE DANGEROUS HAND.
NOW I WILL LEAD DIAMOND FROM THE HAND TO THE DUMMY. IF WEST PUTS QUEEN OR KING I TAKE WITH THE ACE. IF NOT I PLAY THE JACK OR THE 10. LETTING EAST TAKE THE TRICK .
NEXT ROUND I FINESSE AGAIN DIAMOND FROM HAND TO DUMMY,
THIS WILL WORK ONLY IF KING AND QUEEN OF DIAMONDS ARE DEVIDED BETWEEN THE 2 OPS (or both in West). IF BOTH KING AND QUEEN ARE IN THE SAME SIDE (East) - THE CONTRACT WILL BE SET.
Comments: when there are two vital outstanding honours (in this example the K,Q) you must finesse twice. So doing, in the 75% of the times, you would lose only one trick.
|
|
|
|
|
|
|
|
|
 |
|
|
|
|
|
|
|
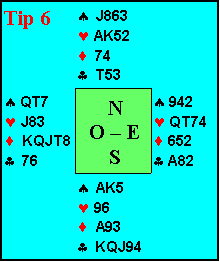
Tip 6 - Contract 3 NT by South (Degree of difficulty = 5)
West leads the King of diamonds. How should South plan his play?
By Mary:
West leads the King of Diamonds. South plays the 4 of Diamonds from the dummy and the 3 of Diamonds from his hand.
West probably would lead the Queen of Diamonds and South will again play low, losing the trick.
West would probably continue with the lead of diamonds (J) and South should play the 3 of Hearts, winning the trick with the Ace of Diamonds in his hand.
South leads the 2 of Clubs to the 10 of Clubs from the dummy, losing the trick.
Whether opponents lead the Hearts next of the spades, South will take the trick with the Ace.
Play all the clubs KQJ9 as all will win the trick. Play to the King of Hearts, King of spades and the final trick (3 and 4 of spades) will be taken by opponents. Making 3NT.
Comments: Yes Mary, you have been lucky that the Ace of clubs was in the East hand…. But no other way to make the contract that to pray....
|
|
|
|
|
|
|
|
|
|
|
|
|
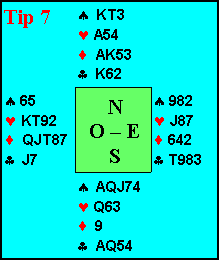
Tip 7 - Contract 6 ª by South (Degree of difficulty = 12)
West leads the Q of diamonds. Taken with the Ace from dummy, South tries at once the finesse hearts playing little heart to the Queen, but West takes with the King and returns hearts. How should South play to take in a safe port this contract which is not a sure one?
By Hana:
THIS CONTRACT COULD BE MADE IN ONE OF THE 2 SITUATIONS:
1) CLUB SUIT IS DEVIDED BETWEEN OPS 3-3 OR:
2) CLUB SUIT IS DEVIDED BETWEEN OPS 4-2 AND TRUPS 3-2 - BUT THE HAND WHICH HOLDS 4 CARDS OF CLUBS ALSO HOLDS 3 TRUMPS AND THE OTHER HAND WITH 2 CARDS OF CLUBS HAS ALSO 2 TRUMPS.
ANY OTHER DISTRIBUTION WOULD MAKE IT IMPOSSIBLE TO MAKE THE CONTRACT.
AFTER TAKING FIRST LEAD WITH ACE DIAMONDS AND FAILING HEARTS FINESSE (WHICH LEAVES A HEART LOSER IN THE HAND) I WOULD PLAY 2 ROUNDS OF TRUMPS, THEN 3 ROUNDS OF CLUBS- AND RUFF 4TH CLUB WITH 10 OF SPADES
KING DIAMONDS - AND DISCARD THE HEART LOSER
ACE HEARTS
RUFF ANOTHER HEART IN THE HAND WITH THE JACK
AND PLAY LAST 2 TRUMPS
|
|
|
|
|
|
|
|
|
 |
|
|
|
|
|
|
|
|
|
Comments: Yes Hana, you've got it! Trying before the hearts finesse and then the odds in club 3-3, is a good way to play ( you play with a probability p=0,68). But there is a better way to play this contract: how Hana described that which is called "The manouvre of Guillemard": it would add about a 5% of probability to make the contract, and the hand in the graphic would prize you way of playing!
And if the third clubs is ruffed by the opponent who holds the third trump, you wouldn't have lost anything since the contract would have been set the same: in fact the fourth club wouldn't have been good and would have lost it while now could be ruffed by the last trump at dummy.
|
|
|
|
 Tips n° 8 - Guess who is the Oy Vey Vise Member the following story tells of. (It's worth 12 p.) Tips n° 8 - Guess who is the Oy Vey Vise Member the following story tells of. (It's worth 12 p.)
Hey folks, look at the answer Mary gave to the tip. It was the first time I was exchanged for a lady lol!
|
|
|
|
|
|
|
|
By Mary: Hmmm, this one is such a stumper. You see, the wise man of the Oy Vey Club, seems at first to be Elaine...but that doesn't work because she does not golf, she is a lady, and she did not golf in her youth. This is a statement she would say though. I must say that the Wise Man of the Oy Vey club has to be you, Lucio! You are such a character that I bet you figured out the joke before it was finished because you would say the SAME thing. Thank you for trying to help me learn this game better. Ciao.
Comments: Ty Mary for answering to this tip. Your answer is worthing more than 12 points….. But, unfortunately, neither do I play golf and it was just a joke, not a Bridge Tips…… Ty anyway!
|
|
|
|
|
|


 Tips n° 8 - Guess who is the Oy Vey Vise Member the following story tells of. (It's worth 12 p.)