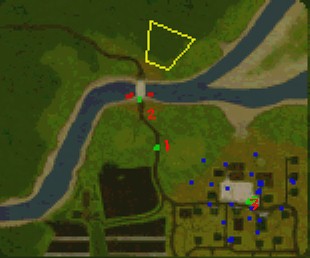
MAP LEGEND
1. Key point of placing the units.
2. The Crow's Bridge where the undead come from
3. Backup from the village
Walkthrough
You will see two knights on the bridge (waypoint nr 1).Retreat them to the hill by the waypoint 1. Move units from the village (waypoint 3) to the rest of your army. Put your army so that most of your Warriors will face the bridge in a short line. Place the archers on the hill and secure them with 2/3 warriors in order to defend them against wandering around Ghols.
Set your Warriors on the Guard option("G"), don't let them attack too fast. Select them as the group nr 1(Alt+1 longer) and archers as group 2 - do so in every mission in which you should separate your army into different squads (it happens almost in every mission).
Now it's turn for your dwarf. You must make a few approaches to enemy Thralls:
Order your Dwarf to attack the closest group of Thralls by the bridge. When they get close to your unit, retreat it a little. Thralls won't catch you - they are much slower than your dwarf. After a few seconds of following you they will come back to their positions. Then attack again, retreat and so on...I killed all the Thralls by the bridge this way!
A "great" offensive of undead is coming across the bridge. There is nothing to be afraid of. Try to blow up as many of them as possible and retreat your dwarf close to your Warriors and Stop (Space) him. Choose the group nr 2 (archers) and attack the Soulless. When the Thralls come close enough, unlock the guard option and get rid of the enemy. That's all. You've just finished the first mission.But don't be so happy. This is just a training mission. The next one - A Traitor's Grave is a real combat. In this mission I didn't loose any units