 Desert Maps

If I had a Trow
| Unit |
Available |
| Trow |
3 |
| Fetch |
9 |
| Soulless |
24 |
| Myrmidon |
45 |
| Dwarven Hero |
18 |
| Berserker |
27 |
| Wight |
6 |
The Desert...
| Unit |
Available |
| Dwarf |
9 |
| Archer |
24 |
| Warrior |
27 |
| Thrall |
45 |
| Journeymen |
4 |
| Wight |
6 |
| Ghol |
18 |
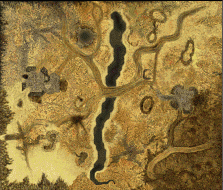
Terrain: Terrain: This is a desert map. It would be as boring as all the other desert maps if not its speical shape. The map is quite big. There is a river across the whole map moreless in the center. There are only 3 ways to cross the river. One is the bridge in the center which is also the place of 90% of the combat. There are also 2 shallow places in the river which allow you to flank the enemy. Most players come to the bridge and fight until they are out of long-ranged units. Then they have their assault. There are also 2 hills on each part of the map. 1 hill is a great place to setup your soulless and defend the balls. The other one is a little lower and makes a great spot for defence, especially the westerrn one. Both players start the opposite sides.
Games Available :
Body Count, Territories, Captures, Capture The Flag
Most Popular :
Body Count
Hints for Body Count:
This is the most popoular game for this map and also the most popular game played on bungie.net Why? I actually don’t know. Maybe because lots of units and tones of carnage. In fact I don’t like playing it too often. I prefer shorter and quicker games like STB. But I’ve played this game a few times and found a few strategies which shall help. My general strategy is not to use the most common strategy which is defending the bridge and killing all enemy long-ranged units. Hills numbered are a perfect spot for defence. The goal is to distract your enemy and make him attack. How to do it? 1st setup the defence on the hill. Then take a trow and kill only one enemy unit. Then run away to your fortress. Not only you will gain advantage, but you may also „invite“ some enemies to your fortress. This strategy always works, cause your dwarves and fetch gain bigger range. They also can’t be killed by a trow assault. There are tones of other strategies. This is just general. If you have any special strategies for
this level, send them to me. They will surely appear here...
Hints for Captures:
This game is a little wierd on this map, but many people still play it. The tip is to get more meele than in body count. You need to capture the ball ass quickly as possible. This may have a great influence into combat. When you capture your ball 1st, you get a great advantage. Send a trow and a Myrmidon to each ball. Then move all 3 to the uneccesable hill. The key is to get max. soulless for this one so that they can defend the balls well. If you touched the ball 1st beware of your enemy attack. He usually does it about 3 minutes before the end, so you will have loads of time to setup wights, fetches, charges etc. When you have to attack, well good luck. Ireally play this game occasionally and I usually got the ball 1st. Good luck.
Hints for Terries:
This game is starting to be more and more popular on bungie.net. It is different than body count, but it engages all player and units. It is also perfect for playing 3 on 3. The most important thing you have to do is capture a flag first. In case if a tie, you will win. That's why the enemy has to attack now, and it is much better to defend than to attack. When playing dark, sell all the soulless and get max meele and fetch. Keep archers and some ghols in the light version, but sell all the dwarves then. Ghols and wight parts can be usefull. Now you can do one of the 3 things. You could leave most of your army in the middle and move some units to the flanks. You can also move your zerks and myrms to the flanks and leave a small army in the middle. Both choices are ok, I usually use the second one.
|
Special strategies for this map
Added by: Mithrandir
Contact: redmike@friko.onet.pl
Game: Body Count
Name: Body Count Different (Trow)
This is an example of playing body count a little different. This strategy has no special trading, I recomend taking all fetch and few soulless. The rest is your choice.
So, this is the strategy which kicks the most commom strategies away. The key to win a war is to surprise your enemy and distract him. When he‘ scattered, he will become an easy piece for your force. What you have to do is as soon as the game start, rush to one of the hills close to your starting position. Leave 1 trow and make a trow assault. Don’t kill as many as possible. Kill anythnig and run back. Meanwhile you should setup a fortress on your hill. Put your dwarves and fetch on the hill, protect them with your trows. Only trows can attack you from the front, all other meelee units will have to take the rares. And you shall defend them with zerks and myrms.
If lucky, the enemy will want to kill you at any cost and will follow you. Your fetch will easily take care of them. He usually sends a trow in order to gain advantage. But this is very difficult. When he will want to kill your fetch he will be stopped by your trows. If he wants to attack from the rares he will have to meet your zerks. The only goal is not to let him gain advantage, but this is usually quite easy. Even if he manages to gain it, you can always do 1 more trow assault. Now you wait. The enemy will probably try to flank you, attack from the rares etc. but he will always fail. Your dwarves and fetch do the main work here. They gain bigger range and can’t get killed by enemy fetch, dwarves etc.
Your enemy will probably divide his force into small groups in order to attack from many sides. These groups are very easy to kill. He will be especially easy to kill if he gets lots of fetch, dawrves which is very common. His wights will become useless in the river and his fetch will quickly die from your cocktails.This strategy really works. Here are a film which proves it!
Added by: Mithrandir
Contact: redmike@friko.onet.pl
Game: Body Count
Name: Wight War (The Desert...)
Everybody must have heard about the wight war. Here is a description of a strategy which also describes this thing. The trading:
Archers = max
Warriors = max
wights = 6
Ghols/Dwarves = remaining
Well this one doesn't include thralls, but i prefer warriors and archers. Archers are faster than thrall and can kill them in large groups. The beginning is very important, because of the wight war. One of your wights will be standing in front of your army. Select it during the planning time and scroll the mouse to the river. When the game is on, click and put it into the river. Do the same with the rest of your wights, put 3 on each side with big spaces between them. Now select all your archers and put them towards the bridge in a long line formation. Put warriors to the flanks in 2 groups. If you start on the East side you have an advantage, cause your wights will probably enter the water first. When facing and experienced player, the wight war shall begin soon...
The key to win BC is to inflict the first damage and then wait for your enemy to slaughter him. Defending on desert maps is much easier than attacking. But to get advantage you need to attack first. And here is the wight war. A wight which is detonated doesen't change your or enemy damage. So when a wight kills another wight, 2 units are dead but the first one to hit gets the points. So what you have to do is start first. When you get to the water first you wait for enemy wights. When they come close enought, boom!! If you see an enemy wight enterning the water, select your archer and attack it. Your hero will shoot the water and trace the wight. Now you can easily kill it with your wight. If you won the wight war, you have big chances of winning the game.
The enemy will have to attack. If he's a newbie, he will probably choose the middle. This is usually a bad choice, especially when you still have wights left. A more experienced one will probably try ro flank you, so move few ghols north and south. The only thing you have to do is defend well and prepere for any type of attack. Good Luck!
Added by: Mithrandir
Contact: redmike@friko.onet.pl
Game: Body Count
Name: Ghol artillery
This strategy is quite different to the previous one, but I think it may be even better. Here is the trading:
Ghols = 15
Archers = Max
Journeymen = 1
Wights = 6
The rest depends on what you like. Heh, you probably know what I am going to do. Yes! Wight healing operation! Move your troops as in the 1st strategy, unheal all your wights. Now pick up its parts with ghols. Now you have a super ghol artillery. So many ghols can easily freeze half of enemy army including archers. The only problems which you might encounter are wights, but if you act quickly they won't manage to enter the river. Divide your army into 2, one to the north flank, the other south. Try to shoot wights with archers and when you know that the river is clean, cross it.
The trick with ghols is to attack from all sides at the same time. Try to spread them, maybe surround. Strike with your artillery, and have your meele just behinf them. As soon as enemy archers are frozen, use ghols to kill them, your warriors should attack his warriors. 16 ghols will easily freeze big groups of enemies. They will also loose some health then and shall become an easy target for your archers.
This is just an overall strategy. Ghols are the key, you can change the rest. Good Luck!
ADD A STRATEGY!

[E-MAIL] - [STRATEGIES] - [SCREENSHOTS] - [LINKS] - [STORY] - [CHARACTERS] - [HOME]

 Desert Maps

