
Level 4: Restore Pride
At the start of the mission, your commandos will be located in the southwestern corner of the map, behind a small copse of trees. To your immediate right are three small sections of wall, and that is where the killing will begin. First, have all your commandos hit the dirt, to avoid being seen when you perform the next few actions. Have your Green 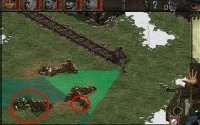 Beret crawl over to the easternmost section of wall and plant his noise maker behind it, then crawl back behind the westernmost section of wall. You goal is to attract the two guards nearest you, one at a time: the stationary one at the end of the railroad tracks, and the one patrolling in an east to west circular pattern. For now, don't worry too much about that other guard, in front of the burnt-out house; the positioning of the wall sections makes it impossible for him to see your actions unless you get careless. When the patrolling guard is as far away from your position as possible, turn on the noise maker so only the stationary guard hears it. He'll rush over to investigate, allowing you to sneak up behind him and slit his throat. After you take him out, turn off the noise maker, grab the body, and deposit it back behind that westernmost section of wall, where you were hiding. Repeat this exact same process for the patrolling guard (he'll hear the noise maker when he's close enough).
Your next step is to have the Green Beret crawl northward to the side of the burnt-out building, next to the complacent guard who's about to lose his life. Keep track of his line of sight; when he looks away, run over and stick him with your knife, and hide his body behind the side of the building (don't worry -- that patrolling guard above you doesn't 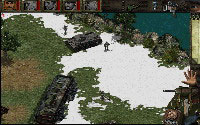 have a clear line of sight to the stationary one). From there, have the Green Beret run over and stab the patrolling guard, as he heads west. Quickly pick up the body and and dump it by the side of the barn, next to the other one. You'll have to time it so the three patrolling guards to the west are walking away from the scene of the crime, and can't see you. From there, you want to repeat the process and kill the stationary guard to your immediate left. Just make sure you travel to the north and east of the burnt-out house; travelling past the western edge will get you seen by the other stationary guard. Once he's dead and his body disposed of, repeat the process once again and kill the other stationary guard to your left (though you can dump his body right behind that nearby outcropping of rock). You now have some room to breathe.
Your next move is a bit tricky. Have the Sniper and Driver crawl up to the rock outcropping, where they'll meet up with their buddy the Green Beret. From there, have the Green Beret crawl northward to the other outcropping of rock; have him plant his noise maker and then crawl back to cover behind the first rock outcropping. 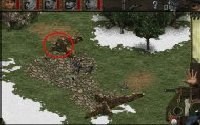 When the three-man patrol reaches the rock, turn the noise maker on. The three patrolling guards, as well as the single stationary guard to the north of that rock outcropping, will come to investigate. As soon as they're over, it's time to move. Have your Sniper and Driver crawl to the north, behind the occupied guards. Your next target is that guard to the left of the unoccupied Panzer II tank; when he's looking away, have the sniper take him out. Then, while the guards at the noise maker are still distracted, stand up and run for the tank. You'll make it, and when you do, all hell will break loose....
Once your Driver gets inside that Panzer II tank, it's time to wreak some serious havoc, because you'll be completely impervious to enemy weapons fire. Kill every Nazi you see, ignoring their paltry cries of "Alarm!" -- they are too far from the main compound to be heard. After you kill everyone in that general area, travel southeast to the railroad tracks. There may be a barbed wire fence in your way, but it doesn't matter: your tank can shoot right through the wire, killing every German on the other side, including the one in that nasty little machine gun nest. 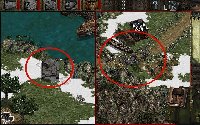 But wait...it gets better. Even when you think you've done all you can with the tank, there's still plenty of killing ahead. Head back to the northwest, to the spot where you originally found the tank. You'll notice that there's a break in the natural cliff wall, and it's just big enough for you to squeeze into. Believe it or not, the range of the Panzer II is so long, it can reach across the river, to the soldiers on the other side! Here's what you want to do: Kill that one poor sap on the dock. A few seconds later, a patrol will spot the body and come to investigate. They will sound the master alarm, but you've got nothing to worry about. Guards will descend on the spot in droves, like lambs to the slaughter. As they keep coming, you keep killing. Before you know it, you'll have a pile of about fifteen bodies built up. Position yourself right, and you'll even be able to take out the machine gun nest. You'll be so thankful of all of this at the end of the mission; after all, you have to exit using the boat at the dock, and not having to worry about those guards is a real relief.
After the guards on the other side of the river are killed, it's time to abandon the tank and get ready for the dangerous journey north, across the railroad tracks. Move all of your commandos to the easternmost part of the map, southeast of the railroad bridge. Notice that across the river and to the left there is a single stationary guard, scanning the bridge for intruders. If he spots one of your commandos, he'll run away, hop on his motorcycle, and head to a nearby guard shack, where he'll alert a three-man patrol to your presence. 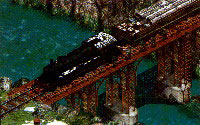 But don't worry -- he'll never get that far. Check out his line of sight, and make note of the maximum safe crawling distance. Now, have the Sniper crawl alongside the railroad tracks (there is a small walkway there, where your commando will be safe from the charging locomotive), as far as he can without being seen. Then, when the guard is looking away (and there's no train blocking your view) put a bullet in his head and crawl back to the southern side of the tracks. Now, the three-guard patrol in the area will see the body, and will even sound the alarm, but don't worry; they're too far from the compound for the main alarm to be raised, and after a few seconds they'll just leave and go about their business.
Remember, from this point on, your goal is to get north to the parachute, have the relevant commandos grab their supplies, and then get inside the compound and blow the headquarters. The first thing you need to do is clear a path to the parachute, and there are quite a few ways to go about this. You could have the Green Beret take out each German one at a time with his knife, but time's a wastin'. So, here's what I recommend: Have your Green Beret crawl 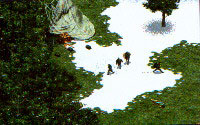 across the train bridge, bang a right, and then continue east, hugging the mountains. Directly to the north are several sections of wall (just like the ones at the beginning of the mission). Have your Green Beret position himself behind one, stand up, and draw his gun; it's time to forgo stealth and start blasting. Shoot the gun once to attract the nearest guards; they'll round the edge of the wall one at a time, making them easy targets. You can easily take out all the guards that come to investigate, and their shouts are too far away from the main compound to raise the alarm. From there, it's a simple matter to work your way northward, killing the last few guards, until you've got a clear path to the parachute. Make sure you stop and kill the driver of the truck when he stops to go into the building. You may take a few hits while all this killing is going on, but don't worry about it; you can always have the Driver administer some first-aid.
After you've moved all of your commandos to the parachute and picked up the equipment (bullets for the Sniper, bombs for the Sapper, and the machine gun for the Driver), it's time to do the job you came here to do -- destroy the headquarters. Have your entire team head north and then west to the compound, avoiding the few remaining patrolling guards to the south. When you get to the compound, position your team against the northern wall. 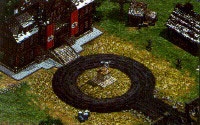 Before you can proceed from there, you'll need to have the Sniper take out that one patrolling guard to the southeast of your position. Kill him at the northernmost point of his patrol, and nobody will see the body. Now, your Sniper should have four bullets left. That's pretty convenient, considering there are four more patrolling guards out there you need to put out of their misery. Southeast of your current position is a single guard, patrolling in a short line from east to west. One shot, one kill. Then, patrolling to the west of that guard are three guards in a group. Your last three bullets will take them down before they know what hit them; just make sure they're out of range of the two guards in front of the compound entrance. Now, there's something you should know. You may encounter more or less guards. Chances are you'll encounter the same weird sight that I did -- several guards lying dead in the center of the compound, having been run down by the truck when it made its rounds earlier in the game! If you're not as lucky as I was, it's quite possible you'll have to deal with a few more guards, but chances are the truck will have taken out a few of them.
Now it's time to infiltrate the compound. The easiest way to take out the two guards at the front gate is to have the Sapper go up, out of view, and toss a grenade. That will kill both guards, and your commando will have plenty of time to run back north to his buddies before the guards from inside come to investigate. Let them come -- they'll mill around the bodies for a bit, and then go about their business. You'll notice that there are patrols in both the inner and outer sections of the compound. Fortunately, you'll be able to time it so you can run right past both groups, into the inner compound and behind the Swiss-style building to the northeast. 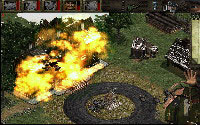 You'll notice that there are two stationary guards in this inner section, both facing west. One is located behind the headquarters, and the other is right in front, next to the fountain. It's a pretty easy affair to have the Green Beret ambush these guys from behind while the patrolling guards have their backs turned...just makes sure you do it quickly, and hide their bodies behind the headquarters. Now it's just a matter of taking out the patrol, and destroying the archway to the inner compound so the guards from outside can't get in. Pretty convenient that you have two grenades left, huh? All you need to do is have the Sapper run after the three patrolling guards when their backs are to you, and blow them to bits with a grenade. Then, immediately blow the archway leading into the inner compound. Now you're home free! Set the explosives, blow the headquarters, and hightail it out of there using the boat. No need to worry about the guards at the dock -- you blew them away ages ago!
![]()
![]()
![]()