
Level 12: Up on the roof
At first, Mission 12 looks pretty damned difficult: your men are scattered around the city; there are guards everywhere,; you have to rescue a prisoner; and the extraction point is pretty far away. But the mission briefing gives the player a valuable piece of information -- "...the alarm has been turned off." When an alarm is sounded, soldiers usually swarm out of a barracks or HQ and then remain a threat for the rest of the mission. 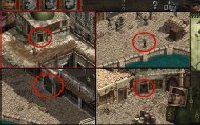 In Mission 12, the alarm has already been sounded, so the guards you see scattered throughout the first half of the map are really the only threat you'll have to face. The Germans already know you're there, so don't worry about sounding the alarm during the course of the mission while you're still on the rooftops. If you do, the most that will happen is three additional guards will come out of the central building on the lower level, but they can easily be taken care of. Remember, this only applies when you're on the rooftops: on the ground, near the extraction point, is another headquarters building, and sounding the alarm near there is definitely something you want to avoid. But for now, don't worry about that. Concentrate on getting your commandos together, rescuing the prisoner, and having some fun. Mission 12 really is one of those scenarios where you can just break the rules and do whatever you want; feel free to use the pistol to shoot guards, and otherwise cause a lot of commotion. After the prisoner is rescued, your group needs to move in a clockwise direction through the map in order to get to the extraction point.
Thankfully, Mission 12 starts you off with a uniformed Spy, who can be used to distract enemy soldiers while your other commandos are sneaking around. For now, you won't need him, though: 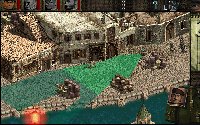 let the Green Beret swing into action. He is located in a building on the lower level, to the northwest of the Spy. When that single patrolling guard walks by the door -- and the patrol to the east is facing away -- have the Green Beret pop out, shoot the guard from behind, and then quickly return to hiding in the building. True, this will set off the alarm, but that's what you want: it's best to get those three extra guards into the picture now so you don't have to worry about them later. After the guards come over to investigate and then return to their patrols, have the Green Beret run west to the ladder and stay to the side of the building. Keep shooting the pistol until the three-man patrols come over to investigate. From your position, you should be able to shoot every guard as they come around the corner, without so much as getting a scratch. When that's done, the lower level will be clear. But don't get ahead of yourself and think you can rescue the prisoner just yet: those guards on the roofs are still a threat, and you'll need to take them out before you can make the jailbreak.
When all the guards at the top are turned away -- and be sure to use the Spy to distract if need be -- have the Green Beret climb the ladder and kill the first guard from behind. 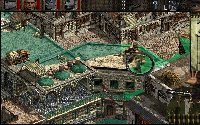 The other guards in close proximity will swarm to the sound of the gunshots, but you can easily shoot them with your pistol -- one by one -- as they run over. Don't worry about taking a couple of bullets: the Green Beret is a tough bastard and can take quite a beating; besides, you can heal any wounds using the Spy's first-aid kit. Once all those guys are dead, it's the Sniper's turn to get some action. The Sniper is in a small shack on the second level, with three German soldiers right outside his door. Move the Spy up there and have him distract while the Sniper pops out, snipes a couple of guards, and ducks back into the shack. He's got plenty of bullets, so don't be too concerned about wasting ammo. Be aware, however, that there are some guards offscreen to the right who will still be able to see the Sniper and shoot at him. It's best to use multiple cameras at this point just to be safe.
Once you've gotten a couple of guards out of the way, and cleared the ladder from view, you can have the Green Beret sneak up, hide by the side of a building or the pile of packages, and use the ol' "take a shot and attract the enemies" trick to kill a couple more guards. 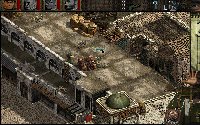 There will be a couple more soldiers who won't come over to investigate, so you'll have to use the Spy to distract them while the Green Beret sneaks up on them from behind. But don't kill the stationary guard on the rooftop to the north! Doing so may very well cause you to abort the mission, because guards to the east might see the killing. You'll notice at this point that there are two guards on the balcony beneath you, overlooking the lower level: you need to take them out before you can rescue the prisoner. This can best be accomplished by having the Spy climb down and inject them both from behind -- quick, easy, and silent. Once that is done, the lower level will be free from the gaze of any German soldier, and you can have one of the commandos go down and rescue the prisoner. Have everyone rejoin at the Sniper's shack, and get ready for the second and final phase of the mission.
From here on in, things get a little tricky. The easternmost part of the map, where your escape point is located, 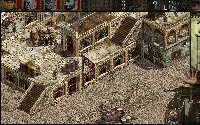 is thickly settled with guards and has another Nazi barracks. Sound the alarm over there, and you're in big trouble. It's time to put the pistols away and rely on your greatest weapon -- stealth. Remember, however, that you won't get the flashing lights and siren this time around is the alarm is sounded; if someone so much as yells the word "Alarm!" guards will begin pouring out of the headquarters, and that must be avoided at all cost. So, not only do you have to kill silently, you need to hide the bodies as well.
Your first task is to take out that single guard on the rooftop, using the Sniper. Be aware of the situation to the east -- there are two stationary guards looking your way (the Sniper can hide behind the pile of boxes and remain unseen); and any overt commando activity near the green-domed building will raise the alarm. 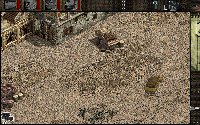 Once that single guard is dead, move the Sniper back to the safety of the shack. Use the Green Beret to pop out so the two guards to the east will see him. When they yell for him to halt, immediately go into the prone position and crawl behind the boxes to the west. They'll come over to investigate (one other guard may join them) and you can shoot them one by one as they come around the corner. From that point on the mission is tricky, but not overly difficult; the worst is certainly past. Keep moving your entire group, including the prisoner, clockwise, hiding in buildings as you go. Use the Spy to distract and the Green Beret to kill silently from behind, making sure to hide the body after each each kill. The toughest part will be getting down the stairs and making it to the escape vehicle, so your best bet is to use the Spy to distract the patrol so the others can sneak into the vehicle, then have him run to join them. Once everyone is safely inside, you'll drive away and the mission will end. Be warned, though: that's no tank you're getting into; it's just a plain old truck, and is very vulnerable to enemy fire.
![]()
![]()
![]()