
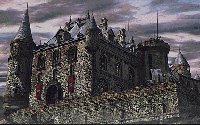
Level 20: Operation Valhalla
Okay, this is it -- the big one. Everything you've done so far has just been practice for this mission. The Nazis have stolen the plans for the atomic bomb, so as the mission briefing states, "If you fail, may God protect us!"
You've got a full crew for this mission, but they're in two different locations: the Sapper, Marine, Driver, and Sniper are all the way to the east; and the Green Beret and Spy (without the uniform) are all the way to the west. Both groups are safely hidden behind outcroppings of rock.
 Take a second to get familiarized with the castle. It's massive, guarded by a small army, and every inch is under watch by the soldiers. There are a few areas that should be of particular interest, though: a Panzer III tank, that can be used to rampage through the courtyard; a gun emplacement guarding the tank; the firing range, where you can shoot your pistol without fear of sounding the alarm; an underwater accessway along the eastern wall, which is currently blocked by a gate that can be opened using the nearby switch; and a clothes rack, where the Spy can steal a German uniform. This mission takes quite a while to complete, so don't worry about the time. Take it slow, do it right, and you'll save the world from the threat of Nazi domination once and for all.
For now, have the rest of the commandos sit still while the Green Beret does his thing.  Have him crawl north to the castle wall, and climb up. Stay on the wall until the single patrolling guard at the top begins travelling east; when his back is turned, run behind and kill him with the knife (his body will be safely hidden from view behind the building). Then, when no one is watching the guard by the searchlight, kill him with the knife as well (there's no need to hide the body). As soon as he drops, run back to the side of the building. When the coast is clear, you want to climb up the ladders to the turret and silently kill the other guard at the searchlight. When that's done, climb back down the ladders to the side of the building.
From the bottom of the ladder, crawl right until you get to the small section of wall (near the spotlight and dead guard) leading down to the lower level. When the patrolling guard turns east, climb down the wall.  Wait until the guards above are looking away, then run, kill the guard, and drop to the prone position. When it's clear, kill the two stationary guards who looking south. Don't worry -- nobody will see the bodies where they fall. From there, crawl down the stairs and onto the battlements. Your goal is to crawl counter-clockwise along the battlements, killing all the guards except the two standing together looking south; they're too close together, and killing them is sure to sound the alarm. This part of the mission is extremely difficult; if your timing isn't perfect you will be seen, and the guards will sound the alarm. Ultimately, you want to end up at the other end of the battlements, just to the north of the shooting range where there is a staircase down to the courtyard and a staircase up to more battlements. If things get tough, you may want to consider having the Sniper take out a couple of the guards from the outside of the castle. From there, have the Green Beret crawl back clockwise a ways and position himself at the ladder, in preparation of clearing out the shooting range area.
Climb down the ladder when the coast is clear and take cover once you get down. There's really more that one way to clear out this area, but your best bet is to open the water gate and have the Marine come in to lend a hand.  Silently kill the guards near the pool, and hide their bodies (in the corner of the building, next to the ladder, is as good a place as any). Have the Marine crawl from his position outside westward to the moat, and swim under the walls into the pool. Using a combination of the Green Beret's noise maker, his ability to hide bodies, and the Marine's harpoon, kill all of the guards in the shooting range area. As usual, be extremely careful so you're not seen. Now, here's the deal with the shooting range: you can shoot your gun in there and the alarm won't go off, but...if a German soldier shoots at you (and not a target) then it will go off. So, although it's possible to use the gun, I'd recommend against it. Once that area is clear, have the Marine get back to the safety of the water, and prepare the Green Beret for more killing.
Have the Green Beret crawl in a counterclockwise direction, hugging the wall as he goes, until he's comes the westernmost gate. Your goal is to clear out that gate so the Spy can get in and steal the uniform. 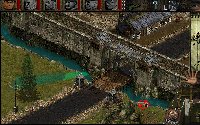 Take your time, killing the first few guards on the inside with your knife; make sure you find a good spot to dump the bodies (by the side of a building will work). See those four stationary guards just outside the gate? Do the same thing to them: kill each guard, one by one, stopping between kills to hide the bodies. Your greatest threat at this time is actually the patrol of three guards who pass through the gate. Avoid them at all costs. Once the gate is clear, you should be able to have the Spy sneak through the gate, bang a left, and get to the clothes rack; when the coast is clear, put on the uniform. Now that your Spy looks like a German officer, you can use him to distract soldiers and move about freely. If you've gotten this far, take heart -- you're actually farther along than you may think. From there, have your Sapper and Driver (who should still be in their starting positions) sneak counterclockwise around the outside of the castle, and hide behind the rock where the Green Beret and Spy started out. Wait there for a few minutes. Use the Spy and Green Beret (Spy to distract, Green Beret to kill and hide bodies) to essentially clear a path to the gun emplacement guarding the tank. Now it's time for some unorthodox maneuvering. Have the Sapper sneak into the compound, bang a left, and take the path that the Spy and Green Beret cleared for him, up to the gun emplacement. Being careful to avoid any leftover guards, place one of the remote control bombs right at the base of the gun. When the charge is set, have the Sapper crawl out of the compound and back to his position behind the rock. As a matter of fact, have the Green Beret and Spy join him there, as their work is done.
Before you blow the charge, move the Driver into the courtyard, following the same path that the Sapper just took. Have him stay right by the staircase to the south of the gun emplacement. 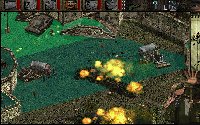 The next few minutes is going to be pure chaos. Split the screen so you have the Sapper in one window and the Driver and tank in another. Set off the charge to blow up the gun emplacement. The alarm will sound, and all hell will break loose, but at least you've got that nasty gun out of the way. Have your Driver run at breakneck speed for the tank; he may take a couple of hits, but those can always be healed later before you accomplish the mission. Once the driver is in that Panzer III tank, the mission is practically won. Drive around the entire map, killing every German soldier in sight. Take out the HQ buildings (just to spite Hitler), and then destroy the two V2 rockets. When the entire courtyard is cleared of enemy soldiers, send the Green Beret back in to mop up any stragglers. When it's safe, have the Sapper destroy the main castle building using an explosive. When all your objectives have been met, pile your commandos into the tank, have the Driver take it south to the extraction point, and celebrate the end of the war!
![]()
![]()