
Welcome to my walkthru for The Legend of Zelda: Ocarina of Time! I am currently starting a new game so I can do the best walkthru possible. I will put each section up as I get done, complete with maps (where needed)!

CHAPTER II: THE SEVEN SAGES
You awaken in the Chamber of the Sages. Rauru fills you in on the goings on for the past...what was that? Seven years!? Yikes...
Seems Ganondorf has obtained the Triforce and made a mess of things...better set them straight, no? Listen well to Rauru. He will add his power as the Sage of Light to yours.
You will then meet Sheik, a Sheikah. He will tell you of the five sages...one in a deep forest (Lost Woods), on a high mountain (Death Mountain), one under a vast lake (Lake Hylia), one within the house of the dead (Kakariko Graveyard), and one inside a goddess of the sand (Desert Colossus). Listen well to Sheik, for he will be your guide throughout this next leg of your journey.
PART I: The Sage of the Forest
Ok, now that you have talked to Sheik, you will have learned that you need an skill in Kakariko Village to get to the first temple. If you don't remember where that is, take a left from the castle gate, go across the bridge, and up the stairs.
As you walk out of the Temple of Time, you will see a red cloud over Death Mountian. The sky is dark, and there isn't a sound to be heard except the wind. The Market is now crawling with ReDead (zombies). Don't get too close or they will suck the life energy out of you. If you choose to go and see what is left of the castle, you will get your first glimpse of Ganon's Castle...a nightmarish place if ever there was one.
But, let's head to Kakariko Village now. You may also use this time to get Epona the horse if you wish.
KAKARIKO VILLAGE
When you get to Kakariko, feel free to wander around a bit. Things sure have changed here! You will find out that Dampe has died during the past years, and that a few other things are different as well. If you have Epona, you can begin the trading sequence to get the Biggoron Sword. If not, it's ok. Your destination is the Graveyard, so mosey on over there when you are ready.
When you get to the Graveyard, if you have not learned the 'Sun Song' yet, you might want to do that now. If you have already done so, then let's get going. You will notice that near the ledge with the crate on it, there is a new grave with some flowers (the grave was there before, but now it has flowers). Go ahead and pull it open, then drop into the hole.
You will be inside what looks like an underground temple. The ghost of Dampe will challenge you to a race through the tunnels of the underground temple. If you get a good time in the race (under 1'30" I believe), he will give you the hookshot. Aha! Now maybe we can get into the forest temple! The exit behind you will close, so go into the next room. The exit behind you will close again, and you will seemingly be stuck in the room. But wait...what's that? There is a large blue block will the Door of Time symbol on it. Play the 'Song of Time', and the block will disappear. Go up the stairs, and you will come out in the windmill. Hop onto the rotating boards, and grab the heart piece before you go.
Stock up on stuff if you need to, then head off to Kokiri Forest.
KOKIRI FOREST
When you reach Kokiri Forest, you will find that it has become infested with monsters! Hmm...the only way to save Kokiri is to destroy the evil in the Forest Temple, so let's hurry!
LOST WOODS/SACRED FOREST MEADOW
Hop up on into the Lost Woods and head to the Sacred Forest Meadow. If you don't remember how to get there, go right, left, right, left, straight, left, right. At one point, Mido will block your way. Play SARIA'S SONG for him and he will let you pass. When you get the the Sacred Forest Meadow, there will be some large bear creatures with big spears. Attack them from behind with the hookshot. If they see you they will charge, so be careful! When you reach the stairs, you will see a huge bear-guy. His large club will make shock waves in the ground, so run a zig-zag pattern to avoid them. When you get behind him, smack him with your sword.
Go up the next set of stairs to where you found Saria as a kid. Seems no one is around today... Or is there? Sheik will make an appearance and teach you the 'Minuet of Forest', which will enable you to warp to the Forest Temple anytime you want to. Afetr that, hookshot to the tree branch and walk through the doorway.
FOREST TEMPLE
Enemies:
Blue Bubble (use hookshot to stun, or hit them with your shield, then attack)
Green Bubble (same as Blue Bubble)
Big Skulltula (use the hookshot)
Skullwalltula (use hookshot/bow)
Wolfos (defend and attack)
Stalfos (defend and counter, watch for jump attack)
Wallmaster (drops from ceiling...watch for a shadow)
Octorok (deflect their rocks back at them, or use bow/hookshot)
Deku Baba (slash it)
Big Deku Baba (block it's lunges, then attack)
Floormaster (block it when it flies toward you, then attack...kill smaller ones before they grab you)
Ghost Sisters (see below)
Phantom Ganon (see below)
Treasure:
Map (2nd floor, room L)
Compass (2nd floor, room G)
Boss Key (2nd floor, room D)
Bow (2nd floor, room F)
Keys (1st floor, rooms C, G; 2nd floor, rooms A, E; B1, room A)
Arrows (1st floor, room I; 2nd floor, room B; B2, room A)
Recovery Heart (1st/2nd floor, room H/M)
Secrets:
Gold Skulltulas: 4
First Floor
Now you have entered the Forest Temple. As you walk towards the door, 2 Wolfos will attack you. Dispatch them easily with some sword action. efore you go through the door, climb the vines and grab the silver key in the small chest on top of the large tree. Now you can go inside. When you get inside the Temple, four ghosts will appear, and then vanish. You'll tackle them later, so don't worry about them yet. Head off kinda north-westerly and you will see a large,blue block (#1). Stand in front of it and play the 'Song of Time'. It will disappear, leaving you a door to go through. Go through it. Take a right and climb the vines to the small alcove. Take out the Skullwalltulas with the hookshot. The very top one might be too far up to reach, so just climb on the far right to avoid it.

Second Floor
Go in the door and defeat the Blue Bubble to earn the MAP. out the other door (with the symbol above it) and you will be on a balcony. Use the hookshot to grab onto the bulls-eye target on the balcony adjacent to you (#2). Step on the switch to drain the water from the well. Drop down from the balcony and hop into the well. If you're running low on hearts, you can hookshot to the small island for a recovery heart in the chest.

Basement 1
Once in the well, head to the other side and get the silver key in the chest. Climb out and you will find yourself back in the first courtyard you visited.

First Floor
Go back into the main room and go through the door up the staircase on your left. Kill the Blue Bubble, go through the door and you will have your first encounter with Stalfos Knights (room G). Block their attacks and counter, but be careful of their leap attacks! Remember that you aren't super tough yet. There's a fairy and heart in the jars should you need them. Once you have defeated the Stalfos, get the key and head back to the main room. Go up the stairs and through the door to your right. Kill the Big Skulltula and continue through the next door. You will find yourself in a big room. Climb up the ladder in front of you, and then up again. Follow the corridor and you will see some arrows painted on the floor (Navi will point them out to you) and a large, grey block. Pull the block out, then push it along the direction of the arrows. You will need to circle around the wall to push it all the way into the hole. Go back to where you pulled out the block and climb the ladder. Take a right, then another right, and you will see a large, red block. Push it as far as you can, then go back down the ladder. Climb up onto the grey block, then up again. Push the red block into the hole, then climb up it, and then up the ladder to the right.

Second Floor
Go through the locked door after killing the Blue Bubbles (if you want, of course). Whoa! What a twisted hallway! Navi thinks so, too. Go on through and into the next room (room D). Be wary of the Wallmaster that lurks here (if you get caught, you will go back to the beginning of the level) and go through the door on your right. Don't worry about the big chest on the wall, you'll get it later. You will see a picture with a ghost in it in this next room. It will disappear when you get close. Don't worry about this either...all in good time. Go down the stairs and through the door to the room with the big hole in the floor (room F). A Stalfos will challenge you. Take him out, but be careful of that hole! Although he can walk over it, you cannot. After he is dispatched, the floor will drop down, and two more Stalfos will appear! What's with the double-teaming here guys!? Anyhow, after you have beat one, kill the other as fast as you can or Stalfos #1 will come back to life! Once you defeat both however, you will win the BOW! Cool beans! Go back into the room you came from and like before, one of the pictures will have a ghost in it. Shoot it with the bow and it will burn up. Repeat for the other two pictures, and Julie the Ghost will appear. KIll her (she's not too hard...block when she swings her torch, and attack when she appears) and grab the key. Go back up to the room with the big chest on the wall and go through the twisted hallway again. When you get to the room with the Blue Bubbles, turn around and use the bow to shoot the eye switch above the door. The hallway will straighten out! Go back through it and you will see that the chest is now on the 'floor'. Open it to get the BOSS KEY! Drop down into the hole in the floor and kill the Blue Bubbles to open the door.

First Floor
Go out into the courtyard and kill the Big Deku Baba. Go into the door in the second alcove (#3). Defeat the Floormaster for a silver key. Go out to the courtyard again, and go into the door directly to your right. Work your way back up to the eye switch, and shoot it to twist up the hallway again.

Second Floor
Go back to the Stalfos room, and this time take the other door (the one with the symbol above it). Shoot the pictures as before to make Beth the Ghost appear. Defeat her as you did Julie to get the COMPASS. Continue up the stairs and through the door. You will be in another wierd room. Climb the ladder on the right and go though the hallway into the next room (room J). You will be in a room with a frozen eye switch and rotating pillars. Get onto one of the pillars and shoot an arrow through the torch in the center at the eye switch. It will unfreeze and switch on. The hallway will twist up. Go through it and fall through the hole in the wired room.

First Floor
You will land in a large room with a checkered floor (room I). If you try to walk across, the ceiling will fall and crush you. There are safe spots, though. Look for the shadows of the Big Skulltulas hanging around. Make them drop down, kill them, then stand in their spot. You will be safe when the ceiling falls. Do this and head for the switch on the right side to open the door. You can get the chest if you need some arrows, too. Go through the door into the next room. Shoot the picture of the ghost and 5 blocks will fall down. Arrange them to form the picture of the ghost in the time limit to make Amy the Ghost appear. The dark block is a fake, so the only time you should move it is to get it out of the way. Kill Amy like you did Julie and Beth, and go through the door back into the main room. Meg the Ghost will now make an appearance. She will split into 4 images and move around you. Stay in one spot and use the bow or hookshot to shoot at the images. If you hit her, she will disappear and try again. Hit her 4 times to defeat her. An elevator will pop up after you defeat her. Make sure you have what you need, and head on down.

Basement 2
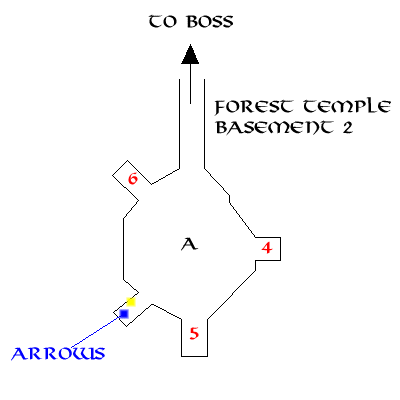
You will end up in a large room with slabs of stone sticking out from the wall. Push the slabs to make the wall rotate. In doing so, you can align the holes in the wall to open switches (#4,5,6). I won't tell you exactly how to do it, but it shouldn't take more than 5 minutes. After flipping the 3rd switch, you will be able to enter the hallway with the large locked door. Open the door and go up the stairs to the room with the pictures. Hm...seems no one is home. But as you try to leave, bars pop up, trapping you...

BOSS TIME!!!!!
Evil Spirit from Beyond, also known as Phantom Ganon...
This ghostly apparition of Ganon sits upon an equally ghostly horse. At first, he will fly into one of the pictures. Position yourself on one of the small Triforces around the edge of the room and you will be safe from his magic until you dismount him. To do so, fire an arrow at him as he rides out of a picture. Be careful, sometimes you will see two Ganon's coming from pictures. As long as you are standing on a Triforce, however, you won't take damage in case you should happen to miss. After you dismount him, use your sword to deflect his energy balls back at him. Play tennis with him until he takes a hit, then run up and slash him. Repeat until dead. He can be tough sometimes, so be careful. Bring a potion or a fairy if you think you might need one.
After you have dispatched him, grab the heart and warp out.
AFTERMATH
You meet Saria and she gives you the Forest Medallion. Afterwards, you meet the Deku Tree Sprout. He will tell you about where you came from, and that you are actually a Hylian, not a Kokiri! That's why you grew up over those seven years. He will talk to you a bit about your destiny and stuff, then it's time to move on!


