VidWorks Entertainment New Developer Training Program
Tutorial #6
Advanced Graphics Techniques
Inversion
You know what would be a really cool feature? If we could take an image and invert all the colors. Actually, the Graphics class has a method:
void setXORMode(Color cl)
This function puts the painter into a mode where if you paint over the given color, it'll swap it with the current color, and if it sees the current color, it'll swap it with the given color. Whatever painting function you do, if you do the exact same function again, you'll complete reverse the previous function (as the XOR name suggests).
The XOR mode has a side effect that if you choose the XOR mode color and the current color to have opposite bits (such as black and white), you'll have an inverting effect.
I think an example speaks best:
|
/* Inversion.java */ import java.applet.*; import java.awt.*; import java.io.*; import javax.imageio.*; public class Inversion extends Applet { Image
img; public
void init() { try
{ img
= ImageIO.read(new File("vidlogo.gif")); }
catch (IOException e) { System.out.println("Error loading image!"); } setBackground(Color.black); } public
void paint(Graphics g) { g.drawImage(img,
0, 0, null); g.setXORMode(Color.BLACK); g.setColor(Color.WHITE); g.fillRect(50,
50, 300, 100); } } |
Here's a screenshot:
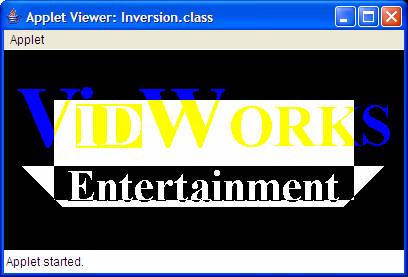
This is basically the same as the image drawing example from the previous tutorial, except that after drawing the image, we set the Graphics class into XOR mode and drew a rectangle, inverting the center of the image.
Use setPaintMode() to return the painter to normal mode.
Screen Fade
Another really cool effect would be to fade the screen in and out. There's no way to do this directly with AWT, so we apply a little trick. We set a partially transparent color and then draw a rectangle of that color over the entire window. This gives the illusion of a fade.
For example, if we wanted a scene to be rendered at 30% brightness, we set the color to black with an alpha value of 0.7f and draw a rectangle onto the screen. If we wanted to render a scene that was 25% red, we'd set the color to red with an alpha value of 0.25f and draw a rectangle.
Here's a code example:
|
/* ScreenFade.java */ import java.applet.*; import java.awt.*; import java.io.*; import javax.imageio.*; public class ScreenFade extends Applet implements
Runnable { static
final int FRAMETIME = 40; static
final int FADEFRAMES = 25; boolean
running = true; Image
buffer, img; Color
fadeColor; public
void init() { try
{ img
= ImageIO.read(new File("vidlogo.gif")); }
catch (IOException e) { System.out.println("Can't load file!"); } setBackground(Color.BLACK); buffer
= createImage(400, 200); new
Thread(this).start(); } public
void update(Graphics g) { paint(g); } public
void paint(Graphics g) { Graphics
bgfx = buffer.getGraphics(); bgfx.setColor(getBackground()); bgfx.fillRect(0,
0, 400, 200); bgfx.drawImage(img,
0, 0, null); //
set to a transluscent color and fill the window //
with a rectangle for a fade effect bgfx.setColor(fadeColor); bgfx.fillRect(0,
0, 400, 200); g.drawImage(buffer,
0, 0, null); } public
void run() { fadeIn(FADEFRAMES,
0.0f, 0.0f, 0.0f); while
(true) { if
(!running) return; fadeOut(FADEFRAMES,
1.0f, 0.0f, 0.0f); fadeIn(FADEFRAMES,
1.0f, 0.0f, 0.0f); if
(!running) return; fadeOut(FADEFRAMES,
0.0f, 1.0f, 0.0f); fadeIn(FADEFRAMES,
0.0f, 1.0f, 0.0f); if
(!running) return; fadeOut(FADEFRAMES,
0.0f, 0.0f, 1.0f); fadeIn(FADEFRAMES,
0.0f, 0.0f, 1.0f); } } void
fadeIn(int numFrames, float red, float green, float blue) { float
delta = 1.0f / numFrames; float
alpha; for
(int i = numFrames-1; i >= 0 && running; i--) { try
{ Thread.sleep(FRAMETIME); }
catch (InterruptedException e) { } alpha
= delta * i; fadeColor
= new Color(red, green, blue, alpha); repaint(); } } void
fadeOut(int numFrames, float red, float green, float blue) { float
delta = 1.0f / numFrames; float
alpha; for
(int i = 1; i <= numFrames && running; i++) { try
{ Thread.sleep(FRAMETIME); }
catch (InterruptedException e) { } alpha
= delta * i; fadeColor
= new Color(red, green, blue, alpha); repaint(); } } public
void stop() { running
= false; } } |
Here's the obligatory screenshot:
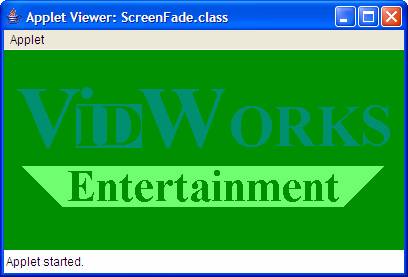
This code simply combines the image drawing example with the animation example. Inside the thread that controls the animation, we have some for loops that will vary the alpha value and set the color. Then, these two lines:
bgfx.setColor(fadeColor);
bgfx.fillRect(0, 0, 400, 200);
These two lines set the faded color, then fill the whole window with a rectangle, making it appear as though the image was fading into solid green.
Sprites
What would you do if you wanted an animation that flips between 4 images? Well, the stupid solution would be to create 4 different images and in every frame, switch to the next image. However, that's not the way game developers work.
To reduce overhead for opening files, we usually load a series of related images into a single file. When we start the program, we then load the entire image file into memory. When we want to display one of the smaller images, we just select a small portion of the image file and draw it using this method:
boolean drawImage(Image img, int dx1, int dy1, int
dx2, int dy2, int sx1, int sy1, int sx2, int sy2, ImageObserver observer)
where (dx1, dy1) and (dx2, dy2) are the corners of the destination rectangle and (sx1, sy1) and (sx2, sy2) are the corners of the source rectangle.
Here's a code example:
|
/* Sprites.java */ import java.applet.*; import java.awt.*; import java.io.*; import javax.imageio.*; public class Sprites extends Applet implements
Runnable { static
final int FRAMETIME = 125; boolean
running = true; Image
buffer, img; int
index = 0; public
void init() { try
{ img
= ImageIO.read(new File("sprite.gif")); }
catch (IOException e) { System.out.println("Can't load file!"); } setBackground(Color.BLACK); buffer
= createImage(300, 200); new
Thread(this).start(); } public
void update(Graphics g) { paint(g); } public
void paint(Graphics g) { index
= (index + 1) % 4; Graphics
bgfx = buffer.getGraphics(); bgfx.setColor(getBackground()); bgfx.fillRect(0,
0, 300, 200); //
grab a piece from the file and draw it onto the screen int
fromX = 150*index; bgfx.drawImage(img, 75,
25, 225, 175, fromX,
0, fromX+150, 150, null); g.drawImage(buffer,
0, 0, null); } public
void run() { while
(running) { try
{ Thread.sleep(FRAMETIME); }
catch (InterruptedException e) { } repaint(); } } public
void stop() { running
= false; } } |
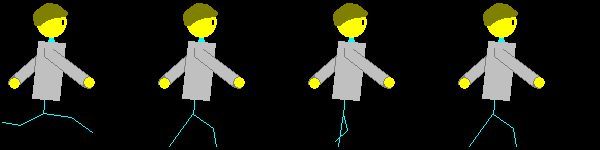
This was the original image:
This is using Sprites to animate:

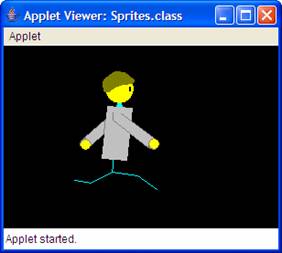
Again, this example combines image drawing and animation. However, instead of using multiple files and using the regular drawImage() method, we use a single image and draw parts of it at a time using the other overloaded drawImage() method with 10 arguments.
Image Break
There's actually a much neater trick that we can do with the overloaded drawImage() method. If you've ever played Final Fantasy, you'll see that some bosses die piece by piece rather than all at once. With the overloaded drawImage(), we can achieve a similar effect.
In our case, we're going to use drawImage() to draw an image line by line. With clever logic, we'll group all the even lines and odd lines and have them oscillate in opposite directions.
Well, at this point, the best thing to do is to show you the code, then have you try it out for yourself:
|
/* ImageBreak.java */ import java.applet.*; import java.awt.*; import java.io.*; import javax.imageio.*; public class ImageBreak extends Applet implements
Runnable { static
final int FRAMETIME = 40; static
final double D_THETA = 0.05; static
final double TWO_PI = 2*Math.PI; boolean
running = true; Image
buffer, img; double
theta = 0.0; public
void init() { try
{ img
= ImageIO.read(new File("vidlogo.gif")); }
catch (IOException e) { System.out.println("Can't load file!"); } setBackground(Color.WHITE); buffer
= createImage(600, 400); new
Thread(this).start(); } public
void update(Graphics g) { paint(g); } public
void paint(Graphics g) { theta
+= D_THETA; if
(theta > TWO_PI) { theta -= TWO_PI; } Graphics
bgfx = buffer.getGraphics(); bgfx.setColor(getBackground()); bgfx.fillRect(0,
0, 600, 400); //
Make the two groups oscillate in opposite directions int
dx = (int) Math.ceil(100*Math.cos(theta)); int
oddDestX = 100 + dx; int
evenDestX = 100 - dx; //
Iterate through each line and find its position for
(int i = 0; i < 200; i++) { int
destX = (i%2==0)?evenDestX:oddDestX; int
destY = i+100; bgfx.drawImage(img, destX,
destY, destX+400, destY+1, 0,
i, 400, i+1, Color.BLACK,
null); } g.drawImage(buffer,
0, 0, null); } public
void run() { while
(running) { try
{ Thread.sleep(FRAMETIME); }
catch (InterruptedException e) { } repaint(); } } public
void stop() { running
= false; } } |
And here's just a taste of what it looks like (it's more impressive when animated):

It also looks better when it's not compressed.
In any case, this is, again, based on your run-of-the-mill image drawing and animation paradigm. However, a few notes about the logic in the paint() method (commented briefly in the code sample). The first block generates the x-coordinate of the lines. They both oscillate about the same axis, but in different directions.
The second block is a for loop. It runs through all the lines of the image and, based on modulo two, divides them into even lines and odd lines, then use the drawImage() method to draw one line.
Graphics2D Class
Before we can continue this tutorial any further, we need to introduce to you a new graphics class. In fact, it's a sub-class of the Graphics class that we all know and love. The Graphics2D class is an extension of the Graphics class with added functionality and power. In fact, the way that most graphics engines are implemented is closer to the Graphics2D class than the Graphics class. Before we can use the Graphics2D class any further, however, we need to discuss 3 things.
First of all, how do we obtain an instance of the Graphics2D class? Remember how in all animated applets, we got the Graphics class from the image buffer using a line like:
Graphics
bgfx = buffer.getGraphics();
Well, it turns out the getGraphics() function actually returns a Graphics2D object. All we have to do is cast it, like so:
Graphics2D
bgfx = (Graphics2D) buffer.getGraphics();
Incidentally, the Graphics argument passed into the update() and paint() methods are also Graphics2D objects, so you could also pass those (except we usually use the Graphics object from the image buffer rather than the Graphics object passed into the paint() method.
Second of all, we need a notion of image transformations. Suppose we had an image. Now, it's pretty simple for us to translate (move) it arbitrarily about the screen. All we have to do is pass in different x and y values into the drawImage() method. Scaling (stretching) is also pretty trivial. We could just use the more complicated drawImage() method and pass in two source coordinates and two destination coordinates. But what if you want to do other transformations, like rotate and shear (skew)?
Well, all linear transformations can be decomposed into translations, scales, and rotations (technically, shears can be decomposed into two rotations and a scale). These are the elementary transformations. Also, all transformations can be expressed as a matrix operation. Essentially, if your image is at position x, you can move it to position y by left-multiplying x by several transformation matrices--for the purpose of our tutorial, let's call them A, B, and C, and you want to apply them in that order, where A, B, and C are elementary transformations. In this case, the matrix formula you would end up with is y=C*B*A*x. Note that matrix left-multiplication occurs from right to left (well, that's technically not true, but it's a good way to think of it), so A indeed is applied first, and C applied last.
Fortunately, the Graphics2D class provides the following member functions that, if your current matrix equation is y=M*x, and the operation is transformation T, then you end up with the new location y'=M*T*x:
void translate(double tx, double ty)
void rotate(double theta) - theta is counter-clockwise and in radians
void scale(double sx, double sy)
void shear(double shx, double shy) - included here for completeness
Now, back to our example of transforming x into y using A, B, and C (y=C*B*A*x). If you take the matrix multiplication C*B*A and multiply it out (let's say you get the answer M), then you can write this matrix equation as y=M*x. Now, let's say you wanted another image, at x' and you wanted to transform it into y' using the same transformations A, B, and C. Well, you could apply A, B, and C separately, or you could apply the compound transformation M, since y'=C*B*A*x', and C*B*A=M, so y'=M*x'.
This is actually a very profound result, because let's say you had a group of items that you want to transform in the exact same way. Well, now, instead of storing A, B, and C and transforming each item 3 times, all you need to do is store M and transform each item once. This gives you a 3-to-1 improvement in both speed and memory.
The third thing is an extension of the previous paragraph. Let's so you have an object which is made up of several images. Now, each image has to be transformed differently in order to properly build up the object (perhaps the object is a monster, and there's an image for its leg, its arm, its torso, etc). Now, we could either figure out exactly where all the body parts are on screen and do some complex calculation to figure out the best way to transform each image, or we could simply assume that the object is at some default location and orientation (let's say, centered at (0, 0)) and first transform the images to the default object. Of course, the object is not centered at (0, 0), so we'll have to transform the entire object to its proper location and orientation.
Thus, in essence, we want to apply the compound transformation M*N to each image (note that M and N could also be compound transformations), where M is the same for all images and N is different for all images. N is called the image to object transformation, and M is called the object to world transformation.
Thus, the ideal scenario is, you apply M. Then, you apply N for the first image, draw the image, and un-apply it. Then, you apply N for the second image, draw the image, and un-apply it, and so forth.
You could actually chain this arbitrarily deep. (You might have a case where images make up object components, and object components make up objects, and objects make up super-objects, etc. It's more common in 3D graphics than 2D graphics.) Thus, it could happen where you have to first apply transformation M, then sequentially a bunch of transformations N, then for each N, you may have to sequentially apply a bunch of transformations P.
In order to make this work smoothly, however, (since if you keep on having to recalculate M*N, it could waste a lot of time), you need a way to save the state of the transform. One of the popular ways of saving the state is using a matrix stack. Let's say, you have a stack with matrix M at the top:
stack...->M
Now, let's push a copy of M onto the stack. We now have:
stack...->M->M
Now, we wanted to apply N for the first image, so let's do that:
stack...->M->N1
Then, we draw the first image. Now, we could simply recompute M, but why would we do that? We have it saved on the stack. All we have to do is pop off N1:
stack...->M
And now, we're free to push another copy of M onto the stack and apply N2 to it. Also, it's easy to see that this extends to stacks of any depth.
Fortunately, the Graphics2D class has methods that allow you to get and set the current transformation, which is an object of the class AffineTransform:
AffineTransform getTransform() - returns a copy of the current transform on the Graphics2D object
void setTransform(
Unfortunately, Java doesn't natively implement its own matrix stack, so we'll have to create our own. If you know what the max size of your stack is, you could simply use an array-based stack, as follows:
AffineTransform[] transformStack = new
AffineTransform[STACK_HEIGHT];
int stackPointer = 0;
It'd be really nice to define push and pop functions, since a stack just isn't a stack without them. Thus, I hand-coded the following functions:
void pushMatrix(Graphics2D g) {
transformStack[stackPointer++]
= g.getTransform();
}
void popMatrix(Graphics2D g) {
g.setTransform(transformStack[--stackPointer]);
}
Now, we need to know everything we need to know to draw pretty 2D graphics in Java. Incidentally, this is the same model that OpenGL uses (in fact, I based this section of the tutorial based on my experiences with OpenGL), so aspiring 3D programmers, take this section to heart.
(For more details, please take a Computer Science course on Computer Graphics. The details of Computer Graphics transformations is out of the scope of this tutorial. All I plan to do is teach you just enough so that you can write the code to make multimedia programs.)
However, this is considerably more talk than I ever recall writing for any of my other tutorials. To help you get a better understanding, I'll present to you my code sample, which embodies everything I've talked about above.
|
/* Graphics2DDemo.java */ import java.applet.*; import java.awt.*; import java.awt.geom.*; import java.io.*; import javax.imageio.*; public class Graphics2DDemo extends Applet
implements Runnable { static
final int FRAMETIME = 40; static
final double D_THETA = 0.25; static
final double IMAGE_TO_OBJECT_DX = -200; static
final double IMAGE_TO_OBJECT_DY = -100; static
final double OBJECT_TO_WORLD_DX = 200; static
final double OBJECT_TO_WORLD_DY = 200; static
final int STACK_HEIGHT = 2; boolean
running = true; double
theta = 0; Image
buffer, img; AffineTransform[]
transformStack = new AffineTransform[STACK_HEIGHT]; int
stackPointer = 0; public
void init() { try
{ img
= ImageIO.read(new File("vidlogo.gif")); }
catch (IOException e) { System.out.println("Error loading file!"); } buffer
= createImage(400, 400); new
Thread(this).start(); } public
void update(Graphics g) { paint(g); } public
void paint(Graphics g) { theta
+= D_THETA; Graphics2D
bgfx = (Graphics2D) buffer.getGraphics(); bgfx.setColor(Color.BLACK); bgfx.fillRect(0,
0, 400, 400); pushMatrix(bgfx); //
object to world transformation bgfx.translate(OBJECT_TO_WORLD_DX,
OBJECT_TO_WORLD_DY); pushMatrix(bgfx); //
image to object transformation bgfx.rotate(theta); bgfx.translate(IMAGE_TO_OBJECT_DX,
IMAGE_TO_OBJECT_DY); bgfx.drawImage(img,
0, 0, null); popMatrix(bgfx); popMatrix(bgfx); g.drawImage(buffer,
0, 0, null); } void
pushMatrix(Graphics2D g) { transformStack[stackPointer++]
= g.getTransform(); } void
popMatrix(Graphics2D g) { g.setTransform(transformStack[--stackPointer]); } public
void run() { while
(running) { try
{ Thread.sleep(FRAMETIME); }
catch (InterruptedException e) { } repaint(); } } public
void stop() { running
= false; } } |
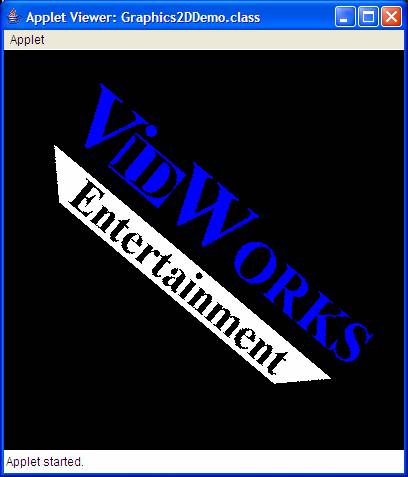
Before I show you a screenshot, let me explain what it does. Essentially, it takes the VidWorks logo and centers it at (0, 0) as its image to object transform. Then, it rotates it a bit. Then, it centers the logo onto the applet as the object to world transform. The rotation is slightly increased with every frame, so what you end up with is a spinning VidWorks logo.
Run it at 400x400 and you'll get something like this:
Now, there was an incredible amount of information in this section of the tutorial. To get a complete grasp on the subject, I highly recommend you experiment a bit with the techniques covered in here. Only with experience can you truly understand how this stuff works.
Image Fading
You know what's another really cool death effect among RPG monsters? When the monster just kinda fades away. You know, when the monster becomes translucent, and it becomes more and more translucent until it disappears completely. Well, we already know how to do translucency with solid colors (recall the alpha channel in the color class), but how do we do translucency with an entire image?
Fortunately, the Graphics2D class also gives us that ability. The Graphics2D class contains a member called the Composite, which is an interface that basically tells the Graphics2D class, whenever it draws something to the screen, how to composite the drawn object with objects already on screen. By default, the Composite tells the Graphics2D object to draw opaquely, thereby overwriting anything we had in the image underneath. We can get and set the Composite using these member functions on Graphics2D:
Composite
getComposite()
void setComposite(Composite comp)
In order to change the Composite to one that allows us to draw with a bit of translucency, we need to set the Composite to one with an alpha value. There's a class called AlphaComposite, which implements the Composite interface. However, we can't simply create a new instance of the object. Instead, we'll use the following line:
AlphaComposite.getInstance(AlphaComposite.SRC_OVER, [some alpha value (float)]);
Remember that a higher alpha value means more opaque.
Anyways, here's a simple code sample that draws an image, then draws a translucent image over it:
|
/* ImageDemo.java */ import java.awt.*; import java.applet.*; import javax.imageio.*; import java.io.*; public class ImageFade extends Applet { Image
logo, sprite; public
void init() { try
{ logo
= ImageIO.read(new File("vidlogo.gif")); sprite
= ImageIO.read(new File("sprite.gif")); }
catch (IOException e) { System.out.println("Error loading images!"); } setBackground(Color.black); } public
void paint(Graphics g) { g.drawImage(sprite,
0, 25, null); Graphics2D
g2d = (Graphics2D) g; Composite
oldComp = g2d.getComposite(); Composite
alphaComp = AlphaComposite.getInstance(AlphaComposite.SRC_OVER,
0.5f); g2d.setComposite(alphaComp); g2d.drawImage(logo,
100, 0, null); g2d.setComposite(oldComp); } } |
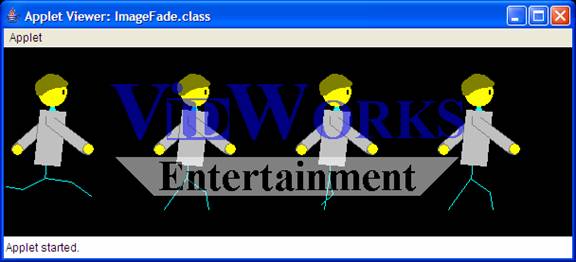
Notice that in this code sample, we first save the old Composite in the variable oldComp. Then, after drawing the translucent image, we set the Composite back to oldComp. This is because after drawing something, we always want to return the Graphics object back to its original state, in case another method wants to use the same Graphcs object to draw something else.
Anyways, if we run this as a 600x200 applet, we get the following screenshot:
You should already know more than enough to make this effect animated.
Full-Screen Mode
Honestly, how many computer games run in windowed mode? Well, granted, they've become more and more popular these days because people like to play their computer games while running AIM, but traditionally, computer games have run full-screen, and for our last section, I'm going to teach you how to run a program in full-screen mode.
This section has a lot of interconnected stuff, so I'll do something different this time. Rather than explain how everything works and then giving you the code sample, I'm going to give you the code sample and then teach you everything through the code sample:
|
/* FullScreen.java */ import java.awt.*; import java.awt.event.*; import java.io.*; import javax.imageio.*; public class FullScreen extends Frame implements
KeyListener { GraphicsDevice
fscreen; DisplayMode
oldDisp, newDisp; Image
img; public
FullScreen() { super("This won't appear unless full-screen
fails."); } public
void initFrame() { fscreen
= GraphicsEnvironment.getLocalGraphicsEnvironment().getDefaultScreenDevice(); try
{ img
= ImageIO.read(new File("vidlogo.gif")); }
catch (IOException e) { System.out.println("Can't load image!"); } setBackground(Color.BLACK); // set up full-screen mode setVisible(false); setSize(800,
600); if
(fscreen.isFullScreenSupported()) { setUndecorated(true); setIgnoreRepaint(true); fscreen.setFullScreenWindow(this); if
(fscreen.isDisplayChangeSupported()) { oldDisp
= fscreen.getDisplayMode(); newDisp
= new DisplayMode(800, 600, oldDisp.getBitDepth(), oldDisp.getRefreshRate()); fscreen.setDisplayMode(newDisp); } } addKeyListener(this); setVisible(true); requestFocus(); redraw(); } public
void paint(Graphics g) { render(g); } public
void redraw() { Graphics
gfx = getGraphics(); render(gfx); gfx.dispose(); } public
void render(Graphics g) { g.drawImage(img,
200, 200, null); g.setColor(Color.WHITE); g.drawString("Press
'Q' to quit...", 10, 590); } public
void keyPressed(KeyEvent e) { } public
void keyReleased(KeyEvent e) { } public
void keyTyped(KeyEvent e) { char
typed = e.getKeyChar(); if
(typed == 'q' || typed == 'Q') { //
quit if
(fscreen.isDisplayChangeSupported()) { fscreen.setDisplayMode(oldDisp); } if
(fscreen.isFullScreenSupported()) { fscreen.setFullScreenWindow(null); } System.exit(0); } } public
static void main(String args[]) { FullScreen
fr = new FullScreen(); fr.initFrame(); } } |
First, let's go over what this example very abstractly. Basically, this example normally runs as a Frame (Java window). We obtain the GraphicsDevice from the system, then call member methods of the GraphicsDevice and pass in the Frame to make it full-screen. Note that we could have also used a JFrame for this example, but I opted to use a regular Frame for simplicity's sake.
All
right, the first place we want to look at is the initFrame() method. Recall that since this is a
Frame and not a JFrame, we can omit the lines JFrame.setDefaultLookAndFeelDecorated(true) and fr.setDefaultCloseOperation(JFrame.EXIT_ON_CLOSE). The
first thing that we do in the initFrame() method is to obtain the GraphicsDevice
and storing it in variable fscreen. The static method GraphicsEnvironment.getLocalGraphicsEnvironment() returns the GraphicsEnvironment,
which is a class representing, um, the current graphics environment. The
GraphicsEnvironment class has the method getDefaultScreenDevice(), which is how we obtain our
GraphicsDevice.
The second thing we do is load an image (kind of mundane by now), but the third thing we do is set the window to full-screen mode. First, we have to do setVisible(false), because we can't upgrade to full-screen on a visible window. Now, let's suppose that we want to display our program at 800x600 resolution (kind of small, yes, but it's just an example). Well, just in case our full-screen thing fails, we want the window to at least be the right resolution, so we do setSize(800, 600). Then, we have to check fscreen.isFullScreenSupported(), because if full-screen mode isn't supported, there's no point in trying to set the program to full-screen mode. setUndecorated(true) removes all the borders and title bars and all those other things that we don't want to see in a full-screen application. setIgnoreRepaint() tells the system to ignore calls to the repaint() method (more on this later). Finally, we call fscreen.setFullScreenWindow(this), where this is a pointer to the current Frame, to set the window to full-screen.
The next thing that we do is change the resolution. First, we have to check fscreen.isDisplayChangeSupported(). Otherwise, there's no point in even trying to change the resolution. Now, let's suppose your user runs his machine at 1024x768.
Let's say you change that resolution to 800x600 and you forget to change it back. Well, most implementations of the JVM will automatically change it back after your program ends, but let's say it doesn't. Well, your user will be pretty annoyed that he's lost a bit of his screen real estate, and now he has to go change it back. That's why it's a good idea to store the old resolution and change it back when you quit. The GraphicsDevice has a member function getDisplayMode(), which returns the DisplayMode object, that does precisely that.
The DisplayMode also has the following constructor:
DisplayMode(int width, int height, int bitDepth, int
refreshRate)
In our case, we want to change it to 800x600, but we don't want to touch the bit depth or the refresh rate. Well, since we saved our old DisplayMode in the variable oldDisp, we can just get the bit depth and refresh rate from that. Thus, we create our new DisplayMode as follows:
newDisp = new DisplayMode(800, 600,
oldDisp.getBitDepth(), oldDisp.getRefreshRate());
Finally, we set the resolution of our window using
fscreen.setDisplayMode(newDisp);
We have to tie up a few loose ends before we can run our program proper. We call addKeyListener(this), because we're using the keyboard to signal closing the window (and this is a class that implements the KeyListener interface, see Tutorial #2). Also, our window is still invisible, so we call setVisible(true). Next, we call requestFocus(), because none of the keyboard events will go through unless our application has focus (again, see Tutorial #2). Finally, we call redraw(), a method that I defined which redraws the screen (more on this later).
Now, I'm going to skip down to the KeyListener methods and come back to the rendering stuff in a moment. As we can see in the keyTyped() method, we quit the program when the user types the character 'Q' (upper- or lower-case). However, before we quit, we have to return the GraphicsDevice to its original state. If changing the resolution is supported (fscreen.isDisplayChangeSupported()), then we want to change the resolution back to the old resolution. If full-screen mode is supported (fscreen.isFullScreenSupported()), then we want to change the display mode back to a window (which won't actually appear, since we quit immediately afterwards). Note that to turn off full-screen mode, we use fscreen.setFullScreenWindow(null).
Now, back to that rendering thing. At high frame rates, it turns out that the repaint() method is not trustworthy. The purpose of the repaint() method was to repaint a small section of the window if it were suddenly uncovered or if some user input had changed the display and required the window to be repainted. What the repaint() method actually does is it tells the system that this window needs to be repainted, so the system we queue a repaint event. Often times, this creates a significant delay while the repaint event is in the queue. Sometimes, the system will merge several repaint events if they are close to one another in time. Thus, this could cause latency issues and frame-rate issues. In some cases, repaint events could be thrown out altogether, resulting in entire animation sequences not being shown. (This was an actual bug in an earlier version of Demons.)
To solve this issue, we're bypassing the repaint event altogether (hence the setIgnoreRepaint() in the initFrame() method). Instead, we've defined our own method that we'll call when we want to redraw the screen, simply named redraw(). Each AWT Component (and therefore, each Frame) has a method called getGraphics(), which returns to you a copy of the Graphics object that you can draw on. (In the case of a Frame, it's also a Graphics2D object.) We pass this graphics object to the render() method (which we've also defined) that does all the real drawing work. Granted, we could have just used the paint() method, but we want to separate our drawing functions from AWT's drawing functions. Then, once we're done, we dispose of the Graphics object.
Also, note that we overrode the paint() method to call the render() method. Even though paint() should never be called, it's better to be safe than sorry, so we'll just have it call render() to get stuff painted. (The alternative is to leave it blank, which also has the effect of ignoring all paint() calls.)
The screenshot is omitted, since I didn't feel like taking a screenshot of a full-screen application.
In any case, like the Graphic2D object, I highly recommend you play with the full-screen API to get a feel for it. Fortunately, it's not as complex or as deep as Graphics2D. It just requires a lot to get started.
Conclusion
Today, we covered quite a lot of flashy graphics effects in Java, including the two important ones--Graphics2D and full-screen. There are most certainly a lot more. We recommend reading up on computer graphics to learn more for yourself.
Incidentally, we've covered everything we've wanted to cover in terms of Java graphics. While that is one of the biggest aspects of game programming, it is by far the entirety of it. Next time: Sound & Music.
Homework Assignment!
Take 2 or more of these techniques and combine them in an interesting way. Bonus points of you use full-screen mode and Graphics2D and combine it with something else while making it animated.