Tutorial
 I use adobe photoshop(specifically version 5.0), alternatively you could use the GNU Image Manipulation Program(the gimp) for linux. After i've found a base photo i open it in photoshop and create new layers and name them fur0, fur1, fur2, other, and palette. The original image will be in the background layer and left unaltered unless you need to clean it up a little. Save it as a psd file. The order of the layers shold be in top to bottom order, palette, other, fur2, fur1, fur0, background.
Use the eyedropper tool to select some colors to work with and draw the colors onto the palette layer with a large brush at 100% opacity. I usually select a few different shades from the hair highlights and maybe some skin tones. The layer fur0 is used to provide a foundation so that skin doesn't show through. Set its opacity to 20-40% and draw over the skin using one of the colors you selected with a 100% opacity brush. The layers fur1 and fur2 are used to give the fur texture. You will use different color in layer fur1 than you used in fur0. On both of these layers i balance using a low opacity brush(20-40%) with slightly reduced layer opacity(75-100%). 
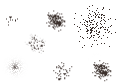 It is possible to make custom brush shapes, and to save and load brush sets. If you select a region and click on the triangle above the scrollbar on the brushes window a menu will appear with an option called 'define brush' which will create a brush shaped like the selected area. On layer fur1 i use many short strokes with a brush that looks like scattered dots.
 Another kind of custom brush can be made by right clicking on a round brush and using the slides to customize radius, hardness, angle and roundness. On layer fur2 i use many very very short strokes using a small very elliptical brush angled to match the flow of the fur. Depending on how large the base photo is alter the diameter and roundness to get a good size. note: lately i've been using scattered dot brushes of varying sizes for this layer more than an oval brush.
On the layer other i draw the everything else, nose, ears, tail, fangs, claws, everything. On the last few pictures i've done i've also drawn in thicker eyebrows in this layer.  To draw an ear begin with a paintbrush at 100% opacity with an angled oval brush. Pick a lighter fur color, and a darker fur color. Using one of the fur colors, draw three curved lines, the first from the top of the ear out to the point, the second from a little lower than the top of the ear to the point and fill in the space betwen the first and second lines, and then change the angle of the brush and draw the third line from the bottom of the ear to the point. Switch to the other fur color and file in the space between the second and third lines. Use the dodge,burn tool to darken or lighten the edge of the ear and/or the inside of the ear for lighting purposes, or you can lower the brush opacity and use it instead.
Next, switch to the airbrush tool at around 10-15% opacity and fade at around 12 with a scattered point type custom brush. Draw short storkes(setting fade to non-zero value ensures that) using dark on light and light on dark in the directtion of the fur.  Very often the ear should be partially obscured by the hair, and instead of erasing the part obscured, your can use a layer mask to make part of the layer partially or completely transparent without lossing any color information. basically it allows your to erase without having to worry about erasing too much, because you can unerase that part of the mask to let the layer be opaque again.
To make a layer mask click on the bottom left button on the layer window, that looks like a light circle on a rectangle. Next to the layer thumbnail you will see another thumbnail separated by weird symbol. The new thumbnail is the layer mask thumbnail, by clicking on the mask thumbnail you can select it and draw into it. By clicking on the layer thumbnail you can unselect the mask and draw normally again. If the picture is going to have a tail, I draw the it in the 'other' layer. I start with the freeform pen tool. on the tool palette(the window where you pick which tool to use.) many tools will have multiple modes that you can switch between by alt-clicking, or pressing and holding the mouse button, on the tool. I decide where i want the tail to be and then draw its basic path with the freeform pen. This will create a path. by holding control and dragging on the squares on the path, or on the control points linked to those squares, you can alter the shape of the path to fine tune the path's shape. Once you have the path where you want the tail to be, select a 100% opacity round brush that is the radius you want the tail to be. Next on the layer palette, there is a paths tab. Select the paths tab and then click on the button at the bottom for stroking the path. This will draw precicely along the path with the brush that is selected. Select the layers tab to go back to viewing the layers. Now that you have the basic tail shape you should touch up where it connects to the body, and/or where it is obscured from view by other objects in the picture. In order to get a furry look, you may want to use a scatter point air brush with a fade value starting on the tail dragging away from it. For canine tails use this technique liberally. Use it less so for feline tails. Set the layer to preserve transparency and use a large scater point brush with a different fur color and draw strokes along the tail to give it a furred look. You may want to switch back and forth between two fur colors until it looks right. Now use the Burn/Dodge tool to shade the tail. If the tail should have a shadow, then use the pentool to draw the shadow's path and stroke it using a mostly transparent brush with a low hardness setting and a dark color on a layer underneath the tail. Once you are happy with how the picture looks, save, turn off the palette layer and use the flatten image option in the layer menu, and Save As a normal image file. You may want to save it as a bmp or targa file first and then use a different program to convert it to a jpg file, because there are other programs that are good at optimizing file size verses image quality with jpg's lossy compression method. Even if a jpg file is saved with '100%' quality there is some loss in image quality, so you don't want to alter and resave jpgs to frequently. It is kind of like making a copy of a copy of a copy of a vhs tape. |
back to the art page
main page
updated 2000.05.11