The real challenge of the upper turret was attempting to glue it to the lower hull. It does not fit! When the front and rear are connected, the sides raise up about a 1/16 of an inch. Too make this part fit, I took a couple of blocks of wood and clamped the vehicle between the blocks of wood in a vise. Then using a solution of plastic sprues melted in liquid glue, I heavily coated the sides, the rear and front connection points. Next came several hours of sanding the shape back and then a further coating in certain areas with a mixture of Testor's red putty with some liquid glue. After sanding for the third time, I had the proper shape and could proceed with the construction.
The upper turret like fighting compartment is completely composed of resin parts. First I took the back piece, which contains the most weight, and removed the plug, which is located on the backside (not the underneath!). I removed this using a wet sponge like sanding block. Once this block is removed a panel line has to be scribed in. I simply did this with a metal ruler and a dental pick. Next I cleaned up the front shields, which contain a stretch of flooring to attach to the rear piece. Extra care should be taken when cleaning the sides of the shields since the fighting compartment side walls/doors have to mount flush to this location. Once this piece was cleaned up, using 5-minute epoxy for strength, I secured the back piece to the front. When attaching these pieces, there is only a small 5mm edge on each side to use for securing the attachment. Some of the rivet heads were missing from the rear section and the interior, so I added them using a trusty punch and die set. I used a raised letter "O" (the kind that would be hung on the outside of a house) under the punch and die set; this catches all the rivets as you punch them out. No need to chase after rivets with this simple trick. The sidewall on the right side is not aligned correctly, so I inserted a plastic shim to fix the problem, however this still requires a considerable amount of filling with putty. The left side suffered from the same problem, but not as pronounced. This gap was filled with additional epoxy putty that was used to attach the piece. The fighting compartment has an upside down 'E' that supports the rear section onto the lower hull. Ironside provides this as PE that must be bent to shape. Failing miserably in bending the PE, I resorted to recreating this piece from plastic strips.
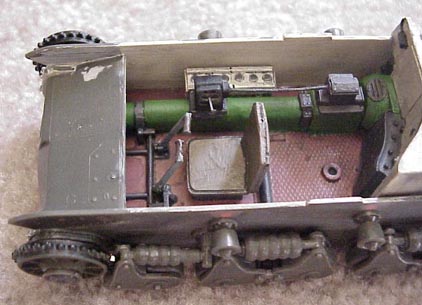
While working on the gun, I noticed the muzzle end and break were deformed. I made new ones from some plastic strip (white and gray strip). The turning wheels for the gun mechanism/controls were replaced by punching out some new disks and adding strip plastic for details. Also the wire was replaced using copper strip. The gun is delicate and requires some careful handling to assemble. When attaching the gun to the shield, there are a couple of white metal support pins. I detest white metal and made new ones from copper wire and from plastic rod. It takes 3 hands more than I have to attach all these support rods from the gun to the shield. Just work slowly and carefully and with enough fiddling, you'll get them attached right.
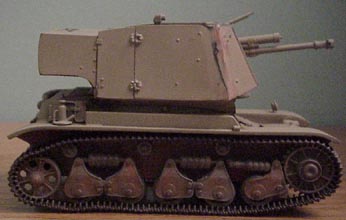
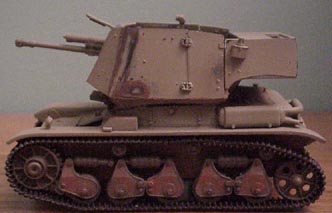
The biggest problem I encounter was once everything was finished, was attempting to attach the upper fighting section unto the turret. No matter how hard I tried it just did not sit correctly on top. After number attempts at sanding I was ready to give up, but continued to fiddle with it. Finally I got it on as well as it would sit and then broke out a lot of putty to try and fix it. I am still not happy with how the final sitting of it came out.
This is a interesting looking vehicle and if another company produces one in plastic one day, I will attempt to build this vehicle again. All in all, the Ironside kit is mediocre, primarily because the old Heller kit is poor.
Coming Soon, images of the painted vehicle and crew!