15cm sIG 33 Pz 38(t) Ausf K Grille
15cm sIG 33/1 Ausf Geschutzwagen 38(t) (SdKfz 138/1) Ausf K "Grille" by Brian Bocchino.
Brief History: The 15cm Ausf K Heavy Self-propelled Infantry Gun was the second of two versions produced on the 38(t) chassis. 90 vehicles of the first version, the Ausf H were produced. Then an additional 110 were built on the Ausf K chassis, which was the original prototype for the second version. These were completed by June 1943. A follow on contract was awarded and an additional 192 Ausf K were built from October 1943 to September 1944 built using a "M" chassis. No distinction was made between the chassis the vehicle was built on; in fact the last 10 vehicles were built on chassis originally built for use as a Flakpanzer 38(t) vehicle. Production information differs between the Engelmann's book and Kliment's book: Engelmann total of 282 versus Kliment 192. The difference between them results from Engelmann crediting the 110 as being second version as opposed to Kliment crediting these vehicles to the first version. They still differ by 20 vehicles when both versions are included. This vehicle would see service on all fronts with schwere Infanteriegeschutz companies of armored Infantry Regiments.
Having been away from modeling for 15 years, I re-entered the hobby back in 1991. As such, I consider myself a novice builder. References on this vehicle as well as pictures seem to be extremely scarce. A number of Ausf H vehicle photos can be found, but the Ausf K is very rare. Aberdeen Proving Ground has an Ausf K in fairly good condition, something unusual. A fellow modeler was gracious enough to send me some pictures of the Aberdeen vehicle plus some other photos from his collection. I also went and made a pilgrimage to Aberdeen to take a slew of pictures myself. Still, wartime photos of this vehicle are somewhat rare. As a break from super detailing kits, I decided to build this model out of the box with a couple of exceptions noted below (while I had that intention, it did not quite work out that way).
Additional note: Both the Kliment and Engelmann book, as well as the caption in the Encyclopedia book refer to this vehicle as a Grille Ausf M. Incidentally, the information that is listed in the Encyclopedia book is mostly from previous work and was added in blocks. In cases where the information was not known, a blank was left that was filled in later, sometimes by best guess. Talking with Mr. Jentz at the Armor Modeling Preservation Society show in '98, he told me the correct designation is Ausf K. At the time of publication, they did not have hard data on the designation and filled in the blank as Ausf M since the vehicle is similar to the known Marder III Ausf M.
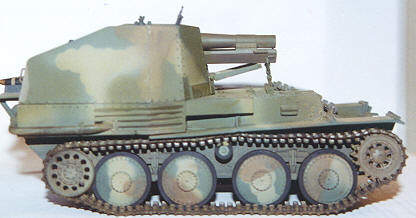
The Model: The vehicle is produced by Cri-El of Italy in resin (# R032). To my knowledge, no plastic kit of an Ausf K version exists or has existed in 1/35th. However, Kirin (now under the DML logo) produces an Ausf H version in plastic. This kit is well manufactured and I would not hesitate to purchase another Cri-El product. Cri-El products are sold through R&J Enterprises in the United States. Some of the kits short comings are the lack of any tools provided, no perforated tool box that seems to be common on almost all 38(t) variants, a non-perforated muffler guard, and a lack of detail on the back side of the road wheels. The kit itself was free of airbubbles and the resin plugs were strategically placed for ease of removal. I had zero problems fitting any of the parts together with the exception of the gun compartment shields. Whether or not the vehicle scales out correctly, I can not address because I did not check, nor have I ever been incline to check measurements. If it looks correct to my "calibrated eyeballs;" then it is good enough for me. No decals were provided with the model.
The gun compartment does not fit correctly. The right side aligns flush and at the proper angles, but the left side does not. The left side requires putty to fill the gap. The difficulty lies in the double row of rivets; one set on the hull and the other on the shield. Upon filling the gap using numerous spatchula tools, I was still unsuccessful in creating a flush seam. This necessitated the need to remove all the rivets, reapply putty where necessary, and sand flush. The challenging part is in realigning and attaching the numerous rivets. To reapply the rivets, I drew two parallel lines. Then with calipers, I bisected the lines every three millimeters. With a pin drill, I made a small indentation. Using two-part epoxy and working only a few rivets at a time; I placed a small amount of epoxy in the indentation hole and attached a Grandt line rivet. The small hole allowed me to forgo the hassle of sanding the rivets flush. They just lie in the indentation and thus appear flush. In theory this initially worked well, but I did not like the appearance, so I started all over again. Taking out my punch and die kit, I made my own new rivets. I created twice the amount I would need to make allowance for distorted rivets and for those that inadvertently go flying off into the carpet. This time using a slow two-part epoxy (90-minute type), I was able to rapidly replace all the rivets and still had time to go back and realign all rivets to make sure none leaned in the wrong direction. The completion came out real nice, see photo. Now suffering from a case of AMS, I shaved off all of the rivets on the right side and began the process all over again.
Having never used resin tracks before, I decided not to tempt fate. The idea of using my wife's hairdryer to heat up tracks to bend around the wheels did not appeal to me. So I opted to use a set of ModelKasten workable tracks (SK-30 Praga 38(t)). The tracks, while time consuming, were simple to build. They consist of two connector pins and one track-link. Each run of tracks required 93 links. The only real difficulty I encountered was when I attempted to marry the links to the drive sprocket. The double guide-horns are too wide for the Cri-El sprocket. If I added a spacer to the sprocket, then the teeth would not fit through the track. I remedied this problem with some ultra high technology engineering; I simply removed the guide-horns from seven of the track links. This allowed the links to attach properly and the missing guide-horns can not be seen.