 Barkhang
Monastery
Barkhang
Monastery
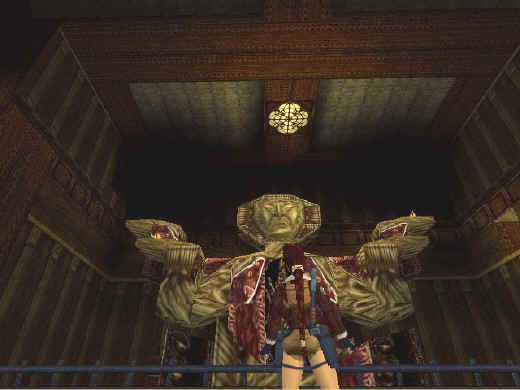
Don’t shoot the monks. They will not attack you. They will help you with the mercenaries. If you do accidentally kill one all the monks will then attack Lara. You will have to start over at your last saved game. Be ready for two mercenaries as you begin. Let the monks help you out. Collect the ammo and medi pack. Head for the ladder across from the steps and climb. Climb up and shoot the crow. Turn and jump to the ledge to your right. Then walk to the edge and jump grab pull up. Drop to the walk and head toward the brown rocks. Shoot two more crows, then jump onto the rock, slide down the sloped part and grab. Then drop and grab the crack below. Shimmy left then pull up at the windows. Shoot the windows then enter. Go right then left and follow the monk. He will turn and run to fight a mercenary. Let the monks kill him and get the ammo and medi pack. Another mercenary will break through a window again let the monks take care of it. Climb out of the window onto the ledge, get the grenades. Go to the first room on your left across from the room with the rolling blades and climb the ladder. Go right then left and get the main hall key, then go left to the end of the walk. In the next room run past the opening to the hall on your left a boulder will roll down. Then continue up the hall. At the tee another boulder will come from the left step out then jump back. Get the flares then go down toward the second boulder, climb down the ladder and push the box on your left. Then go back and head to where the second boulder came from. At the water look left at the opposite wall to see a passage. You need to swim to it the current will try to suck Lara down. Dive straight toward the opposite wall then swim toward the passage and follow it. Fall down the tunnel. Light a flare careful of the blade trap. One way to get past the blade doors is to walk as close as you can then roll through them. There are three doors, follow the tunnel and climb the ladder. In the next room let the monk help you with the two mercenaries. Get the medi pack. On your left jump past the burners and get the prayer wheel. The burners will then light. Get past the first row by jumping over from where you picked up the prayer wheel. Then jump between the burners to get past the second row. Move the boxes in the next room and climb down the ladder. Then go back to the main hall and use the key to open the big doors. In this room run straight toward the statue to the railing. The monks will then kill the mercenaries that came in behind you. Then get the ammo and medi packs. Take the first door on your right as you entered this room. Go through the room take the hallway. Dive over the blade go into the room on your left and get the strongroom key. Exit the room, go right theirs no reason to go left. And return to the main hall. The key fits the lock to the door in the room where the mercenary broke through the window. Use the key to get the rooftop key. It fits the lock in the room with the rolling blades. Stay to the left wall and wait for the blades to roll away then run past. Use the key then head up the stairs. Go right between the golden statues, then right and around to find a lever that turns off the burners. They are timed. A mercenary will come up from the left the monks should take care of him. Climb the ladder get the ammo then go down and pull the lever. Drop down the trap door shoot out the glass then get the two gemstones. Go around the corner pull the lever, then climb the ladder run around and up the steps left then right. Go left between the gold statues and use a gemstone. The door behind you opens, go in and pull the box to get the prayer wheel. Go back to the room with the statue and take the second door on your right climb the ladder. Follow the hallway then run jump and grab pull up onto the statue. Turn pull up by the fire and jump to the statue head, then jump to the other hand. Jump into the opening in the wall and use the other gemstone to open a trap door under the statue. Jump back and slide off the front of the statue. SECRET # 1 follow the gray walk around to the back of the statue on the red part jump up then pull up into the back of the statue to get the gold dragon. SECRET # 2 go beneath the statue and drop through the trap door. Follow the hall and pull up into the next room. Go left then right into the water swim right to the under water opening get the Stone Dragon. Pull up onto the walk and exit the door across from you. Turn right in the big hallway then go to the first room on your left. Pull the box on your left twice towards the barrels. Then pull the next box to get the ammo. Know move both boxes so they line up from the door so you can pull the upper box. Pull it to get some harpoons. Move the box to exit the room and return to the trap door under the statue. In the room you pull up in this time pull the lever to open the door. Go through and push the box to stop the water. Go slide backwards down the slope hang then drop into the know drained room. Go across on the ledge move the box and get the prayer wheel. Climb the ladder go left to exit the room. In the hallway you come into go left around the corner and wait. Two mercenaries will come up from the hall let the monks help out then collect the medi pack and ammo. Head down the hall toward the burner. The burner will turn off as you approach. Stay to one side as the swinging blades move toward you dive into the hole in the floor. Walk forward turn then pull up. Wait for the rolling blade to go by headed left then run and fall into the next hole. At the next rolling blade pull up on your right. Wait for it to roll by then run past into the next room and get the trapdoor key. SECRET # 3 at the rolling blade wait for it to roll past then follow it run into the first hall on your left. Wait for the blade to roll back then, run left around the corner stop careful of the blade doors. Go past the two sets of doors and get the Jade Dragon and some m-16 ammo. Head back to where you got the key and take the hallway. You will drop back into the drained room. Go to the big room with the statue. Head to the wall on your right as you come up the stairs. Use the key and drop through the trap door behind you. Follow the passage then pull up go pull the lever twice to open then close the doors. Turn around run through the room to the opening. Follow the trail when it appears to end go left next to the wall and pull up into the opening. Climb the ladder and follow the path. At the opening to the rope bridge be ready for an eagle then a mercenary from across the other side of the bridge. Get the ammo cross the bridge and continue on the path. Be ready for two crows as you get near the building be careful not to shoot the monk. Use the hill against the wall on your right as you entered to jump to the higher ledge then jump to the roof of the building. Drop down climb the box to get the prayer wheel. Use the lever to exit. Be ready to shoot the mercenary as you leave the building if the monk fails. Get the shotgun shells. Head back to the lever that opens the big doors to exit this area be ready for another mercenary as you head down the slope. Pull the lever to open the doors leading into the big room be ready for mercenaries if the monks didn’t get them. Head for the room with the boxes where you got the harpoons. Follow the hall on the other end as you cross the trap door grab to hang onto the ladder then climb up and continue. Go right then left up the stairs shoot out the window and jump out. Pull the lever to let the monks out then pull it to close the door. Climb the ladder all the way to the top. Climb atop the box to get the prayer wheel. Know head pack to the big room with the statue. As you pull the lever to exit there could be mercenaries the monks didn’t kill so be ready. Collect the ammo and medi packs. As you approach the statue the prayer wheel room is on the other side go in and put them in the empty slots. That will open the door climb the ramp and use the seraph. That will open the door to your right use it to exit the level.