Clan Essays
Clan Warfare
by Timmymwd
Introduction
Clan warfare is severely lacking in strategy. There has never been much development of tactical planning in the entire three years of clan warfare. Mostly what happens is this: two sides agree on a place to fight, and then total chaos ensues. Even with overwhelming numbers an army can take massive casualties. Case in point: At Al Kharid when it was 300 vs. 6, the Syndicate still lost 20+ people just out of confusion and lack of organization. Look at pics of wars throughout the years, you'll find a striking similarity.


No organization, the battle scene is just a smorgasbord of players. You can tell some org based on capes, but that is it. They're all over the battlefield. Thus it is nearly impossible for the underdog to win a war because sheer numbers and sheer strength can always win. It is my belief that any clan that actually employs tactical planning on the battlefield will win hands down. By tactical planning I mean this: formations, fronts and counter attacks, and auxiliary units. We'll discuss all of these in order of them being listed, and counters will be discussed as well. There is one unitary principle behind all of the ideas discussed below: communication between leaders throughout the battle, and adjusting tactics is key to victory. Additionally, all concepts build on one other (ie formations are key to everything else). So after formations are discussed, there will be a "non formation" and "formation" method of employing the concepts I discuss.
Formations
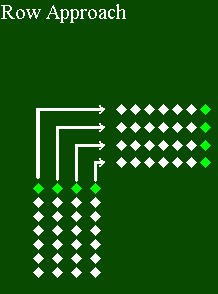
This is - on face - very hard to pull off. However, if you are successful it can really work to your benefit. A bunch of scattered players attacking a group of 24 players in a 6x4 formation is hard pressed to find victory. There are a couple of ways to actually establish rank and file formation. All of them require a chain of people following (as in a bunch of people forming a line by following the person in front of them). The first way is with columns. Simply get a bunch of people following the person in front, and make a good amount of lines this way, and then have them all line up next to each other. The other way is the row way. Start off with the good amount of lines, but instead of just having them walk straight up, have them wheel around to form rows. It sounds confusing, see the pics below, maybe that will help:
Column Method: Row Method:
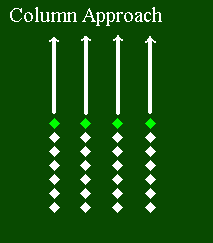
Those are the two ways to create a simple rank and file formation. Now, from the rank and file formation you can implement a couple of battle plans. The most basic is like that of the Greek Phalanx.
The Phalanx Application of Formations
The Phalanx was a large rank and file unit of Hoplites - soldiers with spears and large round shields. When combat began you would stay in the rank and files, and would only move up to combat when the person in front of you died. This idea can be implemented to clan combat, but with a tad adjustment.
The adjustment is this: instead of waiting for the front line person to die, the front line person retreats to the back of the formation to eat/heal/etc, and the next person steps up. That way, a fresh person has entered combat against someone who has been fighting for a while. Note: This is easier to implement with the column approach because people behind the rank leader are still following, so when the next person in line steps up everyone will step up accordingly. Then the person who retreats to the back of the line can follow, and the cycle continues allowing constant replenishment of troops.
Mixed Formation: HtH and Rangers/Mages
The Phalanx application requires you to have all HtH members in the formation, and is best used with the column style set up of rank and file. Mixed Formation is best with the row set up, and has HtH in the first one or two rows, and the other rows filled with mages and rangers. The job of the Hand to Hand combats in the first one-two rows is simple: Attack anybody that approaches the rangers, forcing them into combat so the rangers can finish them off. If your rangers are high enough in lvl, they'll be able to focus-fire quickly enough that there's no chance for your HtH troops to get killed, so you'll never have to worry about moving troops up to the front lines.
In addition to your rank and file block, you will need rearguard and vanguard troops so that the enemy can't flank you and go for the rangers. One solution is to have the entire outer edge surrounded by HtH, but this cuts back on firepower. The main goal of the Mixed Formation is to have the front row trap the enemies into combat, and have the ranged attackers behind them focus fire on the enemies to wipe them out.
Those are the two primary ways to use the rank and file formation. If any of these ideas are used in war and improved upon, please let me know so I can discuss it here. Now, in order to successfully pull this off, micromanagement is key. A strong hierarchy of leaders is important to avoid massive chaos. Having just a clan leader on the battlefield will not suffice. By having great organization and a good chain of command, orders can be handed down in a smooth fashion that can allow for precision execution.
One of the problems with communicating on the battlefield when you micromanage is informing the people below you and only them (as in, don't just type "move into formation" so everyone can see, only let the people one rank below you know). The logical solution would be to PM, but if you have 10 people below you, that would take a long time because the "tell" command that you could just type in no longer works (remember you could just type "tell timmymwd hi" to PM someone?). So you can PM but it might slow you down, or you could use an outside communication source. If all of your leaders have AIM, then a chat room could be used to issue commands. Regardless of how you do it, issuing commands down a chain of command allows for army coherency and stability. Take the example below:
Micromanaging the Battle: Chain of Command
For this example, we'll assume your army will be composed of 6x4 rank and file formations using the Phalanx strategy. Now, in order to keep the formations from falling apart, you have to have various levels of leaders telling people what to do. The most basic person in the micromanaging world is the soldier, the person who gives no orders, and the nit moves up to the highest level, being the army commander. Here are the different levels of command (remember this assumes the army is deployed in formations 6 wide and four deep and uses the column method) :
Level Name Unit Commanded Number of People 1 Soldier None None 2 Line Commander Line 4 People 3 Sergeant Regiment 6 Lines 4 Lieutenant Battalion 3 Regiments 5 Captain Division 2 Battalions 6 General Army 2 Divisions So, there are approx. 220 people in this army. The Line Commanders are obviously at the front of the lines, and it would actually be feasible for them to just type the commands to the Soldiers under their watch. Where a line commander usually resides would be taken up in one line by the Sergeant. And in one out of three regiments, the Sergeant would be replaced by the Lieutenant. The Captain does not replaced the Sergeant or Lieutenant, but rather replaces another Line Commander. Therefore, the higher up officers issue their orders on the chat but also have to remember to command their own lines (This can be tricky, make sure your officers don't issue their line an order until all other officers now of it on the chat screen .. otherwise your line will move and nobody else will!).
If you maintain unity in the formations you will win hands down versus an uncoordinated enemy.
Auxiliary Units: Skirmishers
The most devastating blow to a formation based army is an attack to the flank or rear. At best - there's only an attack to the flank or rear and no front attack. Even that is devastating because the entire formation has to turn and non officer soldiers are now at the front of battle leading. At worst - a formation is now forced to fight multiple fronts. This kills the rotational system of the Phalanx and exposes the rangers to hand to hand combat, which would summarily be devastating.
Therefore, units of skirmishers should also be deployed along the flanks and rearguard of the army. They do not fight in formation, but rather just stay together loosely and attack any units that attempt to go for the flanks and rear. If the majority of the enemy are on the flank or rear, then the formations can wheel around. Since there is such a large amount of micromanagement and different leadership, a Regiment or even a Battalion could be dispatched (using the above terminology in the example) to hold the flank or defend the rear while the rest of the army fights on the main front.
Counters to Formations
Flank and rear attacks. I can't even say it enough to emphasize how big of a TKO it is to formation based armies. If you can get through their skirmishers - or kill them right out - you've won the battle. A tightly packed formation = cannon fodder as long as you can hold up the combat on the front of the formations. Caught between two combat areas, the enemy will crumble.
Also, force them to break rank if possible. Range their front line, since they will typically be HtH. If you're successful, you can draw them out and then it is like any other clan fight.
Fronts and Counter Attacks
To a certain extent, the notion of combat "fronts" and the use of counter attacks has already been employed, albeit sloppily. At Barbarian Village, the main force pulled out of the fighting front to Lumby to regroup and attack again (a counter attack, the other subject of this part of the essay). Light Sabres and Phalanx Clan launched an attack on the Rearguard Front in the Dark Sabres/Gladz and Light Sabres/Phalanx vs DC/Razors war. In a recent war, a flank attack launched by Alliance members dealt a crushing blow. Proper coordination in battle would make these maneuvers even more successful.
Fronts and Counter Attacks with Formations
With formations, there is a much more definable "main front" of combat. Since everyone is rank and file, your force the enemy to attack your lines and bring combat there - especially with skirmishers protecting the flanks, you've put the battle on your terms. While everyone is already engaged in combat, the most devastating thing to an opponent is the arrival of fresh support troops. Counter attacks with formations usually involve the arrival and deployment of new troops, since falling back in formation is very difficult to pull off. Therefore, most counter attacks occur on the flank or the rear of the enemy.
One technique for counter attacks is the classic "hammer to anvil" technique. Bring less than half or at most half of your troops to the battle at first when making the main front. Farther up north in the wilderness, or if you're not oriented North-South ... then far away on the opposite of the battlefield where your army is deployed, have the majority of your forces form up. After the enemy is engaged with your smaller force, have them charge in. Your larger force will be to the enemies rear, and they'll be trapped. You've got them, and the only thing that can save them is a teleport. Your skirmishers that accompany both units can fill in the sides, boxing the enemy in. IT IS CRITICAL TO MAINTAIN FORMATIONS. If you go into "mop 'em up mode" they can escape through the cracks. In formation, if they get past the front man, they have at least three more people in each rank to deal with.
Attacking the enemy's flank is summarily devastating, because they'll be focused on attacking your primary force, which will give your incoming formations key time to engage the enemy and crush them.
Fronts and Counter Attacks Without Formations
Without formations, counter attacks are easier, since you have more flexibility in how your troops move. In order to avoid your injured members from being PKed, have any remaining strong members hold off any pursuers while your weak retreat and regroup. Once you're all at a location and healed up, then attack, try and stay bunched together. Effective counter attacks can not be spread out, that would defeat the purpose and the enemy could pick you off piecemeal.
Flanking attacks can be much more powerful and faster w/o formations. 20+ people running from the side or rear into the enemy can be a devastating blow to morale. While a formation marching does reminisce of the old British Steel, the chaotic charge of a bunch of soldiers is even more scary to the enemy clan members, especially if they're higher level.
Counters to Fronts and Counter Attacks
Keep scouting. Have some low levels walking around watching for enemy movement. If you are aware ahead of time you can survive a flank attack or counter attack. One thing that can deal a blow is not brace yourself for the attack until right when they show up and then move to engage, that way they will think you're unaware of their movement right up until they're on top of you.
For counter attacks, if your forces are weak, it would be wise to regroup as well and get food as well. If you're stronger, however, pursue them out of the Wilderness if you have to. Keep on chasing. Do not stop, you'll either kill them or you'll chase them out - both are embarrassing defeats for your opponent.
Auxiliary Units
Most of your members will be HtH, Rangers, or Mages in battle. They could hypothetically be prayer tanks, but overall most of your members will be fighting in combat. One way to win battles is to employ other forces as well with specialized tasks to augment your combat troops. The ideas listed in this section can be employed with or without formations, the only difference is that with formation the Skirmishers are an additional type of auxiliary unit (see Formation section). By Auxiliary Units, I mean units that are not for combat at all, but provide extra food, armor, intelligence, etc. Most Auxiliary Units should be level 10s or lower so they can't be killed by other troops.
Mule
People who played Runescape pre Item Bank knows exactly what this is. A mule is a character whose sole purpose is to carry items. A Mule auxiliary is someone who carries around supplies for combatants. They should only carry one type of item as to allow them to distribute more at one time. For instance you'll have a Food Mule type, a Rune Mule, Armor and Weapon Mule, etc. These are critical, because you can extend the life of your combatants by providing more food.
Application of Mule In Phalanx Formation: Food mules should hover around the rear, so when the injured show up, they give food and they're all healed up.
Scout
The name explains it all. They patrol the battle and all surrounding areas to detect enemy troops movement, etc. This is critical to avoiding a surprise attack from any and all sides, and to see where the enemy is positioned/re-grouping at. Scouts should also be very low leveled to avoid being killed by the enemy.
General/Tactician
Yes you heard me correctly. Your leading man, or at least somebody who calls the shots, should be another low level auxiliary unit. That way, he can be in the heat of battle, see what is going on and make decisions without the risk of being killed.
Counters to Low Level Units
Simple. Get lvl 10s, or even lvl 20s. In a level 30 wildy, they will own the mules. Benefit for you? All the stuff they're carrying! You can take out scouts that way too and the General. The only problem is your lvl 20s can be exposed to some lower level combat units.
Conclusion
These are my thoughts on what should be included in clan warfare for tactical strategy. These plans would require some hours of practice to get them down right, especially formations. These plans are what I'll put out publicly, I've developed some strategies that I will give only to close allies. Hope you enjoyed!