

After the photographic stencil has been exposed and washed out, the stencil is almost ready for printing. There is one more important step that must be completed before the stencil is completed.
Any opening in the mesh that is not covered by the stencil itself, must be covered in order to stop ink from passing through it. "Masking" is the process of completing the covering of the mesh.
There are three basic methods that can be used to "mask" the stencil and they are as follows:
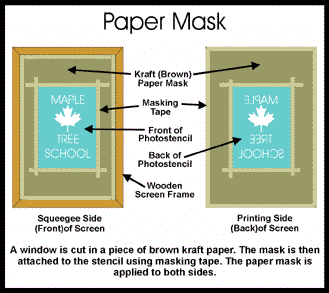
Paper Mask
The paper mask is one of the quickest and easiest ways to mask the stencil. Brown, kraft paper is most commonly used to create the mask. A window is cut in the paper and it is placed over the stencil. Masking tape is used to hold the paper in place. It is placed on both the front side and back side of the stencil fabric. This method is not recommended for long printing runs, since the solvents in the ink will cause the paper to begin to break down and fall apart.
Tape Mask
The tape mask is another quick way to mask a photostencil. Masking tape (in a variety of widths) or specially made solvent resistant tape is used. The masking tape is not recommended for long printing runs, since the solvents in the ink attack the adhesive on the tape. This causes the tape to loosen and peel away. Solvent resistant tape is recommended, since the adhesive is not affected by the ink solvents and it will last through long extended printing runs. The tape should be layered on both the front and back sides of the stencil.

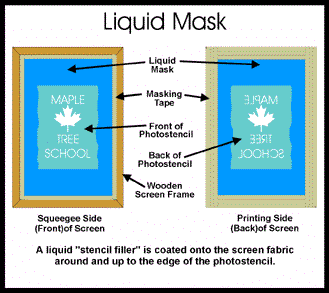
Liquid Mask
The preferred method for masking a photostencil is to use a liquid masking material. There are a few different materials that may be used. A "heavy stencil filler" may be used, or in some cases, a small amount of direct emulsion is used. Usually, small pieces of cardboard are used to coat the fabric around the stencil. This liquid coating will dry, resulting in a smooth and durable mask. Additionally, this type of mask is easier to work with when cleaning the screens after printing. There is no paper to break down, or any tape to loosen and peel up.
Observe your instructor as he demonstrates the masking procedures. Then decide which procedure is best for your screen. Once you have completed masking your screen, it is time to get ready to print.
Review the page again to be sure that you understand the material. REMEMBER, YOU WILL BE TESTED ON THIS MATERIAL!
TOC / Top of This Page / Home