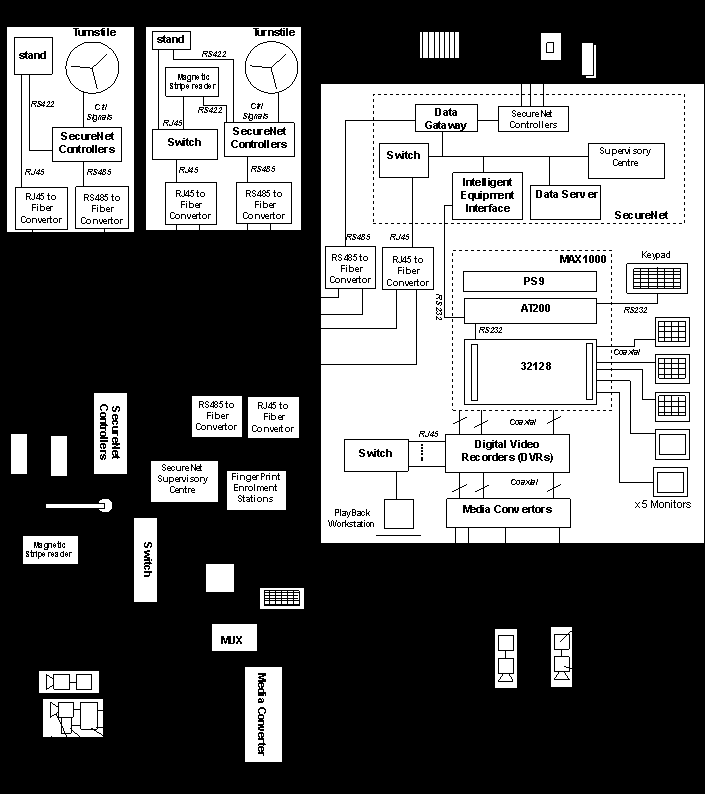
Appendix A
Figure A - Simplified Final Design of the Security System

Appendix B
Figure B1 – Interior of SecurNet IOS (Intelligent Outstation)
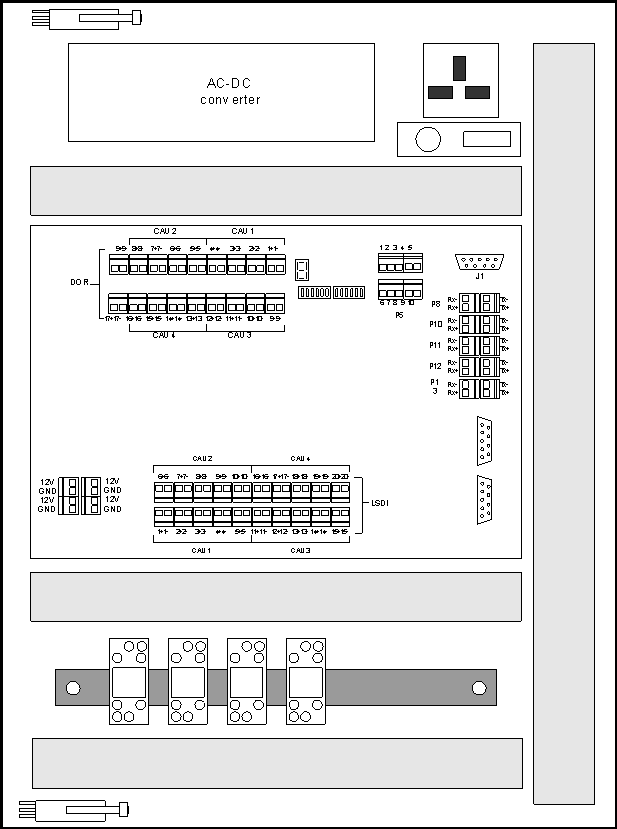
Figure B2 – Relays and Tamper Switch in the SecurNet

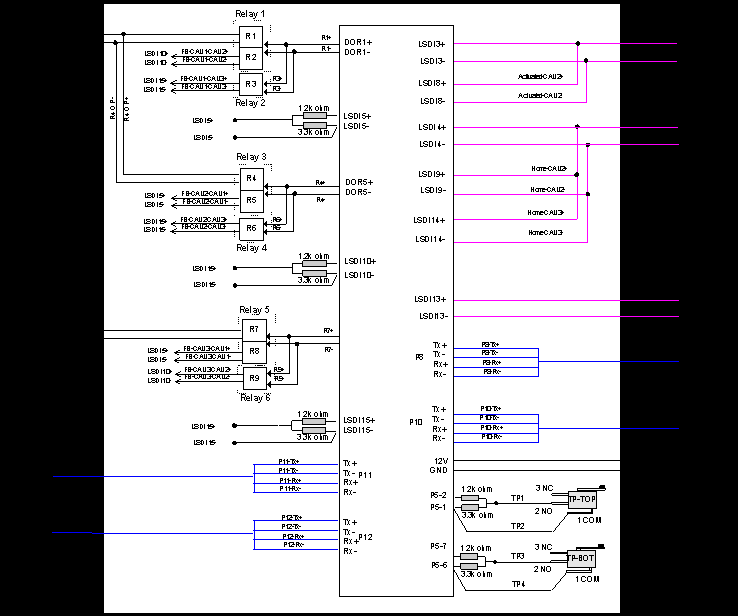
Figure B3 – Wiring Diagram of IOS for Access Control Gates
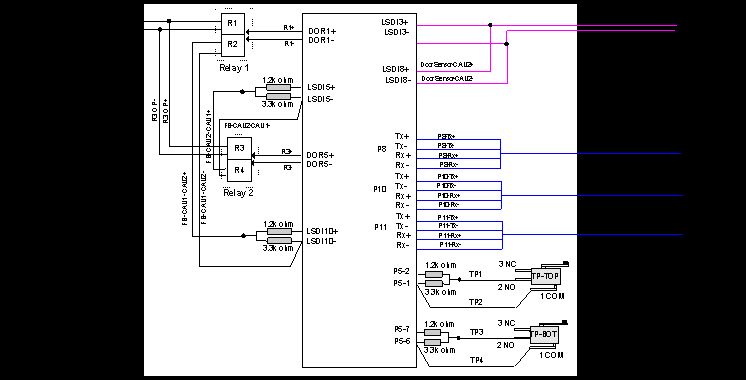
Figure B4 – Wiring Diagram of IOS for Swing Gates
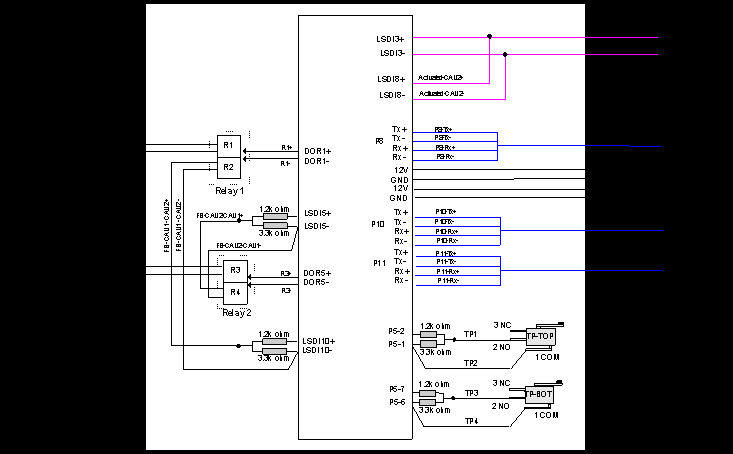
Figure B5 – Wiring Diagram of IOS for Turnstile
Appendix C
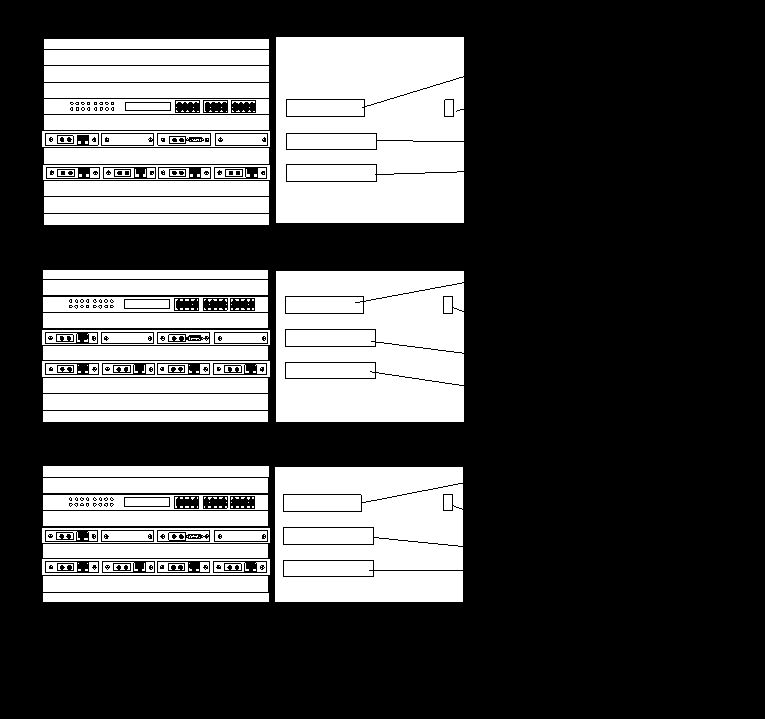
Figure C1 – Site A Rack 1 Design
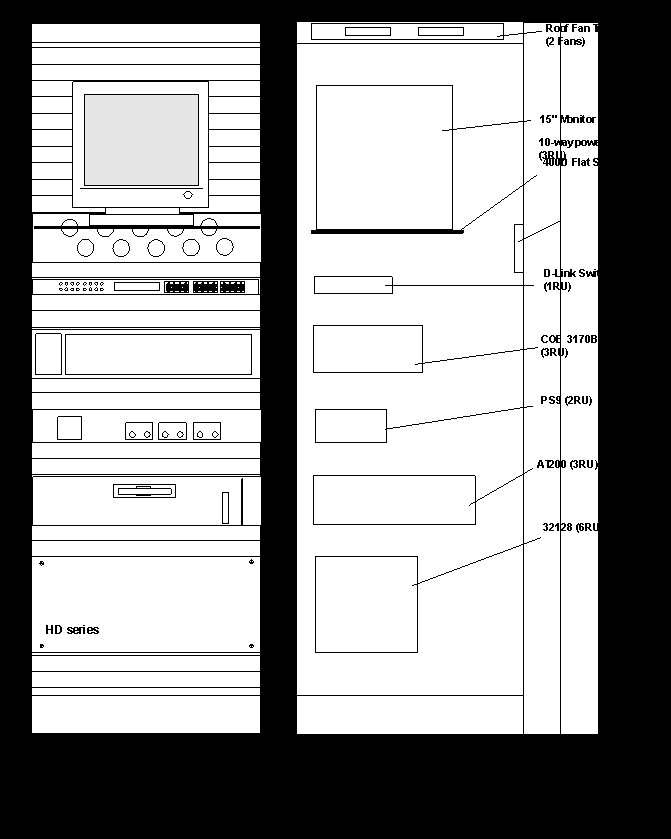
Figure C2 – Site A Rack 2 Design
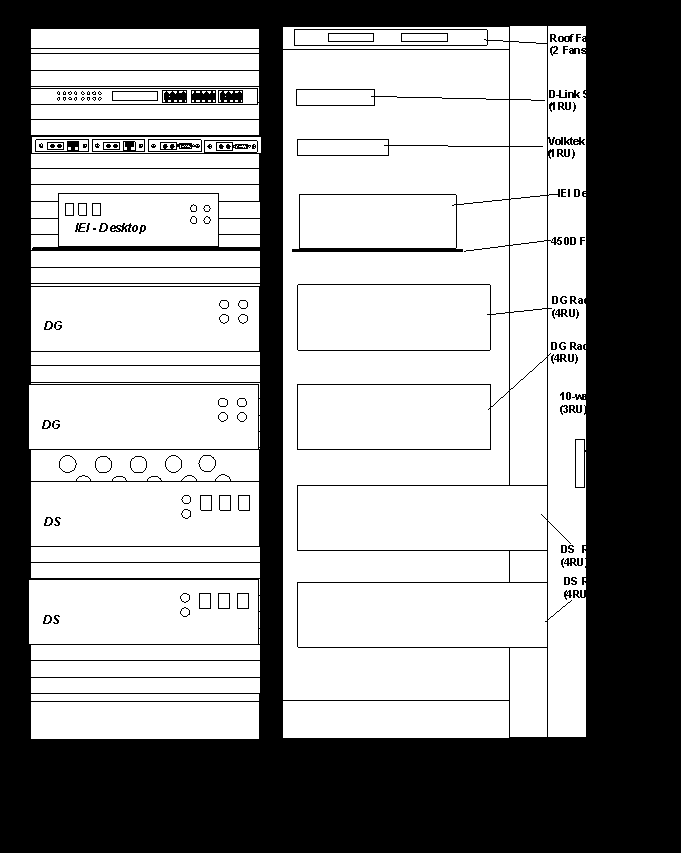
Figure C3 – Site B Rack Design
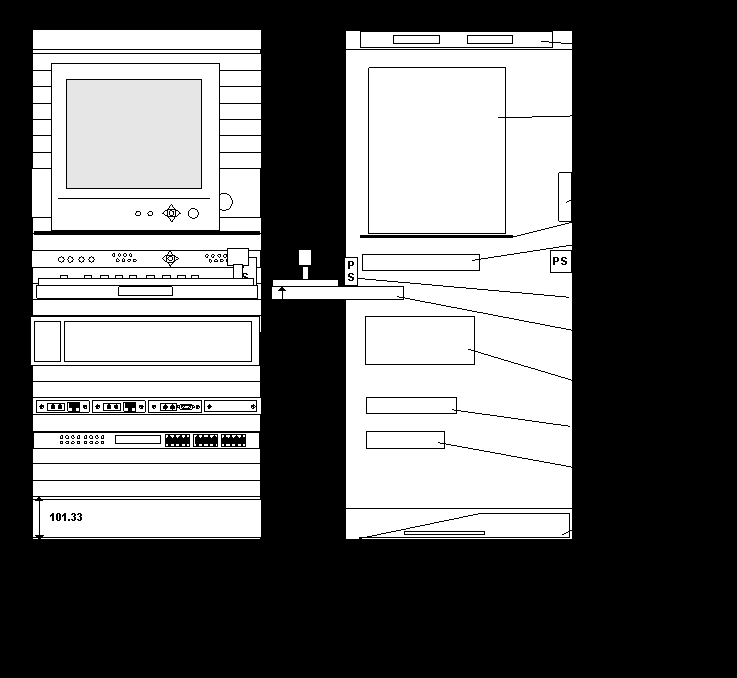
Figure C4 – Site C Rack Design
Appendix D
Figure D1 – Wiring Diagram of a Fixed Camera Enclosure

Figure D2 – Wiring Diagram of a PTZ Camera Enclosure

Appendix E
Figure E1–Wiring Diagram of a 700x500x150mm wall mount enclosure

Figure E2–Wiring Diagram of a 600x400x150mm wall mount enclosure

Figure E3–Wiring Diagram of a 300x300x150mm wall mount enclosure

Appendix F
Figure F1–Fiber Connectivity (Fiber Optic Junction Box Adapter Plates Plan)
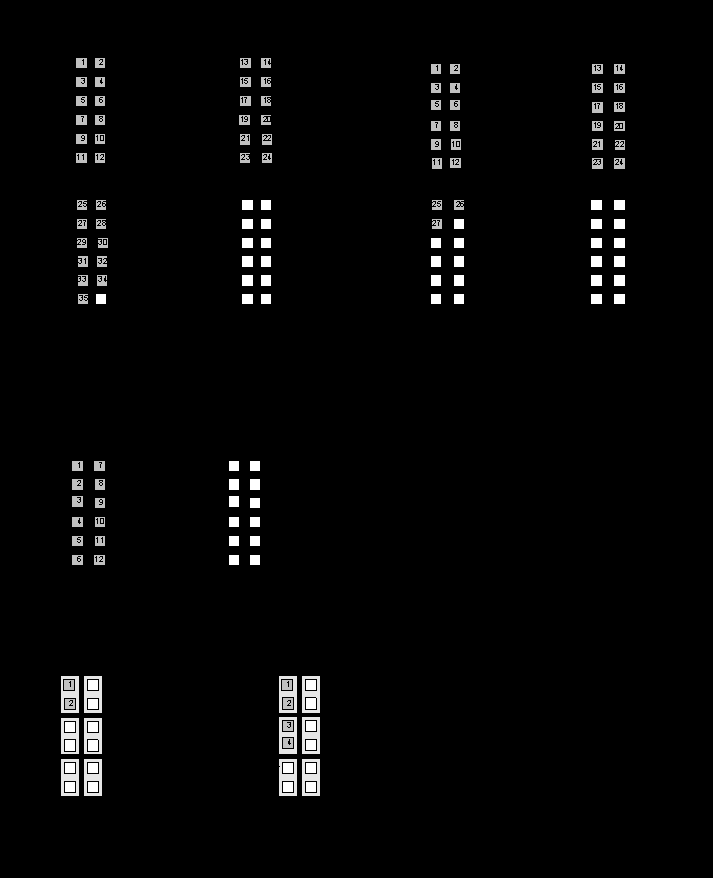
Figure F2–Fiber Connectivity (Fiber Junction Box Interconnection)
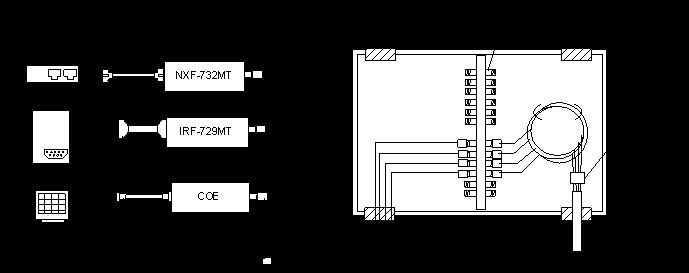
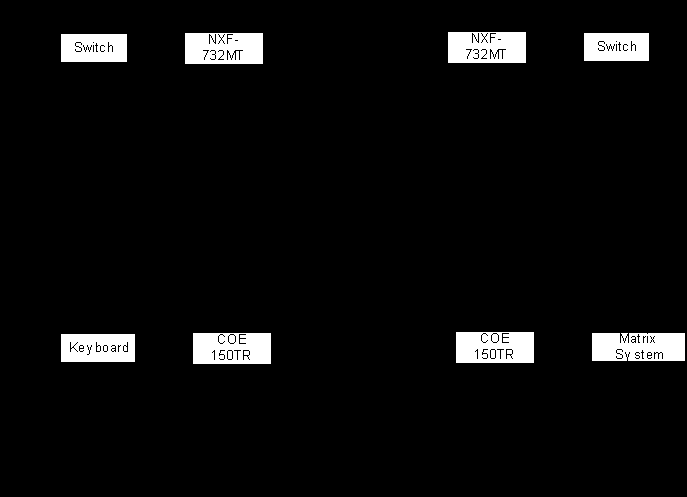
Figure F3–Fiber Connectivity (Fiber Distance Calculation)
Appendix G
Installation Procedures
General Prior-Installation Notices
SC Setup and Installation Procedure
DG Setup and Installation Procedure
IEI Setup and Installation Procedure
DS Setup and Installation Procedure
Appendix H
IP Table

Appendix I
Enrollment and Verification Documentation
Introduction
A) FingerPrint Enrolment Procedures (refer to Appendix A)
The following are the set of procedures to start enrolment of users. Note: At this point in time, the FingerPrint Database at the Enrolment Station (Local) and the DS (Server) is empty and there is no administrator to log in to the station.
The following are the set of procedures when using the CAU Pedestrian Barrier.
For the CAU terminal to allow particular user to access, the FingerPrint Templates must be uploaded to the DS and downloaded to the CAU Terminal.
Note: N = Nil , Y = Yes , D = Don’t Care
The following are the listed errors messages for different scenarios.
|
Terminal List |
Server List |
Card ID |
FingerPrint |
Terminal Msg |
IOS Msg |
|
N |
D |
D |
D |
Access Denied FP not matched |
- |
|
Y |
N |
N |
N |
Access Denied FP not matched |
- |
|
Y |
N |
N |
Y |
Access Denied FP not matched |
- |
|
Y |
N |
Y |
N |
Access Denied FP not matched |
- |
|
Y |
D |
Y |
Y |
Welcome XXX |
Legal Access |
|
Y |
Y |
N |
N |
Access Denied FP not matched |
- |
|
Y |
Y |
N |
Y |
Access Denied FP not matched |
- |
|
Y |
Y |
Y |
N |
Access Denied FP not matched |
- |
Special Scenarios
|
Description |
Terminal Msg |
IOS Msg |
|
Card Not Listed (User ID not in White List) |
No Such User |
Invalid Attempt |
|
Card Not Active (Card Activation Date Not Valid) |
Card Inactive |
Invalid Attempt |
|
Time Zone Violation (IOS Time Block) |
TZ Error |
Invalid Attempt |
|
Card Not Listed (Wrong Card Version |
Wrong Card Ver |
Invalid Attempt |
|
Card Expired |
Card Expired |
Invalid Attempt |
. i) Fingerprint Template uploaded to DS BUT NOT downloaded to CAU. The error message will be "Access denied, Fingerprint does not matched"
Therefore, the pedestrian barrier will not allow access if the fingerprint template is not downloaded to CAU.
ii) Fingerprint Template downloaded to CAU BUT NOT uploaded to DS. Scenario is not possible, software does not allow such feature.
Therefore, direct downloading of fingerprint templates from Local Enrollment PC to CAU is impossible . Only fingerprint templates in DS database is allowed to be downloaded to CAU.
F) Test Layout

Figure F: Test Setup in IB
G) Appendixes
Appendix A : FingerPrint Enrolment Procedures

Step 1: open fprint.mdb

Step 2: SC database is empty, no administrator exist, PF Enrolment System will detect this and request for enrolment of the first administrator for uploading of new users.

Step 3: Select "Add New User"

Step 4: Register first administrator (Card ID and User Name)

Step 5: Register FP of first administrator.

Step 6: Ensure good image capture.

Step 7: Confirm all user details and successful registration.
Appendix B : CAU Terminal Procedures

Step 1: Scan magnetic strip card.

Step 2: FP Verification System will request for finger.

Step 3A: FP Verification System will display the following message should verification fail.

Step 3B: FP Verification System will display the following message after 3 verification failures.

Step 3C: FP Verification System will display the following message should verification succeed.
Appendix C: IOS Procedures

Step 1: FP System will request for first administrator to login.

Step 2: First administrator will be automatically updated to SC ( if connected to the network ). No additional updating of server required.

Step 3: Upload to SC database.

Step 4: Add in new terminal/terminals.

Step 5: Ensure newly added terminal is in the terminal list and is active.

Step 6: Update user to the terminal.

Step 7: Successful updating message will appear.
Appendix J
Enrollment Process and Verification Process Flow


Appendix K
Procedure to Setup Enrollment (limited) Account
Step 1: Go to Control Panel and select User Account

Step 2: Select Create a New Account

Step 3: Fill In The New Account Name, for example "Enrollment"

Step 4: Select "Limited" Account and Select Create Account.

Step 5: Go to Administrator Tools Under Control Panel

Step 6: Select Computer Management

Step 7 : Select "Local Users and Groups", follow by "Groups"

Step 8: Create New Group call "Enrol Only" and Make Sure Enrollment User Account is listed under this Group.

 Step 9: Go to Explorer, Select "Tools", "Folder Options", followed by "Views" and De-select "Use Simple File Sharing"
Step 10: Go to the folder of the program you want to restrict , for example "Movie Maker", right-click and Select "Sharing and Security"

Step 11: Ensure Enrollment Account is granted "Deny"

Step 12: Ensure Enrollment Account is granted "Deny" and the bottom two boxes are selected.


Appendix M
Network Setup


Appendix N
Encoding Track 2 ISO Data Instructional Walkthrough
Encoding Track 2 ISO Data Instructional Walkthrough

Step 1 : Ensure the above displayed settings are followed. Enter the Card ID in the Track 2 row. Click on "ENCODE"

Step 2: Wait for the "Encoding Successful" message.

Step 3: To read a card, Click "Cancel" followed by "Read".