
REPORT ON
INDUSTRIAL ATTACHMENT
WITH
SINGAPORE TECHNOLOGIES
ELECTRONICS LIMITED
PREPARED BY: Kwek Chih Siang
012557E03
EEE
Table of Contents
Abstract
Acknowledgement
List of Figures
CHAPTER 1: INTRODUCTION
1.1 Background of Company
1.2 Purpose and Scope of Report
CHAPTER 2: HARDWARE SPECIFICATION
2.1 Overview of Hardware Implementation
2.2 Security Management System
2.2.1 Introduction
2.2.2 System Components
2.3 CCTV System
2.3.1 Introduction
2.3.2 System Components
2.4 Intrusion Detection System
2.4.1 Introduction
2.4.2 System Components
2.5 Fingerprint Recognition System
2.5.1 Introduction
2.5.2 System Mechanisms
2.5.3 Problems Encountered & Solutions
2.5.4 System Limitations & Suggestions
2.5.5 3 Problems and Solutions (User Account Issue)
2.6 Access Control System
2.6.1 Introduction
2.6.2 System Functions
2.6.3 Problems and Solutions (Magstripe Issue)
2.6.4 Problems and Solutions (Peripherals Testing)
2.7 Stand-Alone System
2.7.1 Introduction
2.7.2 System Components
2.8 Hardware Interfacing
CHAPTER 3: SOFTWARE SPECIFICATION
3.1 Overview of Software Implementation
3.2 Security Management
3.3 Xbios Finger-Print Management System
3.3.1 Problems and Solutions (Enrollment Process)
3.3.2 Problems and Solutions (Encoding Track 2)
3.4 CCTV Interfacing
3.5 Software Interfacing
CHAPTER 4: LAB TEST
4.1 Introduction
4.2 Termination of Cables
4.2.1 RJ45 Crimping and Termination
4.2.2 RJ45 Testing
4.3 Camera Testing
4.4 Network Setup
4.4.1 Problems and Solutions (New System Network Setup)
CHAPTER 5: CONCLUSION
Appendices
Appendix A - Final Design of the Security System
Appendix B - IOS
Appendix C – Rack Design
Appendix D – Wiring Diagram of Camera Enclosure
Appendix E – Wiring Diagram of Wall Mount Enclosure
Appendix F – Fiber Connectivity
Appendix G – Installation Procedures
Appendix H – IP Table
Appendix I – Enrollment and Verification Documentation
Appendix J – Enrollment and Verification Process Flow
Appendix K – Procedure to Setup Enrollment (Limited) Account
Abstract
The Industrial Attachment (IA) program has benefited many Undergraduates with valuable hands on experience that cannot be obtained during Lectures and Tutorials. It also provides the opportunities to apply the knowledge that we have gained during the course of study in NTU.
This report presents the project and tasks that I was involved in during Industrial Attachment for the period of 24 weeks from 6th January to 21st June 2003 at Singapore Technologies Electronics. It also summarizes the knowledge and experience gained throughout the attachment.
The project that I was involved in was the design and implementation of the security system. As this project was highly classified as confidential by the company, this report will not be too detailed and some of the terms used will be altered.
Acknowledgement
I would like to thank Mr Ho Kah Tong (Senior Manager) and Mr Cheong Kum Hoong (System Manager) for their patience, guidance and support. I would also like to thank my supervisor, Mr Chan Chee Wai (Senior Engineer) for his guidance and support. I am grateful for his understanding and consideration in allowing me to participate in this project. He had shared a lot of his valuable experiences and provided magnificent help to the IA students throughout the attachment.
Credits should also go to Mr Tan Yew Hock (Project Manager), Mr Goh Chong Eng (Senior Engineer) and Mr David Tan (Senior Engineer) for sharing their experiences with me during the 24 weeks. They have been great in supporting and guiding me throughout the project.
I would also like to thank my NTU Tutor, Asst. Prof. Zhu Ce, for his support and concern, and the other IA students who had worked together during this period of time. Last but not least, I would like to express my gratitude to NTU for organizing such a meaningful and enriching Industrial Attachment.
List of Figures
Figure
2.1 Overview of the Security System
2.2 Security Management System Block Diagram
2.3.1 CCTV System Block Diagram
2.3.2 Camera Housing Block Diagram
2.3.3 Camera Housing Block Diagram with IR illuminator
2.3.4 Camera Housing Block Diagram with IR illuminator and PTZ
2.3.5 Wall Mount Enclosure for Different Camera
2.4 Intrusion Detection Sensors
2.5 Fingerprint Recognition System
2.6.1 Access Control Hardware
2.6.2 System Function for Turnstile and Access Control Gates
2.7 Intercom and Video/Audio Phone System
2.8.1 System Interface between Access Control Gates and SecurNet IOS
2.8.2 System Interface between Swing Gates and SecurNet IOS
2.8.3 System Interface between Turnstile and SecurNet IOS
3.3.1 Fingerprint Verification
3.3.2 Fingerprint Registration Screen
4.1 Lab Test Layout
4.3.1 Camera Testing Setup
4.3.2 Panasonic Camera
4.4.1 Network Setup
A Simplified Final Design of the Security System
B1 Interior of SecurNet IOS (Intelligent Outstation)
B2 Relays and Tamper Switch in the SecurNet
B3 Wiring Diagram of IOS for Access Control Gates
B4 Wiring Diagram of IOS for Swing Gates
B5 Wiring Diagram of IOS for Turnstile
C1 Site A Rack 1 Design
C2 Site A Rack 2 Design
C3 Site B Rack Design
C4 Site C Rack Design
D1 Wiring Diagram of a Fixed Camera Enclosure
D2 Wiring Diagram of a PTZ Camera Enclosure
E1 Wiring Diagram of a 700x500x150mm wall mount enclosure
E2 Wiring Diagram of a 600x400x150mm wall mount enclosure
E3 Wiring Diagram of a 300x300x150mm wall mount enclosure
F1 Fiber Optic Junction Box Adapter Plates Plan
F2 Fiber Junction Box Interconnection
F3 Fiber Distance Calculation
CHAPTER 1
INTRODUCTION
Singapore Technologies Electronics Limited (ST Elect), is the electronic arm of Singapore Technologies Engineering Ltd and is listed on the Singapore Exchange Securities Trading Limited (SGX). ST Elect, is one of the largest electronic system houses in the region and provides wide range of engineering services ranging from innovative system solutions to defense, commercial and industrial globally.
ST Elect ensures that new technologies and design applications are applied to the demands and stringent requirements of customized electronic systems and solutions. Continuing research and development help create cost-effective proprietary products at both the system and component levels, ensuring that innovative and quality solutions are delivered to our customers.
 Singapore Technologies Electronics Limited has three Core Business Groups:


Core Values of Singapore Technologies Electronics Ltd:
Integrity
The Integrity of an organization is the pillar of long-term success and its foundation lies in its people. It is the sum total of individual traits of honesty, dedication and responsibility as professionals and co-workers in a common enterprise of creating value and bringing positive contributions towards a better world.
Value Creation
As individuals, as companies and as countries, we must bring value to what we do, not just once, but consistently. It is a part of the quest to enhance quality of life through constant thought and application effort. As individuals, we may be good, but with teamwork, we can multiply the value we bring.
Courage
To try for the seemingly impossible, to break the mould and to start over again, to look at issues and at ourselves dispassionately, to take responsibility for failure, to take the future into our own hands and to contribute to that small bit of change for the better - courage is the seed for creation and progress.
Commitment
Commitment is the spirit that drives energies positively against seemingly impossible odds to achieve extraordinary results. It sustains the drive and keeps the standards flying.
Compassion
In our drive to succeed as individuals and organizations, we will fail to bring value to others unless we empathize and support others in need. Organizations do not have compassion only people do. A true act of compassion must come as a direct gift from the individual.
Accreditations


1.2 Purpose and Scope of Report
The primary purpose of this report is to document the skills, knowledge and experience that have been gained over the 24 weeks of industrial attachment to Singapore Technologies Electronics Ltd in the department of System Integration Division (SID).
The objective of this project is to design and implement a security system. Security system has been developed due to the awareness of delegates to the threats and vulnerabilities to our security posed by terrorism and espionage. The security system consists of various parts: Security Management System, CCTV System, Intrusion Detection System, Fingerprint Recognition System, Access Control System and Stand Alone System.
Chapter 2 will introduce the various parts of the security system and their hardware connections and interface with one another. Chapter 3 will introduce the software implementation and configuration of the various parts of the security system. The various Lab Test for the individual system and the results will be reported in Chapter 4.
CHAPTER 2
HARDWARE SPECIFICATION
2.1 Overview of Hardware Implementation

Figure 2.1 Overview of the Security System
The Security System is made up of several sub-systems including
2.2 Security Management System
2.2.1 Introduction
The Security Management System is the main body of the whole security project. The objective of the Security Management System is to manage the overall system, including intrusion detection and notification, access control monitoring, video monitoring and databases management. It is basically an Ethernet network consisting of devices such as switches, servers, gateways and controllers.
The Security Management System is actually an in-house ST Electronic product from the Intelligent Building (IB) Department, known as SecurNet. We were required to build up the system with the help of IB Department who will provide the necessary devices such as the SecurNet Controller, also known as Intelligent Outstation (IOS) and the software to manage the security system known as SecurNet 1800. We were also required to do the interfacing from the Security Management System to the CCTV system, intrusion detecting sensors, fingerprint recognition system and the access control system.
2.2.2 System Components
The SecurNet consist of
Figure 2.2 Security Management System Block Diagram
Supervisory Centre (SC) is an IBM Desktop loaded with SecurNet 1800 software acting as a monitoring station for the user. There are 3 SC stations located at different places, each having a keyboard that enable user to change monitoring setting. These monitoring stations monitor all the CCTV cameras and intrusion detection sensors, indicating them in the form of map in a windows program.
Database Server (DS) is an IBM Server acting as a database server in the SecurNet. It will load all user data to the Intelligent Outstation (IOS) via Data Gateway (DG). There are 2 DS stations, one acting as active and the other as a backup server.
Data Gateway (DG) is IBM Workstation which acts as a gateway, transforming different protocols for Intelligent Outstation (IOS) and the network. There are 2 DG stations, one acting as active and the other as a backup gateway.
Intelligent Equipment Interface (IEI) is an IBM Desktop acting as a communication translation device between other securities systems, for example the CCTV system and the network.
Intelligent Outstation (IOS) is special piece of hardware that monitors dry contacts from the sensors, output signal to external devices such as access barrier gates, and as a temporary data storage device for magnetic stripe reader and access barrier stand and gates.
LAN Switches in the SecurNet are only Ethernet network switches that interconnect all devices to form the network. The distance limitation of the network was solved by using RJ45 to Fiber Optic converter.
2.3 CCTV System
2.3.1 Introduction
 Closed Circuit Television (CCTV) System is the Video monitoring and management body of the overall security system. The main objective of the CCTV System is to manage all camera videos, enable user to control the Pat-Tile-Zoom (PTZ) head, user login via keyboard, video recording, playback, and display.
Figure 2.3.1 CCTV System Block Diagram
The CCTV System is actually made up of several off-the-shelf products from the ULTRAK System Singapore, Panasonics Singapore, COE and several other companies.
2.3.2 System Components
The CCTV system components includes
The diagram above shows the CCTV system. The heart of the system is the video management system (ULTRAK MAX1000 System). There are 20 existing cameras, 17 internal cameras, 4 fixed outdoor cameras and 1 external camera with PTZ control. All these cameras are link to the video management system via fiber optics cables. At the front office, there is 1 video monitor to view all the external camera video inputs. At the main office, there are 3 split and 2 spot video outputs for viewing all the video inputs. All video are recorded via the Digital Video Recorders (DVRs) and the PTZ is controlled by the two keyboards. All the DVRs are connected to the playback station via the network switch.

Figure 2.3.2 Camera Housing Block Diagram

Figure 2.3.3 Camera Housing Block Diagram with IR illuminator

Figure 2.3.4 Camera Housing Block Diagram with IR illuminator and PTZ
All camera units, apart from the camera itself, also consist of camera enclosures for housing the cameras, wall mount enclosure for housing AC-DC converters and other devices. Figure 2.3.2, 2.3.3 and 2.3.4 show the interfacing diagrams for camera housing and Figure 2.3.5 shows the interior wiring of the wall mount enclosures.


Figure 2.3.5 Wall Mount Enclosure for Different Camera
2.4 Intrusion Detection System (IDS)
2.4.1 Introduction
Intrusion Detection System is made up of sensors mounted on the doors, gates and any entry or exit point. The main objective of the Intrusion Detection System is to signal to the Security Management System whenever there any intrusion been detected.
 The Intrusion Detection Sensors are all off-the-shelf products from the Sentrol, Potter and Magal.
Figure 2.4 Intrusion Detection Sensors
2.4.2 System Components
The Intrusion Detection Sensors includes
Some of the sensors such as the vibration sensors and the magbar require an AC-DC converter because they require DC power input. The magnetic door contacts need not to be powered and all the sensors provide output in terms of dry contact in the form of COM (Common), NC (Normally Closed), NO (Normally Open) output, which is interfaced with the Security Management System via the IOS.
2.5 Fingerprint Recognition System
2.5.1 Introduction
Fingerprint Recognition System is made up of USB Fingerprint Readers, Enrolment Stations (Laptop loaded with Enrollment Software) and the Verification Terminals (Panel PCs loaded with FPVeriTerm Software) of Access Control System.
2.5.2 System Mechanism
Fingerprint Recognition System mechanism comes in different stages including
Fingerprint Enrollment makes use of IBM laptops loaded with Fingerprint Enrollment Software, attached with a Keyboard Wedge Bar Code Card Reader and USB Fingerprint Reader. It enrolls new user fingerprints and Card ID number into the local databases. The fingerprint management system software will then updates the local databases, uploads the data to the Data Server and download it to the Verification Terminals in all Access Control Devices. The Verification Terminals have the fingerprint verification software (FPVeriTerm) to verify the identity of any user from entering or exiting the restricted premises system via the matching of the users’ Card ID and Fingerprint data in the database. The Verification Terminal will then send a "match" or "not match" signals to the IOS (Intelligent Outstation) for further action to be taken based on any configuration setting.
 More details regarding the software aspect of the Fingerprint System will be discussed in Chapter 3c. The procedures in the enrollment process and verification process are also documented in Appendix J, as part of the tasks assigned.
Figure 2.5 Fingerprint Recognition System
2.5.3 Problems Encountered and Solutions
Due to the nature of the fingerprint reader capturing methods, there may have instances whereby the users’ fingerprint is not properly captured resulting in inaccurate readings and subsequently problems verifying the identity in the Verification Terminals after uploading of the database.
The gist of the capture is to ensure that the flat side of the finger (where the majority of the fingerprint information is etched upon) is depressed on the fingerprint capturing screen on the fingerprint reader. Should the user depress the tip or side of the finger on the screen, the images captured will be inadequate for accurate matching.
After several braining storming sessions, the following methods were deem as sufficient enough to prevent the above mentioned scenario from occurring. The methods are as follows:
2.5.4 System Limitations and Suggestions
In the ideal world, every human being will have a unique set of fingerprints which can be captured and used as a form of official identity. However we are not implementing this security system in an ideal world, therefore one would expect that there will be cases where users do not have capture-able fingerprints. Therefore an additional verification system would have to be setup and catered for these circumstances.
Another possible scenario is whereby the user used to have capture-able fingerprints, however due to some unforeseen circumstances, has possibly lost the capture-able Fingerprint such as a cut in finger, burn injury on finger.
Therefore while the system of using Bar Code ID and Fingerprint Matching will work in most circumstances, there will exceptions.
2.5.5 Problem Solving and Solutions (User Account Issue)
As the configuration and ultimately the service support for the system, there must be a capability to restrict certain features in the system components to prevent users from interfering with the system flow. One of these circumstances occur when the users will be doing the enrollment process, it is highly undesirable to allow the users to access the areas of the laptops (loaded with Fingerprint Enrollment Software) where the user may upset the system flow. Therefore one of the tasks assigned was to create restrictions on the login accounts for the Microsoft Windows XP loaded laptops.
Microsoft Windows XP comes with user management software, which allows the administrator to create access-limited accounts for various purposes. After some consideration and brain storming sessions, the following user accounts were suggested and the procedures for creating these accounts are also documented.
The full documentation for the creation of these user accounts are listed in Appendix K.
2.6 Access Control System (ACS)
2.6.1 Introduction
The Access Control System is the entry and exit control of the security project. The access control hardware consist of


Figure 2.6.1 Access Control Hardware
2.6.2 System Functions
 The access control gates consist of a panel PC connected to a fingerprint reader, a magnetic stripe card reader, a motor controller that controls two motors that open and close the gates and other devices. Whenever a person enters the restricted premises, he/she needs to access the gate. That person has to stripe his/her magnetic card on the magnetic stripe reader and input his fingerprint data using the fingerprint reader on the access control gates. The fingerprint data and card ID number will be processed by the fingerprint verification software and the card ID number verification software in the panel PC. The verification result is then transmitted to the SecurNet IOS via RS422 link. If the verification result is positive, the IOS will then send the control signal to the motor controller inside the access control gates to open its gates. The panel PC will also display the result of the verification via a LCD display.
Figure 2.6.2 System Function for Turnstile and Access Control Gates
The control mechanisms for other access control devices are similar to the access control gate. The only difference is the different control signals used to interface the access control devices to the IOS. For the Turnstile and the Swing Gate, there are an embedded controllers rather than a motor controller as in the Access control gates.
2.6.3 Problems and Solutions (Magstripe Issue)
One of the issues which we had to resolve early in the project was the issue with the clients’ access control system. Our client has a pre-installed security system which uses magnetic bar code cards as part of their access control. Our security system must be able to integrate the older access control system to our own access control system seamlessly, this is to facilitate our clients’ wishes not to have to make major changes to their current access control system.
This sounds straightforward enough, until one finds out more about the client’s current existing access control system. The client uses an encrypted proprietary encoding format referred to as MicroMax format to encode the data in the magnetic strip. In order to read this MicroMax Encoded Data, one must pay for the rights to decrypt this proprietary formatted data. However this was not catered for in the project plan, therefore, we were tasked to resolve this issue.
In order to be able to appreciate the problem, one must be able to at least understand the technology beneath the problem. Since we had no background in magnetic card technology, what follows were a series of research and data sourcing. To summaries the important points that we found, the following is shown.
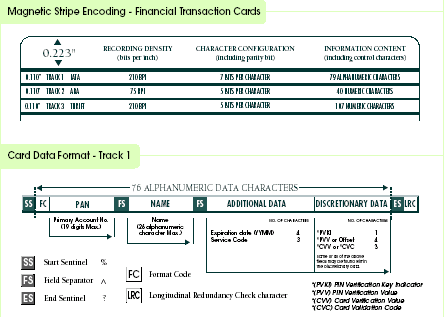
We realized that besides the proprietary MicroMax format, the rest of the world who do not need such high security encrypted data uses an ISO format, as shown in the figure below.
What followed was a brief brain storming session which resulted in 3 different alternative solutions to the above mentioned problem. To simplified the solutions, the following summary is shown, also the pros and cons of each solution is also stated.
MAGNETIC CARD SUMMARY

|
Pros |
Cons |
|
No Additional Encoding Needed |
Difficult To Extract Card No. |
|
No Change is Hardware Form Factor |
Raw Data Reader Not Found / Rare |
|
Fits Client’s Requirement |
Raw Data Unique Status Not Confirm |
|
Software to Interface Raw Data Format to Client Database |
Solution 1 is based on the assumption that the raw data encoded in MicroMax
format is as unique as the MicroMax format. Therefore, since our priority is not to find out what is inside the MicroMax format rather to use this unique identity to help us bring up the users’ details in the client database, therefore assuming the raw data (which does not make any sense since it’s MicroMax encrypted) is as unique as the data which is encrypted inside. We can make use to this raw data, not to try and read it but rather use it to link to the user’s details in the client database.

|
Pros |
Cons |
|
Easy to Interface Read Data to Client Database, no Addition Programming Needed |
Encoding Process (For ISO Card No) Needed During Registration |
|
Card Reader Already Found, May be Cheaper for Track 2 Only Reader |
Does Not Meet Client Requirement |
|
Card No is Confirm Unique |
Solution 2 is to totally ignore the track 1 MicroMax encrypted data, instead we will encode our own ISO data into the empty track 2 data. Then we will use a normal track 2 ISO reader to read the encoded ISO unique data to link to the users’ details in the client database.

|
Pros |
Cons |
|
MicroMax Out of Picture |
Change in Hardware Design |
|
Slow Login Process (Entry) |
|
|
Does Not Meet Client Requirement |
|
|
KeyPad Not Found Yet |
|
|
Chassis Design Change |
Solution 3 is also to totally ignore the track 1 MicroMax encrypted data, instead of using/reading any bar code encoded data. We will request the user to enter his unique identity to link to the client’s database, using a numerical keypad on the access control panel. This will solve the issue of not being able to read the MicroMax encrypted data and also the need for the client to own an extra encoder.
The final solution chosen was Solution 2. This chosen solution is especially suitable for our problem when we realized that our client processes a suitable encoder, thus eliminating one of the major cons of the solution. The next step in the problem solving was to find and select the suitable hardware designed in the solution. Finally the theory was tested with the software and suitable hardware, and finally proposed to the client.
Thru the process of solving this problem, we were exposed to the real time problem solving techniques of the company’s engineers. The real life issues an engineer has to deal with especially when dealing with a business client. There is also a deadline which one has to content with while problem solving and implementing a system.
2.6.4 Problems and Solutions (Magstripe & BarCode Testing Issue)
In our security system, there are two methods of data input which we will be using. One of the methods is using a magnetic strip reader to read the magstripe card of the users, the other is to use a bar code scanner to read the NRIC of the users. One of the tasks assigned was to come up with a procedure/method of quickly testing and troubleshooting these data entry equipment with little or not special tools.
One of the important points to note is that the type of connection used to connect to the processor will determine the way to properly test these equipments. The magstripe reader uses the serial port while the bar code scanner uses a PS/2 keyboard wedge port.
Thus after some brain storming, it is decided that HyperTerminal, a built-in program in also all Microsoft Windows Operating Software, would be suitable for our use. As always the procedure to setup HyperTerminal for testing were documented and tested. The full documentation for setting up HyperTerminal for testing are shown in Appendix F.
2.7 Stand-Alone System
2.7.1 Introduction
Other stand-alone systems consist of the Video/Audio System and the Intercom System. Both Video/Audio System and the Intercom System are off-the shelf products from Aiphone, Nemic-Lambda and Trimet.

Figure 2.7 Intercom and Video/Audio Phone System
2.7.2 System Components
Video/Audio System consists of one video/audio door station, one master station, an AC-DC converter and an EM-Lock (Electo-Magnetic door lock). Intercom System consists of two audio door stations, one master station and an AC-DC converter. Door stations are placed outside the door and will be activated upon visitors’ input. The master stations act as monitoring devices to monitor the visitors outside the door. The EM Lock is connected to the Video/Audio master station such that the master station is able to enable/disable the lock to control any visitor’s entry. The AC to DC converters acts as a power source for all components of the system.
2.8 Hardware Interfacing
As shown in Figure 2.1, there are various links from the Security Management System to the other sub-systems.
From the Fingerprint Recognition System, there is a downlink (RS422 protocol using Cat5E cable) and an uplink (RJ45 connection with Cat5E cable) to the SecurNet. The RS422 downlink is used to notify the SecurNet to send control signals in order to operate the Access Control System. The RJ45 uplink is used to load the fingerprint data and card ID number from the SecurNet to the Fingerprint Recognition System.
For the CCTV system, a coaxial cable (75ohms) with BNC terminations is used to transmit the video signal from the CCTV Matrix switcher to the SecurNet SC via frame grabber card for live video monitoring on the network. The Security Management System is able to control the CCTV Matrix switcher using RS232 link by issuing control signals.
For the Intrusion Detection System to the Security Management System, the hardware interfacing is simply dry contacts. All intrusion detection sensors have dry contact outputs (COM, NC, NO) outputs that will be monitored by the SecurNet IOS.
For the interfacing from the Access Control System to the Security Management System, there are different control signals depending on the type of access control hardware.

Figure 2.8.1 System Interface between Access Control Gates and SecurNet IOS

Figure 2.8.2 System Interface between Swing Gates and SecurNet IOS

Figure 2.8.3 System Interface between Turnstile and SecurNet IOS
The above diagram show the control signals use to interface the access control hardware to the SecurNet IOS. IN and OUT are control statuses that signal the access control hardware to operate. Activated, Door Sensor and Home are dry contacts that signal the access control hardware to notify their statuses.
CHAPTER 3
SOFTWARE SPECIFICATION
3.1
Overview of Software ImplementationThe security system providing the backbone of the network is managed by an in-house product referred to as SecurNet V3.2_0. This software provides the management functions to control the various features of the control system and third party software. As describe in the earlier chapters of the report, the other integrated third party systems integrated into the security project also involves heir own software management systems for example, Ultrak CCTV systems and Xbios Fingerprint Management System.
Since the whole security system must work seamlessly together and perform as one unit, the compatibility of the hardware interfaces and connections are not sufficient to ensure that these various systems "talk" to one another seamlessly.
The purpose of this chapter is to highlight the overview of the management software, the procedures involved in the familiarization of the software as part of the tasks assigned to the students involved in this project. The difficulties encountered and subsequently the steps taken to resolve these issues will also be described briefly.
One of the tasks assigned prior to any software installation on the SecurNet components was to come up with a list of IP numbers to be assigned to the various components. See Appendix H.
Part of the consideration of the assignment is to take expansibility into account in the future where more components may be installed. The IP are assigned with location reference, this means that components in the similar locations share similar IP with additional consideration taken into account for expansibility. These IPs and Workgroup must be assigned to the components upon boot-up and prior to third part software installation.
3.2 Security Management
As described earlier, the main software management system for the security system is referred to as SecurNet 1800. This software management system by itself is also an integrated software comprising of several other third party software integrated together to perform as a unit. It is designed to be configuration-free in terms of third party software integration and to perform automatically upon installation. All the user is required to do is to decide what settings to use in the security system and select the desired configuration via the core control GUI software in SecurNet 1800. The various third party software integrated in SecurNet 1800 are as follows.
These third party software are to be pre-installed onto the various systems prior to the installation of the core control GUI software, hencefore referred to as SecurNet V3.2_0. The following are a list of third part software required on the different components on the system architecture. (SUGGESTION PUTTING SYSTEM ARCHITECTURE PICTURE HERE See pg 4 of sercenet manuel fig 1-1 )
Software Requirements
Software Requirement
Software Requirement
Software Requirement
The various settings, configuration and additional notes to take notice of are complied and attached as Appendix G as part of the requirement of the tasked assigned. These procedures will later be integrated into the security system user manual to be used as a reference should any re-installation or troubleshooting is required.
3.3 Xbios Fingerprint Management System
Xbios Fingerprint Management System refers to 2 different subsets such as FPVeriTerm and FP Enrollment Software. FPVeriTerm software refers to the part of the system where the matching of the users’ fingerprint is carried out. This FPVeriTerm software will be installed in the Verification Terminal (Panel PC). FPVeriTerm will request for the Users’ Card ID followed by the Users’ FingerPrint as shown in the Figure 3.3.1.
 Figure 3.3.1 Fingerprint Verification
The Verification Terminal will then send a "match" or "not match" signal to the IOS (Intelligent OutStation) for further action to be taken based on the configuration setting. The FP Enrollment Software is used to enroll all the users’ fingerprints, to enter these information into the database for identification and fingerprint matching purposes. The following is an screenshot of how the enrollment interface looks like.

Figure 3.3.2 Fingerprint Registration Screen
As part of the tasks assigned, I was tasked to familiarize with the workings of the Fingerprint Management System Software and to document the procedures involved in the enrollment process and verification process. The detail documentation is shown in Appendix I.
3.3.1 Problems and Solutions (Enrollment Process)
As the security system proceed on, it became clear that ensuring that the various 3rd party systems talk to each other will not be an easy process, learning and remembering the various methods and procedures of using each individual system and their integrated process became a challenge. One of the major tasks assigned to me was to come up with a set of documentation with strong visual help that will allow any layman to understand and operate the security system easily and within a short time.
These documentation will eventually be complied and used as a form of customized user manual for our client. This is also a long and lengthy process which will be carried out as the implementation of the project carries on, therefore at the moment, only the enrollment part of the security project is finished.
The topics covered in the Enrollment Documentation is listed below and the full documentation can be seen partially in Appendix I.
3.3.2 Problems and Solutions (Encoding Track 2)
Since we have decided on encoding Track 2 with ISO format for client. The next step is to figure how to encode track 2 without disrupting data in Track 1 and leave track 3 alone for future expansion purposes. Since track 1 data is the client’s existing data and is extremely important not to disrupt data in this track, track 2/3 only encoder will be used in the system.
The procedures and steps involved in encoding Track 2 is shown in Appendix N.
3.4 CCTV Configuration
3.5 Software Interfacing
The major third party software used in the implementation of the system are, as described earlier, the Xbios FingerPrint Management System Software and the CCTV Ultrak In House Software. The SecurNet 1800 must be able to interface with each other in the software aspect. The interfacing of the Xbios FingerPrint Management System Software and the SecurNet 1800 is done by the developers of the Xbios and SecurNet developers, is this also true for the CCTV Ultrak In House Software. One of the aims of the project was to achieve proficiency in the user interface and the configurable settings in the software to allow for customizable user features.
CHAPTER 4
LAB TEST
4.1 Introduction
Before the implementation and installation of the equipments on the actual site, a small-scale lab test was set up. The objective was to test the functionality of the individual equipment as well as the integration and interface of the different security system parts together. Terminating and soldering of the essential cables and wires were also carried out in the lab. The test was carried out in the company’s lab and the lab layout is as shown in Figure .

Figure 4.1 Lab Test Layout
4.2 Termination of Cables
4.2.1 RJ 45 Crimping and Termination
RJ 45 Connectors are standard connectors used for unshielded twisted-pair cable. The eight-pin connector is used for data transmission or networking. Pins are number 1 to 8 with a locking clip at the top. It is important to ensure that the right colour wires are connected to the right pin in the RJ 45. The eight wires are always thought of as 4 pairs.
The steps for and crimping terminating the RJ 45 cables are:
4.2.2 RJ45 Cable Testing
To test if theRJ45 connector is terminated properly, one end of the connector was connected to the PC and the end to a switch. A ping loop-back test was performed ( Ping 127.0.0.1 at DOS prompt ). A reply to the PC which read 0% data loss showed that the RJ 45 was terminated and functioning properly.
To reassure that the cable was well terminated, another PC was connected to the switch. A ping test to the other PC’s IP address was performed and a similar result was shown.
4.3 Camera Testing
The cameras were to be adjusted and tested in the lab before they were sent to the site for installation. Each camera was powered up by a 12 Vdc battery via 2 wires and was connected to the monitor via coaxial video cable as shown in Figure ().

Figure 4.3.1 Camera Testing Setup

Figure 4.3.2 Panasonics Camera
The procedures for the camera settings and testing were as follow:
4.4 Network Setup
The netup setup procedure was briefed to us by our supervisor. This setup procedure is also used in setting up the SecurNet as well, the procedure include:

4.4.1 Problems and Solutions (New System Network Setup)
All the computers used in the security project are brought brand new from selected vendors. These computers are ultimately be used in the network system, and therefore must be network ready, however they will not be network ready off when brought off the shelf. One of the tasks assigned was to come up with a step by step procedure documentation on how to get the computer network ready.
One of the important issues before actually setting up the computer for the network was to go up with an IP List, which allows for expandability. Such a list was discussed and drawn up as shown in Appendix H. It is also important to note that while the OS of the computer determines how the network is setup, the OS in the computers used in the security project are all Windows NT.
The full documentation for setting up the network in the system is shown in Appendix M.
CHAPTER 5
Conclusion
This attachment program had been very fulfilling and fruitful. The 24 weeks of attachment to Singapore Technologies Electronics had provided me with an invaluable working experience that could not be gained in the academic studies in NTU. The exposure to a non desk-bound job had provided the need to work independently and the emphasis of problem solving techniques on the project.
As such, technical knowledge especially in the field of Security System interface and design were greatly enhanced. This was also due to the necessity of reading additional materials to have a better understanding of the project involved. It was also observed that an engineer has to handle not only the technical but as well as the non-technical aspects of any given project. Time management and human relation management skill had also been acquired at the same time as the project involved interaction with colleagues from other departments, meetings with vendors and restriction from a tight schedule. As a result, such skills developed throughout the course of training to achieve better productivity and efficiency.
In conclusion, Singapore Technologies Electronics had provided an optimum environment to learn and experience the working life in an engineering field.