 |
|
There are probably many ways to make a Ranma style shirt; in fact, they are actually for sale at some Martial Arts stores. I'll just tell you how I made mine, and add some advice on deviations.
Time:
Anywhere from a few hours to a month.
Difficulty:
I dunno, Ko-chan, how do ya rate this kinda thing? It's easy for me, but you need to at least know how to use a sewing machine.
Materials:
I suggest you use either cotton or silk for this costume, preferably cotton since Ranma is a starving martial artist ^_^
* Just a warning. When I made my pattern, I had a shirt that I had taken apart and laid out. This is a whole lot easier if you take a cheap cotton T-shirt, pick out the seams and cut up the middle of the front piece. If you're imaginative, you can probably find a way to do this without cutting up a shirt.
** Frogs are the type of ties that Ranma uses to fasten his shirt in the front. Your local fabric store might have them in the "Notions" section (along with zippers and thread), but these tend to be expensive and do not come in yellow. They also don't look exactly like the kind Ranma has on his shirts. You might want to make them yourself. (Ko-chan, how about posting instructions for the nice folks at home ^_~)
Okay, I'm assuming you've gathered all your materials, so on to:
Making the Shirt
Let's start with making the pattern. Remember that Ranma's shirt is a little loose on him, and make any necessary adjustments. If you are using a shirt that is loose on you already, don't add too much more unless you're going to be Ranma-chan. Also, remember to add about a half-inch of seam allowance on all sides.
Lay out sheets of the newspaper and lay the pieces of your shirt out on top. You may need to tape the newspaper together where the shirt pieces overlap two sheets. You need to make the following pattern pieces (but don't forget to label them on the top):
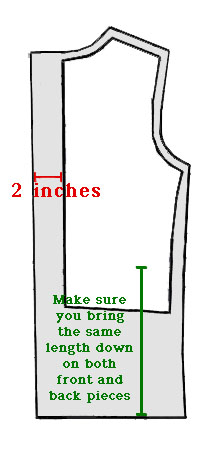
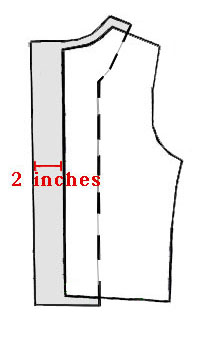
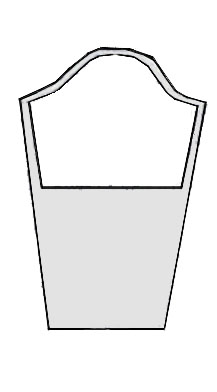
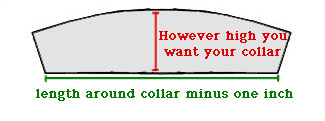
| For all of these patterns, a white outline indicates the shape of the fitting shirt, grey is the pattern you want. | |
| Right Front Pattern | Left Front Pattern |
 |
 |
| The side the wider pattern is on depends if this is to be "correctly" worn by a male or female. In general, "boy-type shirts" have the left side of worn over the right, and "girl-type shirts" have the right side worn over the left. The side on top has the holes to accept fasteners. If you are a girl and are planning on playing Ranma-chan, use the above pattern (boy-type). On the other hand, if you are just making this for casual wear, you may wish to reverse the left and right patterns to avoid curious glances. |
|
| Right Front Interface | Left Front Interface |
 |
 |
| Back | |
 |
|
| Sleeve | |
 |
|
| If you want to make the sleeveless shirt, don't make the "Sleeve" pattern and ignore any further mention of sleeves. | |
| Collar | |
 |
|
Next, you need to lay out the patterns on your fabric. This is pretty much up to you, put it on any way it'll fit. The only pieces you don't cut out of fabric are the "Interfacing" pieces Also, you need the same pieces in white as you do in red, so if it's easier for you, lay the red out on top of the white and cut both at the same time.
If you happen to be using fabric that has a distinct right and wrong side, you want to lay the Right front and the Left front pieces face down on the wrong side of the "red" fabric and face up on the lining fabric. It doesn't matter as much with the other pattern pieces. I have never encountered this problem with cotton, but if you found some nice oriental prints at the fabric store, you want to make sure that the design is on the outside ^_^

You also need to pin the "Right Interfacing", "Left Interfacing", and "Collar" patterns on the interfacing and cut them out. If your using fusible interfacing, place the pattern pieces face up. If you're not, It doesn't matter which side you place them on. You'll have interfacing left over, save it. You can always use it in another costume.
If your interfacing is fusible, fuse it to the white pieces and don't worry about it ever again. If it is not, don't worry about it just yet ^_^
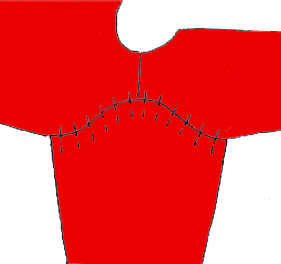
Pin the "Right Front", "Left Front", and "Back" pieces of the red fabric together at the shoulder with the wrong side out. Do the same with the white. It should look like the diagram on the left. Now, to sew. Wind bobbins with red and white thread. We'll start with the red fabric because I want to. Sew the shoulders. It's a good idea to double the seams -- meaning after you sew the first line, go back and sew another one between the first row of stitching and the edge of the fabric. This will make the seams stronger.
 After you have the shoulders sewn, pin and sew the sleeves on,making
sure the right side is in. Then, starting at the seam between the
sleeves and the body, pin the sides and the insides of the sleeves.
After you have the shoulders sewn, pin and sew the sleeves on,making
sure the right side is in. Then, starting at the seam between the
sleeves and the body, pin the sides and the insides of the sleeves.  Since this is Ranma's shirt, remember not to sew all the way down the side seams, stop about two or three inches below where your waistline will be. It was eleven inches for me, but you'll need to measure yourself. After you have sewn the side seams, it'll actually start to look like a shirt, but you're not quite done yet.
Change the thread in the sewing machine to white (remember to change the bobbin thread too) If you used fusible interfacing, sew the white the same way you did the red. If you used non-fusible, pin the interfacing onto the "Right Front" and "Left Front" pieces like this: Now sew along the edges of the interfacing. Now you can sew the white like you did the red ^_^
At this point you should put the red thread back on the machine, but leave the white bobbin in. You don't need to do this, but it will make the finished product look better.
To finish the collar, pin the red piece to the white with the right sides together, and the interfacing out. When you sew, make sure the red fabric is on top. Clip the corners (cut a little off the corners but don't cut the stitching) and turn right side out. Iron if you wish. Fold the collar in half and mark the center with a pin.
Take the red "shirt" and fold the collar area so that the shoulder seams meet. Mark with a pin. Take the collar and pin it to the red shirt. Make sure that the red side of the collar faces the right side of the red fabric. Take the white "shirt" and pin it to the red, right sides together, along the front and the collar aria, and the bottoms, but make sure you don't pin the open arias of the side seams. Sew. Clip corners, and turn right side out through one of the openings in the side seam at the bottom. The collar should be on the outside now. If it isn't, you made a mistake and need to go back and pick out some seams.
The red sleeve may still be inside the shirt at this point. Pull it out. Then pull the white sleeve through it and pin the two together at the cuff so that the seams line up. For those of you who made the sleeveless shirt, pin the armholes together and follow the instructions I give for the cuffs. Now, fold under about half an inch of cuff for both colors, making sure that you fold under to the wrong side of the fabric, and pin. You shouldn't see any ragged fabric edges after you do this. If you like to hand sew, do that. If not, machine sew the edges together, make sure red is on top and stay as close to the edge of the fabric as you feel comfortable. Also make sure that you don't accidentally sew the sleeve shut.
Finally, go down to the slits in the bottom of the side seams. Whereas the first half of the side seam was sewn red-to-red and white-to-white, now your going to fold under the seam allowance and sew red-to-white. Again, if you like hand sewing, hand sew. Otherwise, use the machine and sew close to the edge, red on top, you know the drill.
Hang on there ^_^ you're nearly done. All you have to do now is add the frogs. Pin the front of the shirt together, making sure that the longer left side is underneath the shorter right side. Position the frogs where you want them and pin them down. You can unpin the front of the shirt now. Thread a needle with thread the same color as the frogs. If you don't have thread the same color as the frogs, just use red. Now sew the frogs down securely. Don't sew the front of the shirt to the back of the shirt.
Hooray! You made it ^_^ Now all you have to do is roll up your sleeves and your ready to go!
If you have any questions about these instructions, please e-mail me.
