The rig in this tutorial is a variation of the leg setup in the Blender Documentation Volume One by Lyubomir Kovachev, I'll admit. I wrote this mostly for myself, so I wouldn't forget what I did differently.
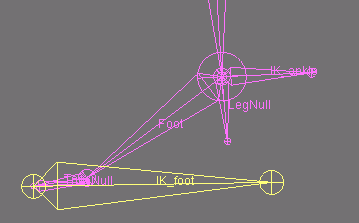
Initial Setup1) Create a 3-bone chain: an upper leg bone from hip to knee, a lower leg bone from knee to ankle, and a small bone extending from ankle to just below the ankle. Call them “LegHi”, “LegLo”, and “LegNull”. 2) Snap your cursor to the ankle bone and create another 3-bone chain: a foot bone from the ankle to the ball of the foot, a toe bone from the ball to the end of the toes, and a bone that cuts back from the end of the toes and ends about where the ball of the foot is. The last bone will overlap or nearly overlap the one before it. Call them “Foot”, “Toes”, and “ToesNull”, respectively. 3) Snap your cursor to the ankle and create a protruding bone. Call it “IK_ankle”. 4) Snap your cursor to the end of the toes and create a bone that extends to the base of the heel. Call it “IK_foot”. | ![]() |
![]() |
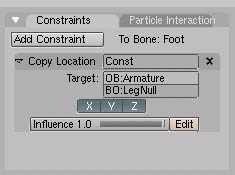
Adding constraintsNOTE: When you specify the target of a constraint, you must enter the name of the armature first. Another text box will open for you to type the name of the bone. Until you specify the armature name, the bone may appear disjoined from the armature. View or change the armature name in Object mode. 5) In pose mode, select “Foot” and add a Copy Location constraint targeting to “LegNull". 6) Select “LegNull” and add an IK solver targeting “IK_heel”. 7) Select “ToesNull” and add an IK solver targeting “IK_foot”. |
Now you can raise and lower the heel or raise and lower the pelvis and the leg bends. The big problem comes in swinging the leg back and forth. I’m guessing that IK in blender works like the rotate-plane IK in Maya, in which angles tend to go negative when joints are pushed though its imaginary rotation plane, so like in Maya, it needs a pole vector to control that plane. I found out how to do that, somewhat by accident. |
Pole Vector8) Now, snap you cursor to the hip joint. Now, draw a bone down to the knee, so that it exists in the same space as the “UpprLeg” bone. Call it “LegVector”. 9) In pose mode, add a Copy Rotation constraint to “UpperLeg” targeting “LegVector”. 10) In edit mode, select “IK_foot”. Set it as a child of “LegVector”. 11) In edit mode, select “IK_ankle”. Set it as the child of “IK_foot”. Now, to swing the entire leg back and forth, as well as side to side, just rotate “LegVector”—but don’t change its location. The "LegVector" bone seems to rotate the rotation plane (my Maya-based thinking), though I don't understand enough of Blender's inner workings to know why. It just works. I don't yet know how to adjust the rotation plane without it. Both IK solvers follow "LegVector" because they are parented, but the solvers can be moved independently. However, if "IK_foot" is moved too far forward, the knee will reverse, so you must grab and rotate "LegVector" to safely pivot the leg. |
![]() |
BACK |