
Nadesico 30G Models and Aestivalis Model introduction:
The First models I got from the Nadesico Line are the three 0G models. The last in the series to see production - these three piloted by Maki Izumi, Subaru Ryoko and Amano Hikaru are made similarly to Akito's 0G (series 2). I apologize if my photography isn't up to par. But my skills behind a digicam are quite limited.
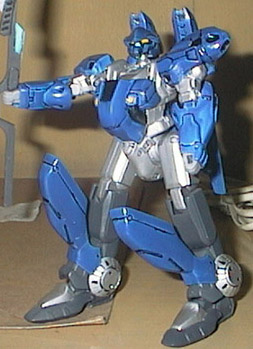
On the left, you can see the Izumi custom. As you can probably tell, my panel lines aren't up to par. I usually wash panel lines to prevent the use of technical pens to make panel lines. I tried it but it doesn't leap out as expected. Please take note of this when you buy an Aestivalis. You have to color them deep to make hidden detail leap out.
You have to be careful about placing the chest portion together. It's very hard to take out when you wish to color it later. Some tabs may snap off after you put them in, so be careful and make sure you read the instructions carefully. With these things in mind, I do not suggest an Aestivalis to be your first modeling project. I advise that you look for Gundams to start testing your modeling skills. Many of them are cheaper to work with and many of the newer models are modeler friendly.
Construction is quite simple and not as interesting as putting together a Gundam line kit from Bandai. They stand around 14 cm. Significantly taller than Gundam Wing 1/144 Kits that they were released alongside with. For the time, the Nadesico Aestis were pretty good kits and were pretty much state of the art for the time until Bandai's latest (such as the Master Grade kits) made them outdated in a cinch.
The Aestis come with a set of Decal stickers to mark certain places that have to be colored. Not all black portions can be covered by stickers (none exist for the shoulder black parts) and must be colored by pen. The overall look of an Aesti with stickers is fairly good, but of course, modeling it in colors is much better.
The set of 3 0Gs come with specially chromed plastic for the legs and shoulders. I stripped this covering for modeling purposes, but it looks fine without painting. By far, the best looking out of the box because of this small add-on - I recommend it as the first model that you should purchase if you have no wish to paint any of these models. Plus the fact that the Ryoko, Hikaru and Izumi Custom Set is a LIMITED release - means you have to get them ASAP.
Other Modeling Notes
The knee guards can be painted separately and snapped on to the calf base after painting. Some difficult parts include painting the shoulders, since you have to paint the inner shoulder first and mask it - before snapping the shoulder on top. It's quite ugly to let the runner line show for the shoulders so there's no other choice but to glue and putty the thing so it won't show. Be careful when puttying, as a lot of panel lines can get lost this way. Have a panel scriber in hand to put back the panel lines in case something happens.
Be careful when placing the hip portions to the ball joint of the central skeleton. The flawed construction will pop the hip a bit open and is quite frustrating if you've painted the hip portion quite thoroughly while sealing the runner line in the middle with putty. It happened to me after I snapped the right hip of the Izumi mech and my folly still shows in the picture above.
I spraypaint and spraycan most of my mecha - and I haven't really encountered any major masking problems apart from the curved chest portion. I suggest that one paint it by hand. I use a combination of both when approaching curved surfaces, but I highly recommend to other modelers to do it by hand.
I'll try getting more pics up. I'm not too satisfied with the way they've come up on my initial photography run.
![]()
Introduction | Nadesico FAQ| The Aestivalises | Other Mecha/Ship specs from the series
Character pages | Modeling Info | RPG Compilation | Links | WORDS FROM THE AUTHOR
![]()
![]()
Back to Aesti Models