

Would you buy a cheap parachute?
 |
When buying outdoors gear, the rule is "Buy the best you can afford". With little exception, this is gospel. In outdoors gear, quality usually does equate to a higher cost. But you must depend on them with your life, so you must ask how much is your life worth? With so many offerings by many excellent manufacturers, who's to say what's best? Truth is, most of them are good, but this review simply tells you which I found were exceptional. I have made my share of mistakes too, so this may tell you what to steer clear from. |
Layering 101: Use the layering priciple when dressing for the outdoors. 3 Layers: the base, mid, and shell. In all cases, this is the rule: do NOT wear cotton. In fact, if the cotton is wet and its windy, you lose body heat 8 times faster than if you were naked. High tech fabrics are typically used for all layers, and are usually synthetic.
- The base layer is next to the skin and must keep it dry. Therefore it must wick moisture away from the body and dry ultra quickly.
- The mid-layer must create the "comfort zone" environment, and is the main insulation for the body. It must also continue to move moisture outwards where it can disperse and dry out quickly. Synthetic fleece is the standard here, as it is light, warm even when wet, retains little moisture, and dries quickly. Be careful, because not all fleece is created equal. Wool has been making a comeback lately, but many people find they are allergic to it, and, personally, I find it too heavy and bulky, especially when wet.
- The shell protects you from the elements, and shelters the micro-environment around your body from the outside conditions. It must protect you from the onslaught of any weather condition, be it rain, sun, snow or sleet. At the same time, it must keep the micro-environment regulated, and must allow moisture to escape while not letting any in.
Choosing: Any of the large manufacturers can be trusted: Arc'Teryx, Garmont, Helly Hansen, Lowe Alpine, Marmot, MEC, Moonstone, The North Face, Patagonia, Raichle, REI, Sierra Designs, Zamberlan, etc.. Stay away from hyped-up urban sports wear like Columbia, Eddie Bauer, Nike and Gap. They may work fine in the city or on the ski slopes, but are terrible in the backcountry. Personally, I've found The North Face and Sierra Designs overrated: pretty to look at but not truly innovative in their clothing (though TNF's Mountain Jacket is a classic), and way overpriced for what you get. However, along with Mountain Hardwear, they still make the best tents and sleeping bags on the market. My favorite gear come from Arc'Teryx (for high-end shells and packs) and Patagonia (base layer and fleece). Another favorite is MEC, who turn out quality high-tech gear (copied from high end manufacturers with the same high-tech materials and designs) at much lower prices.
| Boots |
| Shells |
| Softshells |
| Mid-layer |
| Base-layer |
| Packs |
| Sleep |
| Misc. |
| Drool |
| Mistakes |
| My Gear | |
| Boots | Boots are your most
important investment for backpacking. Make sure
they fit and choose well. With the exception of
approach/trail shoes (which last 1 or 2 seasons
the most), they should last you many years of
adventuring. Fitting: Wear the socks you will be using on your adventures. This gives proper volume when fitting. Don't take your size for granted. Many different manufacturers have different size variations. A size 9 Raichle isn't necessarily the same as size 9 Danner. Make sure the boot fits your feet. After putting them on, walk up and down on a slope (real boot fitters will have one instore), as well as round the store. The heel should not move, and the toes should not touch the front. Your foot swells during the day, so shop later in the day. Try as many makes, models, and sizes as possible - and trust your feet. Choosing: Since boots get heavier as you get more serious, don't get more boot than you need. If you tend to only do day hikes on nice days with a light day pack, approach shoes or light trail shoes are fine. As your pack gets heavier or the weather worse, you will need proper ankle support and weatherproofness, especially going up and down hill, so consider light boots with high ankles. Full leather backpacking boots are required for support in carrying over 25lbs and tackling high peaks, talus or scree slopes, or backcountry conditions. However, these boots average over 3lbs and are easily over $200, so don't buy them lightly. |
| Salomon Raid Wind/Race/X-A Pro. Approach Shoes - I enjoy their light weight and comfort. The current generation (XA Pro2) has a better quicklace than the Raid Race, and much lighter mesh. $129 | |
| Hi-Tec Odyssey. Dayhikers. As long as you don't get too aggressive with these, they're fine. Lightweight and waterproof, they're ok for on-trail hiking uphill or level off-trail with a light pack. Proper backpacking boots such as the Protrek (below) are more versatile, though heavier. These have since been relegated to "city boots" status. $80 | |
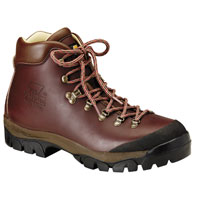 |
Zamberlan Protrek RR. Aggressive backpacking boots. My main backpacking boots are updated versions of the classic Alpin Lite. They employ full grain leather, full nylon shank, vibram soles, and a protective rubber rand around the toe to fend off bumps and rocks. They are truly heavy backpacking boots, and weigh in close to 4 lbs. I use them for everything except light day hikes (for which I use my approach shoes). They've saved me from many a sprained ankle and foot baths, though breaking them in, like any backpacking boot, gave me a few blisters. Originally classed as mountaineering boots, these are perfect for off-trail, rough mountain backpacking with moderate to heavy loads. $215 |
| Shells | Your protection against the elements, the shell must act as the barrier between the outside environment and you. A typical shell should use waterproof-breathable technology like Gore-tex (or similar proprietary technology). At the very least, it must repel rain, wind and snow. More durable "mountain jackets" should fend off ice and sleet and offer some form of insulation. These are often the most expensive parts of your wardrobe, but if you subject yourself to extreme alpine conditions, they could mean the difference between life and death. |
| Marmot Precip Jacket. An instant classic! Breaks the "best-you-can-afford" rule. This jacket is perfect for 3-season use due to its light weight (12oz!) and compactibility (easily fits in a Nalgene bottle). Excellent breathability and compressibility. However, the small hood doesn't fit over my helmet, and its thin fabric offers no insulation and is not durable in the face of serious abuse. $159 | |
| Arc'teryx Theta AR. My extreme mountain/cold weather shell, which has moved from my drool list to my purchased list. Firts, I bought one for Lynne, and then myself. Waterproof 3-layer Gore-tex XCR shell in a lightweight design. They are more breathable than classic Gore-tex, especially at high exertion levels (Gore-tex isn't really breathable without the exertion) Much more protection and durable than the pre-cip - you gets what you pay for. I use it only on big mountain backpacking/mountaineering trips. $750 | |
| Patagonia Direct X Jacket. Retired. Waterproof 3-layer H2No shell in a lightweight design. They are less breathable than Gore-tex - but at high exertion levels, I notice no difference (Gore-tex isn't really breathable either). Besides, that's what the venting pit-zips are for. Extremely durable, but lighter than traditional shells at a mere 18oz. The visor on the hood is my only complaint. It sucks. $300 | |
| Soft Shells | An entirely new category. Soft shells are not waterproof like hard shells, but move moisture outwards much better and faster. They also breathe a whole lot better. They do repel rain and shed snow, and dry very rapidly when wet. They are the preference when doing speed ascentsand body moisture and heat will soak you just as surely as the steady rain. In fact, even in the rain and storms, the soft shell will keep you dryer and more comfortable than hard shells if you are actively moving or climbng hard and fast. |
 |
MEC Pamir Jacket. This soft shell is a virtual carbon copy of the Arc'Teryx Gamma SV at half the price. It excels at high-exertion activity (like backcountry skiing, backpacking, climbing) in abusive weather. Excellent jacket to fend off wind and precipitation and poor mountain weather. Although it isn't waterproof like a hard shell, it breathes much better and moves moisture away from the body like a sieve. However, because it is so tight, I find that layering underneath is impossible. For this reason, I prefer the Ferrata jacket in colder weather. $145 |
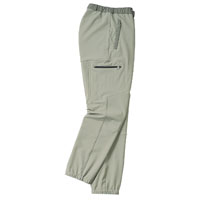 |
MEC Ferrata Jacket and Ultra Pants. The Schoeller Dryskin fabric is the heart of this technical mountain wear, and makes it my best and favorite backpacking/mountaineering softshell and pants. It dries quickly, sheds snow, deflects wind, and repels rain. It breathes about the same as the Powershield fabric in the Pamir Jacket, though does not offer the same kind of insulation. For this reason, the matching jacket is the best piece to cover an R2 or R3 regulator in codler weather. The tough fabric itself is like rhino skin, and seems to shed dirt as easily as snow. $145 |
| Mid-layer | This is the insulating layer, and is depended on to keep the body warm. Today's high-tech mid layers are light, breathable, trap warm air, are warm when wet, and drive moisture away from the body. Because of this, they absorb little water and dry rapidly. Wool used to be a staple fort his function, but has generally lost favor for synthetic fleece. Polartec makes the best fleece and can be purchased from many clothing manufacturers, sometimes, quite inexpensively. |
| Patagonia R2 Regulator Jacket. The Regulator is the new collaboration between Patagonia and Polartec. There has never been a fleece as warm for its weight as the R2, the mid-range Regulator. Its technically not a fleece, but a pile jacket, and moves moisture faster and breathes better than any other fleece on the market. Mine is a first generation, purchased in the winter of 1999/2000. Extremely warm (between traditional midweight and heavyweights in warmth) and compressible (lighter than midweight), the R2 earned its stripes for me when backpacking up Mt Washington the following May, and then climbing the back wall at Lake Louise that summer, keeping me feeling warm and dry despite a thunderstorm. I bought Lynne one as well and she loves it as much as me. $190 | |
| Patagonia Puffball sweater. Lightweight nylon and insulation makes the Puffball the best camp sweater around. No wicking ability means I don't wear it while moving - that's what fleece is for. MEC equivalent is the Northern Lite, and the current Patagonia version is even lighter. $200 | |
| Patagonia R3 Radiant Jacket. The warmest Regulator weight, the R3 is a true blast furnace for cold weather warmth. Its lighter than heavy fleece, but warmer, and more wind resistant which earns its place in my backpack on winter trips. $209 | |
| Patagonia Synchilla Snap-T. The classic, which I've retired from wilderness use. The very definition of "Tried, Tested and True", the Snap-T is the original fleece sweater, a collaboration back in the early 80s from a then-unknown company named Polartec and outdoors manufacturer Patagonia. As a poor student, I bought an LL Bean knock off in the mid-80s, only to have it pill after a few washings (synchilla doesn't pill, even if put through the dryer). I bought my first authentic Synchilla in 1990, and, though the colors are a little dated, it still works great. Even though I've replaced it with the more technically advanced Regulator fleece when I'm on the go, its still a favorite - nothing is more comfortable to lounge around in at a cold camp. In fact, I have recently bought a new Snap T to replace the old one. $120 | |
| Patagonia R1 Flash. Lightest weight Regulator mid-layer, the R1 is in between insulation and base layer. The Flash offers excellent warmth, breathability and moisture control. But because it hugs your body (to increase moisture control), its meant as a base layer. A good layer beneath a softshell for backcountry skiing or mountaineering in warmer (around 0 degrees) weather. $140 | |
| Base layer | A fancy word for "underwear", the base layer is technically whatever is the first layer of clothes next to your skin. It must keep the skin warm and dry, thus offering some insulation and rapid moisture wicking. Today's base layers are not only worn as underwear, but as the "only layer" in warmer weather or during heavy aerobic activities. |
| Patagonia Capilene. The best base layer out there and the standard from which all others are measured by is another original from Patagonia. I've had mine since the early 90s, to replace my LIFA. Different weights are available, though I found midweight and lightweight the most versatile. I also have a silkweight t-shirt, which I love. $45 - $100 | |
| Patagonia R.5 Zip T. A replacement for my expedition weight Capilene, the "half Regulator" R.5 is warmer, more compressible, though (repudedly) more stinky (retains more odor). Still, an excellent addition to the wardrobe and more versatile than the old expedition weight Capilene. It has become my standard camp shirt. $100 | |
| MEC Powerdry Boxers. What's the point of wearing high tech base layers if you're going to wear cotton skivvies? These are a little warmer than I'd like and the elastic waist gets a bit sweaty. I may go and look for a pair of Capilene boxers next. $15 | |
| Helly Hansen LIFA. Nothing moves water better than polypropylene, but it has largely lost favor to polyester (such as in Capilene) because of its odor retention tendency. However, it is offered at an unbeatable price for those who are value conscious. My second choice after Capilene. $40 | |
| Smartwool Trekking Socks. Wool is making a big time comeback, thanks to companies like Smartwool and Ibex. These are the most comfortable backpacking socks you'll ever wear - wool or otherwise, and they don't itch. Mistake: don't wear them in the Arizona desert. $20/pr | |
| Packs | Fitting: Packs
rank up at the top as the most important pieces
of gear when backpacking. Make sure they fit
properly and don't skimp on the cost on these
items. The size of the pack depends on your torso
size, not your height. To measure your torso,
measure from the seventh vertebrae (the bony
protrusion at the base of your neck) down along
the contour of your spine to the low point
between your hipbones. The pack's manufacturer
should be able to fit you according to that
length (typically <18 inches requires a small,
18 to 21 inches a medium, and >21 inches a
large). The pack's hipbelt should fit snug over
the spot where your hipflares out from your
waist, over your hipbone. Loadlifters should be
about 45 degree angles from your shoulders. For
more on pack fitting, go to: http://backpacker.com/article/0,2646,248,00.html Choosing: Should you go for an expedition or an alpine? 90L or 75L? This really will depend on experience: on how much gear you tend to pack, and on length of your trip. The nice thing is, bigger packs don't have to be heavier - there are many lightweight models out there. Buy for what will be the majority of your trips. Remember, bigger is not better: a bigger pack is extra weight and if its half empty, will not carry as it is intended. For weeklong backpacking, an expedition sized pack of 72L (4500 cubic inches) or more is the norm. An alpine or weekend pack can be used for shorter trips, but again, the exact size will depend on you. Know which features you must have and which are "cool" but you probably won't use anyways. |
| Arc'Teryx Khamsin 62 Backpack. My multi-day backpack for all of my adventures. This pack is light, fits me well, and swallows all my gear and then has room for a Thanksgiving turkey. It says it has a capacity 66L, but its closer to 75L (plus another 10L with the extension collar). The hip belt is better than any I've ever tried or used in a backpack, as it swivels with hip movement. It also features more than you'd expect in a 4lb pack, including a full length zipper, shock cords, and shove-it pocket. The lid is removable if I want to go even lighter. Complaint: no pocket for a Camelbak bladder. $299 | |
| Salomon Raid Race 300 This Adventure Racing pack is extremely light and versatile, but less durable as a result. Room for 2 water bladders, the 300 has replaced my Camelbak pack. Camelbak bladders are great for water on the go, and the mouthpiece is much better than the Platypus equivalent - its like having a water hose as i hike. However, the water in the hose has a tendency to freeze in subzero weather (they sell insulating sleeves for them). $150 | |
| MEC Huascaran Daypack. This has been my workhorse daypack for over a decade, serving as both a weekend pack and a bookpack, used in both outdoors and the city. No-nonsense stuff-sack design with a pocket in the lid, rugged 1000 denier nylon. I just wish I could update the colors. $45 | |
| Sleep | MEC Wilderness -12C Sleeping Bag. A great, economical 3 season bag, which , thanks to the virtue of my being a "warm sleeper", I can use in colder weather. Ample room, and fairly light, though heavier than current equivalents. Lynne uses a Vertigo -12 which is much lighter, using Primaloft insulation. However, for the price, it is a great alternative to those $400 down sleeping bags. $120 |
| Thermarest Classic. Another "Tried, Tested and True", nothing beats an original Thermarest for quality of sleep and weight. Even after burning a dozen holes in it from using it too close to a campfire in the Ghost, a quick patch job ensures many more seasons of use. I've had mine since the 92 and have been wanting to get a new "ultralight" model, but can't find an excuse. I almost had one when it started floating away into the ocean when my brother Ron and I were camping in the Whitsunday Islands down under. These things are great. $75 | |
| Misc. | Petzl Tikka. When I bought my first headlamp (a Petzl Zoom), I knew the days of my Mini-Maglite was over. Headlamps are so much more versatile than a handheld flashlight, especially to keep the hands free. However, the Zoom was heavy, especially the battery pack, and I (like everyone else should) carry an extra battery. Then the Tikka was introduced in 2000. I bought one immediately. This baby is one of my best investments, with 150 hours of burn time and using virtually everlasting LED lights, I've been able to shave off a pound in my pack weight (they weigh next to nothing). Its 2004 and, despite many wilderness trips, I haven't changed the batteries yet. I no longer pack extra batteries either, and at $40 (now $35), they're a steal. |
| Mini-Maglite. After hearing my brother's story 5 years ago, where an 80m fall broke his group's only light source and resulted in a downclimb and hike in the dark, I started packing one again for backup. They're indestrutible and almost free at $12. | |
| Kabar USMC Combat Knife. People often laugh at my "bear huntin' knife". Fixed sheath blades have largely lost favor outdoors (except in hunting) due to their weight, but any serious survivalist knows it is a necessary survival tool, so I still carry mine. The original Kabar is still carried by US Marines and soldiers around the world, just like it was in WW2, for which it was made. I have used mine to dig holes, chop wood, and hammer down tent stakes, as well as usual "knife stuff". Its been with me to Australia, the Caribbean, and all over North America. Made for military purposes, it is an extremely tough and sharp knife, though a bit too long, and the 1095 carbon steel makes it easy to maintain in the field. It also shows everybody who's in charge of the expedition. $100 | |
| Gerber and Leatherman multi-tools. Swiss Army Knives (SAK) are to Multi-tools what sports cars are to Jeeps. They reflect a lot about their designers and the societies that produced them the SAK is refined, stylish, and politically correct. The Multi-tool is ugly, heavy, and utilitarian. Whereas the SAK is very much the gentlemans blade, the multi-tool looks, well, mean and nasty. Its like a medieval bastard sword next to a fencing sword a brute, meant to inflict damage and hold up to abuse. | |
| Both the US and Canadian military have issued multi-tools as standard kit (Gerber MP600 and SOG). Our soldiers use their multi-tools for everything from repairing HMMWVs (Humvees) to digging fighting holes to maintaining their weapons. Apparently, the Swiss Army needs theirs to open bottles of wine wherever they fight. Hmm, perhaps they can open bottles of wine for us while we repair our Humvees. Even its size and weight is utilitarian if I had to clobber someone, Id much rather do it with a multi-tool than a Swiss Army Knife. | |
| My dad got one in 1989 when the term was still young and the number of companies making them could be counted on one finger. My dad's was an original Leatherman Pocket Survival Tool (since renamed the Leatherman PST - due to be retired at the end of 2004). | |
| When I moved out of my house, I upgraded my SAK for a multi-tool that would open one-handed. This time, it was the Gerber Multi-Lock Scout (later renamed MP600 Scout) a variant of the model later chosen for the armed forces. This was the extent of my tool box for half a decade and I carried it everywhere. When backpacking I used it to fix tent poles, hold pots of boiling water, cut food, whittle wood into chopsticks, or repair my glasses. At home I opened my beer, cut wires, and fixed my car. | |
| Recently, I had reason to re-examine what tools I needed and did not need in my multi-tool. This was a result of giving my Scout to my brother, who is serving in the Canadian Forces and had lost his issued 600. My rationale, of course was where I would be using the tool the most. At first, I figured I needed a lighter tool something to carry backpacking, which had the necessary implements but was lighter than others. I would need a blade, both serrated and straight edged, slot and Philips screwdrivers, wire- cutters and, of course, needle-nosed pliers. I also needed a can opener (emergency stashes are still most often in the form of cans) a requirement that eliminated the MP700 and MP800 from my list. The MP400 Compact Sport, weighing in at 7 oz, was my tool of choice. It had everything I needed and nothing more. Though I would've preferred it over the scissors, the serrated blade was not available for the light version. | |
| After a couple of backpacking trips, I decided I needed a different tool. I would forego weight and get something more robust. First, I wanted different blades for serrated and straight-edged blades I found whittling sticks to be problematic with a half- serrated blade. All the different screwdrivers are useless in the wilderness, so I'd rather have another knife blade or file. Next, I would rather have a tool which opened the blades one handed without needing to open the pliers (this in place of quick opening pliers) I used the knives much more frequently than the pliers. Unfortunately, the Gerber tools could not meet my requirements, and I looked back at Leatherman. The new version of the Wave met the requirements, but since I had some money to spend, Id go all the way, and purchased their new flagship - the Charge Ti. Its kind of like a Wave on steroids, with all the same tools, but with Titanium handles and a blade made of premium 154CM steel. | |
| The Swiss Army Knife may be in the Museum of Modern Art, but when you find yourself in a wilderness, whether backpacking in the Grand Tetons or on patrol near Kabul, which would you rather have on your belt? I know my answer. | |
| Spyderco Endura. This is my real survival knife, as I carry it everywhere. A knife that you can open one-handed is a must, especially with a serrated blade to cut rope in one stroke. The Spyderco, which uses premium steel (ATS-55 in my original, VG-10 in my current replacement) offers the best on the market. $75 | |
| Swiss Army Knife Ranger. Bought it in Switzerland in 87 and like the Energizer bunny, it keeps going and going. I retired it as my main tool when i bought my Multi-tool because it wan't as versatile, though not because it was worn out. I keep it in my survival kit. $50 | |
| MSR Whisperlite Internationale 600. One can instantly see the reason for the success of this stove, which is, arguably, the most popular backpacking stove on the market. The ability to burn almost any fuel source makes it "Internationale". I've used it to burn white gas, kerosene, and auto-fuel. It is foolproof, easy to operate, easy to clean, light, compact, and reliable. The very essence of a classic. $105 | |
| MSR Dragonfly. This stove is more robust than the Whisperlite, and is like a Whisperlite Plus. This stove has a dual valve, which makes it the best simmering stove on the market. Multi-fuel like the Whisperlite, I've used it in Australia as well as North America. $165 | |
| REI Trail First Aid Kit. The basic essentials in a light, easy to carry package. It lacked a SAM splint, which I bought separate and keep together with the Kit. But its pefect for day hiking and other light outdoors use. $35 | |
| Adventure Medical Backcountry Kit. A much more extensive First Aid kit. I have not yet had to use it as I only got it at Christmas. It is almost 2 lbs heavier than the Trail , but contains much more supplies, which is necessary for longer, multi-day trips where medical help is more than a day's hike away. This kit includes a SAM splint and both hypo and hyperthermic thermometers. $101 | |
| Nalgene Lexan Water bottles. I've tried 2 L soda bottles and evian bottles (both of which cracked or broke) and I've tried Camelbak and Platypus (both of which froze). I used to use the older (pre-lexan) Nalgene bottles, but they retained odor and had to be tossed. Nothing beats the lexan Nalgene bottle. I now have 4 lexan 1L bottles, one from 1992, still as indestructible as they were when they were new. $6 | |
| Suunto Observer Titanium. It helps that I didn't pay for this - I probably never would have and it would've stayed in my "Drool" section. But I got it as a present last Christmas from Lynne. $650 | |
| Climbing | I can't say I'm an expert in climbing equipment (that would be my brother), but here's a list of what I do have.... |
| Arc'Teryx Verro Harness. A comfortable all-round adjustable harness. $89 | |
| Black Diamond Blizzard Harness. Yes, I have two harnesses. I use one to teach others. $87 | |
| Mammut Flash Duodess 10.5mm Dry Rope 60m. This rope has a nice soft hand, and since I only use it about 6 to 10 times a year (I don't bring it out west, as I can use my brother's), its in good condition. I only wish it were a more pleasing color. $210 | |
| 5-10 Anasazi Mesa. Good shoes for steep and cracks, but next time I'm getting velcro! | |
| Black Diamond Hotwire Quickdraws. | |
| Black Diamond Quicksilver 2 Quickdraws. | |
| Black Diamond ATC. Once upon a time, I was taught to belay using a carabiner and some fancy knot. Thank God for the ATC. Light and easy to use, it is a great little device. $29 | |
| Petzl Grigri. For tired or beginner belayers. $75 | |
| Wild Country Rocks. #1-#10 | |
| Black Diamond Halfdome helmet. | |
| Petzl Attache Screwgate | |
| Drool | |
| Jeep TJ Rubicon. Trucks are not meant to be cute. Trucks are not meant to be economical or fuel efficient. They are meant to be utilitarian and functional, both of which the Jeep is - the original SUV. I think the Jeep is beautiful, and if I were to buy a sports ute today, that is what I'd get. People may ask why a Jeep is on my drool list when they now my dream car is a HMMWV ("Humvee") - basically because the drool list follows my "Best you can Afford" rule, and I cannot afford the Humvee. On the other hand, I hope to get a Jeep. A real truck for real men. $28,000 | |
| Mistakes | |
| Boots | Matterhorn. My first rookie mistake: buying hiking boots from a department store. My second: buying the cheapest boots there. Sure they looked like "big mountain boots", but they performed like a schoolbus on the Chilkoot Trail. The most important piece of backpacking equipment can cause the most amount of pain and suffering on the trail. If you're going to be cheap, don't take it out into the backcountry. Choose wisely. $50 |
| Shell | MEC Neve Jacket. This 2-layer classic Gore-tex shell had a liner that stuck to me like saran-wrap. I hated it. But because Gore-tex was so expensive when first introduced, I couldn't afford 3 layer. The next generations used mesh instead, which really helped (so I'm told). $170 |
| Patagonia Puff Jacket. What was I thinking? Sure its warm, warmer than anything else I have, but so is my daddy's 1950s parka. This jacket is too heavy and uncompressible to backpack anywhere. Its supposed to be for milling about a cold basecamp, but there are much more compressible and lighter options - including a Synchilla Snap-T and my Puffball sweater. I have since replaced it with a R3 Radiant jacket and a "Puffball" pullover, both of which are much lighter and packable. It makes a good city-jacket though, when I don't want to pull on multiple layers. $200 | |
| Mountain Hardwear Windstopper Vest. Its fits well over my R2 Jacket. It moves moisture better than Gore-tex and stops the wind (as its name implies). However, because it uses a laminate, it doesn't breathe or move moisture as well as I'd like. And at $200, its more than I paid for some full jackets, and for those two reasons, it was a mistake. $200 | |
| Mid-layer | Helly Hansen Profleece Vest. Though fluffy when first bought, the fleece pilled to nothing in just a few washes. Proof that "Not all fleece is created equal" and shows why the premium Synchilla commands is worth the extra shelling. $45 |
| Base layer | Nike Dri-fit. Not only is it not as efficient at moving moisture, but it isn't nearly as durable in the bush. It is pretty, though, but srictly city-wear. $50 |
| Misc. | Lowe Alpine Contour Crossbow Backpack. I bought this one because it was on sale and because it was pretty. It also had a cool shovel pocket and reflective straps. That did not compensate for the lack of versatility in this panel loading pack, though. Yet another example that it doesn't pay to be cheap, and always choose form over function. $145 |
| Tilley Endurables Classic Shorts. Who cares if they are warrantied for life? Limited mobility and slow drying times keep these out of the backpack. $105 | |
| MEC Ropebag. Waste of money. I can probably use a backpack to effectively carry all my climbing gear to the crag in a much more comfortable pack than this. Oh well, at least I can store my gear in there. $45 | |