
Supplies Needed


MuRa's Filter Meister - Copies
1. Open the roses image and the gold foil image.
2. Press shift+D to duplicate the roses image. Do this twice. Close the original.
3. Press shift+D to duplicate the gold foil image and close off the original. Minimize your copy of the gold foil image, we won't be needing it for a while.
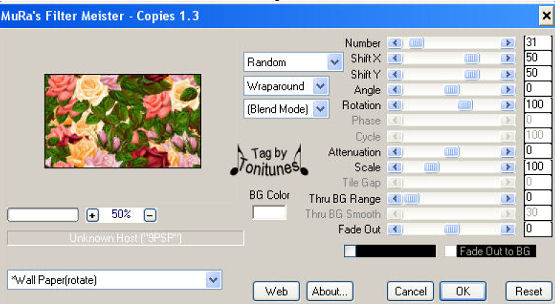
4. On one of your roses images - effects>Mura's Meister>Copies - Use the settings shown below
Minimize this image for now. We will be working on the other roses image.
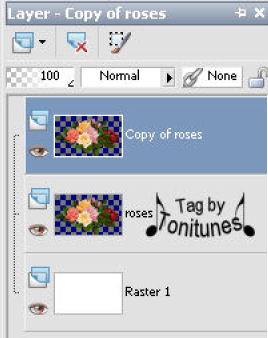
5. On the second roses image - Layers>New Raster Layer
6. Layers>Arrange>Send to Bottom
7. Flood fill this layer with white.
8. Activate the roses layer and duplicate. This is what your layer palette should look like now:
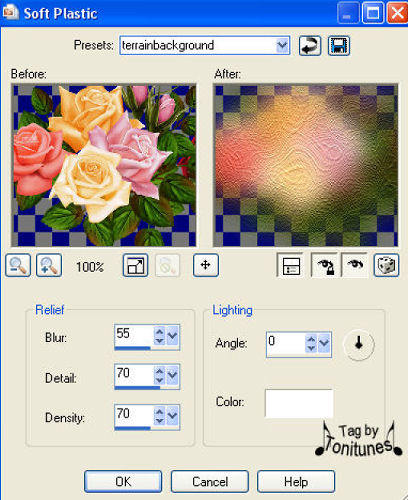
9. Make sure your roses layer is acitve - Effects>Texture Effects>Soft Plastic
- Blur 55, Detail 70, Density 70, Angel 0, Color White
10. Lower the opacity of this layer to 60
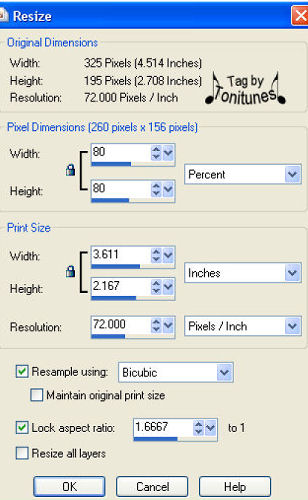
11. Activate the copy of roses layer - Image>Resize Width and Height 80 Percent, Resample using Bicubic - Make sure the resize all layers is NOT CHECKED
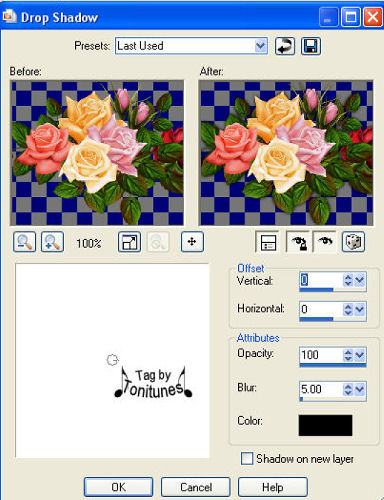
12. Add a drop shadow V0, H0, Opacity 100, Blur 5, Color Black
13. Layers>Merge>Merge All
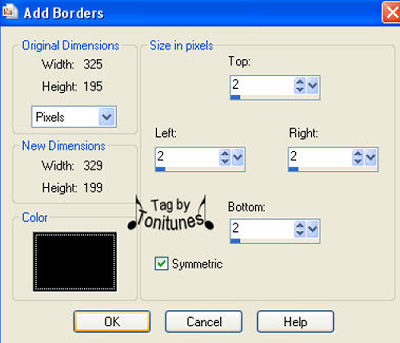
14. Image>Add Borders - Add a symmetric border of 2 pixels and black in color to your image.
15. Use your magic wand mode = add, match = RGB, tolerance = 35, feather = 0 and anti-alias Unchecked and click on the black border around your image.
16. Click on the floodfill bucket
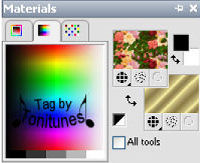
17. Set your foreground to your first roses image that we used Mura's Copies on and your background to the goldfill image. On both set the angel to 0 and scale to 100.
18. Floodfill your selection with your background.
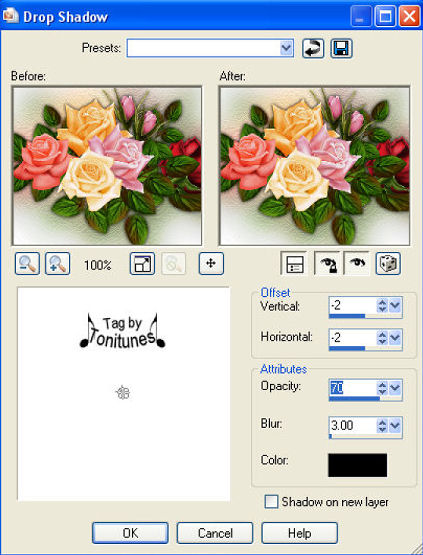
19. Effects>3D Effects>Drop Shadow - V2, H2, Opacity 70, Blur 3, Color Black
Repeat this with V-2 and H-2
20. Selections>Select None
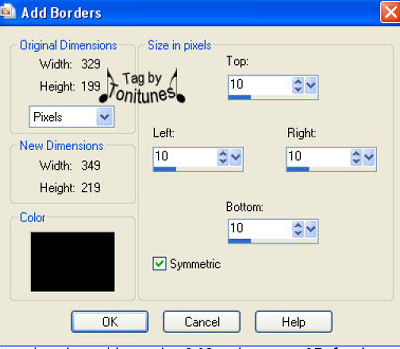
21. Image>Add Borders - Add a symmetric border of 10 pixels and black in color to your image.
22. Use your magic wand mode = add, match = RGB, tolerance = 35, feather = 0 and anti-alias Unchecked and click on the black border around your image.
23. Click on the floodfill bucket - Floodfill your selection with your foreground.
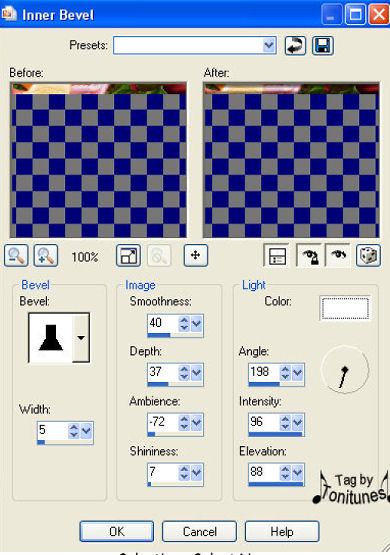
24. While it is still selected - Effects>3D Effects>Inner Bevel - Use the following settings:
25. Selections>Select None
26. Image>Add Borders - Add a symmetric border of 2 pixels and white in color to your image. You want to use white this time instead of black for the contrast so that your magic wand will only pick up your border. Use your magic wand mode = add, match = RGB, tolerance = 35, feather = 0 and anti-alias Unchecked and click on the white border around your image.
27. Click on the floodfill bucket - Floodfill your selection with your background
28. Click on the floodfill bucket - Floodfill your selection with your background
29. Selections>Select None
30. Now you can add your name, watermark and whatever other information you wish.