Welcome
Are you interested in a Mod Chip? Well, this web site is here to help you
out. It was made primarily for my own use, to keep track of information, but
I decided to make my findings public, and so here they are. This information
may be out-of-date for some systems, and I don't have any current intentions
to update it.
About Mod Chips
If you're here, you probably already know this. If you don't know what a Mod Chip is, though, this section is for you. This describes what the site is about.
A Mod Chip can be spelled as Mod Chip, Mod-Chip, mod chip, ModChip, and probably also modchip. A system which has a Mod Chip in it is considered a modified system, and so is often called a modded system.
The purpose of Mod Chips are to give the user of a video game system control to do things that the
manufacturer did not allow (and very often specifically went through some efforts to disallow) the end
user, the consumer of their product, to do. Two examples are:
- Commonly, video game system manufacturers
do "Region Checking", which prevents a system designed for use in North America to play any Japanese
games or European releases, and also Japanese systems cannot play North American titles, and so
forth. Systems are often designed for use in one "region" which is defined by the hardware
manufacturers, and software released in one region won't work on a system designed for a different
region. The reason for these limitations are economically motivated. Since Americans often want to
play the latest game titles, and since games are often released in Japan well before they are
released in America, a demand came to exist for a way to modify American units to play Japanese
games. Americans who purchased a Japanese version of a video game system (in order to play
Japanese games, possibly bought before the system is released in the United States) may want their
Japanese system modified so that it can play American releases. I would imagine that people of other
nations may also have similar desires: I mention Americans because I'm in America so that's what I see.
-
People which to archive their original CDs, and play off of backups so that the original CDs do not
get exposed to the wear and tear of normal usage. Surely there also exists a desire to play software
on recordable medium because people like to cheaply make illegal copies of software, whether that means
copying a game from a rental store, from a friend's original legitimate copy, or from some file
downloaded off of the Internet. Actually, this group of illegal pirates likely consists of far more
people than those wishing to play off of backups for legitimate purposes.
A "Mod Chip" originally referred to a chip that contained logic to bypass region encoding. Today,
though, mod chips can come in different forms. The original Playstation unit can have regional
checks overridden by an external device that plugs into a normal port of the system. This device
is called an "External Mod Chip". There is also a CD which can be booted before switching to another
CD, and this CD is referred to as a "CD Mod Chip". So, today, the term "Mod Chip" is slang for a
certain type of modification device, whether that is distributed as a chip and wires to solder to a
motherboard or as a simpler-to-install unit.
Contact
If there is still a website at
http://TOOGAM.Bespin.Org pointing to my
material, I believe you can still send me an E-Mail at
EasyModChipsPageAtGeoCities@TOOGAM.Bespin.Org . Otherwise I recommend checking for ways to contact me by visiting the
main page on this site, http://oocities.com/toogam
or, more likely to be useful, information at http://TOOGAM.Com
Ordering
I do not currently sell any
mod-chips, nor do I intend to. This page is meant to be informational only,
so don't blame me if any orders you make results in a bad experience.
Status of this site
I expect to largely ignore this site. This site contains useful
information about the consoles which were out at the time of its creation,
including the Xbox (Microsoft's first console system) and the Playstation 2.
If you find any updated information for any of the consoles listed here, feel
free to let me know and I just might update this site with the latest
information.
If I say that I'm not sure of something, it's because I'm not sure. Often
documentation on other web sites is vague, and so when I try to lay things
down into a clear format, I need to state that I'm not clear. Perhaps the
staff of the web site I got my information from does know the answer, but I
don't. Maybe when I have a ton of money I can buy a European system to figure
out exact details, but for now I can only go by what I read.
Terms of this web site
Tested means that I've tested it. Reported means that it's been reported by someone
to this web site. Suggested means that I suggest these products based on I've
read and what I've compared to.
Advantages to EasyModChips
This site doesn't sell mod chips. Right now, this web site is an independant source of information. We have no current biases, no financial profit or hidden agenda why we recommend one product over any other.
Many web sites out there are just trying to sell, sell, sell. When they sell a Mod Chip, they only tell you what it does, and not what it doesn't. They may even be a bit deceptive. As an example from when this site was created, many web sites outright say or try to suggest that a particular Mod Chip supports imports, but upon closer reading you find out that although the Mod Chip which is designed for a PS2 system supports running games off of backup media for both PS1 and PS2 games, the mod chip only supports Imports for Playstation One games in a Playstation 2 system. In contrast, this web site tries to lay things out clearly in charts, what is and is not supported.
Not only does this web site try to make finding a mod chip for your needs
easier, but I also try to make your installation easier. Numerous Mod Chips
exist. Some require soldering, some do not. Some require soldering more
wires than others. The older chips that require more work are often sold long
after better alternatives come out, just because the sellers are trying to
unload their stock. However, when the webmaster of this web site finds out
about a better solution, I have no reason to delay telling you about it.
About Installations
BooB's web site once said:
Remember this catchy phrase: "If in doubt leave any modification out."
Well, you can choose to do this or not. Installation MOD chips can be as easy as plugging
a controller in a system, or it can require soldering. Soldering itself isn't necessarily
difficult, but it basically involves holding a hot object, often steadily, and melting a
conductive material so that you are modifying the electronic pathways on a circuit board.
This means it can be dangerous, not only to you since you're holding a hot tool, but also
you could cross electrical pathways that shouldn't be crossed or disrupt a pathway
that should exist. You'll need to buy a soldering iron if you don't have one, which probably
runs at about $12 from Radio Shack, and you really oughta have some safety glasses since the
heated solder can rise up like steam and you don't really want super-heated metal getting
into your eyes before it cools off.
In any case, any installations you do to your equipment is done at your own risk. This
web site takes no responsibility for the installation or use of any of the equipment on
this page. Information on this page, particularily that based on what I have read on
other web sites, may in fact be false, and if it is then you are given no warranty.
If you break a system, I am not in any way responsible.
Always unplug everything you can before opening an electrical component. The
following generalizations are true in most if not all cases: Realize that
the video game systems described here were designed to be opened only
by qualified technicians, not home users. You're not going to get a factory-authorized
technician to install a Mod Chip for you. No matter who you get to install a Mod Chip,
you are most definitely going to be voided any warranty that the system manufacturer
gives. If you do need to send your system in for repair, a company may "repair" your
unit by removing any modifications, or they may do something much more unexpected such
as confiscating your system and start making declarations of how illegal your actions of
modding the system were. Granted, this response was just made up and perhaps no company
would really do that, but no matter how untrue such allegations would be if they are
made, you may have a hard time fighting the company to get your bad system back. The
general attitude of system manufacturers is either thinking that modifying systems is
illegal or that "If it's not illegal, it should be".
I wish you the best of luck, from far away. All modifications done by you or anyone
you authorize is done at your own risk (or whomever you can pass the blame onto, such
as whoever you are authorizing to modify your own system, but not me).
Specific Mod Chips
This is likely the section you came here for. If I say something is not available, it means that either the item
is not available or I simply don't know about it. It's possible that something becomes released after I do
research and decide that it doesn't exist. Feel free to update me by E-Mailing me in the address given in the
Contact seciton above.
Prices indicated will generally be for one unit. Bulk Rate purchases are often discounted. More information on
those discounts can be found at the individual stores in question.
The Xbox has two types of mods, the standard mod-chips and the software
mods. No information is available here, at this current time, about the
hardware mod-chips. A software mod will let you run unsigned code on your
Xbox, such as a file manager with an integrated ftp server. Even the Linux
operating system can run on an Xbox.
I used a software mod because it
was fully reversable, and I didn't (originally) spend a dime on extra hardware
to do it. (I did eventually decide to buy an Xbox memory unit, the Xbox term
for a memory card. This wasn't until some time after I had the software mod
working, though.) Through a series of button presses, I can run an ftp server
on my Xbox and can execute any code, even unsigned code, on my Xbox. Your
success may vary depending on what software you try to use to get this
happening and what version of the Xbox's dashboard and kernel you have, which
may largely depend on when you bought your Xbox.
For more information, check out
http://TOOGAM.Com/xboxmod. (Unlike
the links to vendors of hardware found elsewhere on this page, this link for
the Xbox software mod does actually go to a site which is run by me.)
I've heard now that there is a method to get the PlayStation 2 to run
unsigned code. I haven't explored this information to find out how, or to
know if it is as significant a development for the Playstation 2 as it was
for the Xbox. Since I have heard from multiple sources that this does exist,
though, I figured I'd mention it here to let you know to look for this
detail.
Note: Some devices may require a Game Shark 2 or an Action Replay in order to provide
some or all functionality. I will abbreviate this according to the following chart.
Note that if I don't specify a region, it means either USA-only or world-wide (and I'm
not really sure which).
| Abbreviation | Meaning |
| GS2 | Game Shark 2. According to
eMulatorzOne.cOm,
"In March 2001, Sony released a new PS2 console (version 4) which
does not work with Game Shark 2 (or Action Replay 2) versions 1.1-1.3. You
need a version 1.4 Game Shark for use with a version 4 PS2 console."
|
| AR | Action Replay |
| EAR | European Action Replay. (A note was made that the Action Replay can be used for European Systems) |
| GS2/EAR | I believe that this unit requires a Game Shark 2 for North American (and possibly Japanese) units, and
an Action Replay in Europe. (Maybe Game Sharks aren't made in Europe, and that's why? Maybe the non-European Action Replay will
also work in the non-European countries, if those exist. I'm not sure about the details here.)
|
Note that it's quite possible that all mod chips work with any domestic GS2, AR, or
DVD Region-X that you can find which works on the system in question.
Determining Your Version
There is a difference between version 5 and version 6 systems. I don't fully understand the difference, but a picture by eMulatorzOne.cOm
on their "PS2 V5/V6 Board" shows
a difference.
To determine your version, see ps2v5v6.jpg (originally at ../images/V5V6-diagram.jpg from http://www.emulatorzone.com/catalog/playstation2/Mod_Chips/PS2_V5_V6_Board.html)
Suggested
| System | Playstation 2 |
| Region | USA, JAP, PAL |
| Model | V5 or V6 |
| Name of Device | PS 2 PnP Key Solderless Mod for V5 |
| Plays Imports? | Unknown (so probably not) |
| Plays Backups? | Yes. For PS1 games: Yes. For PS2 games: With GS2/AP (info below) |
| Any More Extras? | None |
| Usage Requirements | For PS1: None. For PS2: GS2/AP (info below) |
| Installation Requirements | Solderless. Beyond that: Unknown. |
| Installation Instructions | Unknown |
|  |
|
|
There is a
V5 page and a
V6 page which both show the same picture, both
linked to from a page on eMulatorzOne.cOm's Playstation2 Mod Chips.
They both show the same graphic, which shows a chip but no connectors. Maybe the connectors are different
and so you need to order them seperately? They say a V4 version is coming soon.
Available for:
$24.97 at eMulatorzOne.cOm's (V5 version)
$24.97 at eMulatorzOne.cOm's (V6 version)
|
| System | Playstation 2 |
| Region | Probably any (USA, JAP, PAL) |
| Model | Probably Any |
| Name of Device | Neo Key |
| Plays Imports? | PS1: Yes. See requirements.
PS2: Yes but Backups Only. See requirements. |
| Plays Backups? | Yes, see requirements |
| Any More Extras? | None |
| Usage Requirements | For a USA system, the added features for the PS1 have no additional requirements.
Any other functionality gained requires a GS2/EAR. |
| Installation Requirements | Solder 1 wire. Looks like it uses up the USB port too. |
| Installation Instructions | Unknown |
|  |
|
|
I guess this is for people who can solder, but really don't like to, so they'd rather use up their USB port
to get away with a little less soldering. Since it "operates just like a Neo 2 Mod Chip hard-wired to your board."
(according to according to eMulatorzOne.cOm), I would
think that it'd be nicer to do more soldering and have an internal Neo 2 Mod Chip hard-wired to your board so that
the USB port is still available, if desired.
Available for:
$24.97 at eMulatorzOne.cOm's (V5 version)
$24.97 at eMulatorzOne.cOm's (V6 version)
|
Here is how I understand the Neo-Key compatibility chart at eMulatorzOne.cOm::
| If you have a USA PS2 then: |
You can play Playstation Domestic Original Games, Playstation Imported Original Games, Playstation Domestic Backups, Playstation Imported
Backups, and Playstation 2 Domestic Original Games directly. You can play Playstation 2 Domestic Backups and Playstation 2
Imported Backups by using a Swap Trick. You cannot play Playstation 2 Imported Originals.
|
|
If you have a Playstation 2 PAL or a
Playstation 2 Japanese unit then: |
You can play Playstation 1 Domestic Original Games and Playstation 2 Domestic Original games directly.
You can play Playstation 1 Imported Originals, Playstation 1 Domestic Backups, Playstation 1 Imported Backups,
Playstation 2 Domestic Backups, and Playstation 2 Imported backups by using a swap disk. You cannot
play a Playstation 2 Imported Original. |
The Neo Key compatibility chart at eMulatorzOne.cOm
may present this in a more visually appealing format, but I had to guess the meanings a bit. Here is how I guessed things:
The first column should be labeled "Game Types". I'm guessing that Domestic means Domestic to the system (not to the USA), so
a PS2 Domestic Title for a PS2-JAP would be a Japanese PS2 title.
I've heard now that there is a method to get the Game Cube to do something
that it wasn't intended to: I believe this relates to getting the Game Cube
to run unofficial code, but it may have been playing off of a CD. It involved
exploiting some commercial software. I haven't explored this information to
find out how, or to know if it is as significant a development for the
Game Cube as unsigned code being runnable was for the Xbox. Since I have
heard from multiple sources that this does exist, though, I figured I'd
mention it here to let you know to look elsewhere for this detail.
I are not aware of any mod chips for the Game Cube, although there are some pre-modded
versions of the Japanese Game Cube available
from Lan Kwei Trading. At the time of this writing, the modified versions cost only $3 more
than the unmodified ones they sell.
They also sell modified versions of the "Panasonic Q".
The Panasonic Q is a Gamecube-compatible device which has Nintendo of Japan's full permission
to exist and which plays DVD's, unlike Nintendo's Gamecube. Both of these allow imports to be
played (and out-of-region DVD's in the case of the Panasonic Q). There are rumors of the
Panasonic Q being able to play from backups, but I don't think there's been any marketed way
of being able to do so, yet. Lan Kwei also throughs in a free Stepdown power converter so that
you can use, rather than fry, your foreign system on American soil.
Interesting Device:
Nexus Memory Cards. Some, maybe all, of the Nexus Memory Cards, have a connector
and come with a cable (bundled or sold seperately?) which connect to a PC and can upload
and download saved data. This was the only way to upload saved games until a new version
of the web browser allowed people to upload from their VMU. (I think such a new version
of the web browser now exists.) They come in a 16MB and a 4MB version, and there's also
a 2MB version that supports the PC Link (and one which does not come with the PC Link
cable and I believe which does not have the connector on it.) Apparently these are
memory cards, not VMU's, and so they don't have an LCD display on them.
The dreamcast can play games from CD-R's just fine. CD-RW's may be more problematic, and
I'll discuss that later in the section.
Many commercial games are over 650MB and so, even though they fit fine on a GD-ROM disc,
they won't fit on a CD. There's no easy way to deal with this problem. A complicated way
is to copy the software to backups is to do the following:
- Copy the software from the Dreamcast to a PC using the Dreamcast serial port and what has
become known as a "DC Coder's Cable".
- Modify the contents of the CD image that is on the computer, removing some videos or
sound tracks or something, and somehow managing to reduce the size of the image.
- Write the contents of the reduced image to a CD.
Steps #1 and #2 above can be time consuming (to transfer the data) and
complex, and so many software pirates skip #1 and #2, opting instead to use
the Internet to illegally download a reduced-size image created by hackers who
did steps #1 and #2. This may not be incredibly legal, but since people have been
able to do this, there hasn't been a real need to create a Mod Chip to play on backups.
The Mod Chips that do exist are to play Import games.
Regarding CD-RW medium: The laser of a Dreamcast isn't powerful enough to read a
CD-RW disc. At least, it's not supposed to be. In reality, results are mixed: Some
dreamcasts can read CD-RW discs, but others (most of them, I think) can not. That is,
until you make an adjustment. Details on this adjustment are included below, and once
the adjustment is made CD-RW discs should work just as well as CD-R discs. There's no
reason to get a mod chip in order to play off of backups.
As for imports, there is a way to adjust the Dreamcast so that imports can be played
without a MOD chip. However, this could probably cause problems on games that use
multiple CDs, and there is a wait time associated. There are MOD chips available
which would eliminate both of these problems, if you want to spend some money and
don't object to an installation process which is a bit more work.
Suggested
| System | Dreamcast |
| Region | Probably any (USA, JAP, PAL) |
| Model | Probably Any |
| Name of Device | Tightness of a screw |
| Plays Imports? | No |
| Plays Backups? | Yes (a normal DC does) |
| Any More Extras? | Allows CD-RW discs to work |
| Usage Requirements | Nothing special |
| Installation Requirements | A long narrow screwdriver |
| Installation Instructions |
- Remove Modem, Broadband Adapter or the dummy corner.
- Remove 4 screws from the bottom of the system.
- Lift the top off of the system.
- On the bottom of the system, locate the GD-ROM assembly. It's
likely black, and the lens is inside this assembly.
- Unscrew any screws on the top of the assembly, if there are any.
(I got a used system, and I don't think mine had any. Maybe yours does?)
- Lift up, slowly and with no undue pressure, the top part of the GD-ROM
Assembly. You will be unable to totally remove it due to a white ribbon
on the back and some wires on the right. Try to flip the top part
upside down by lifting up the front and pushing that over the back.
- Locate the circuit board that the white ribbon attaches to. Figure out
if you need to remove the ribbon to get to where the screw is. From the
picture shown, it appears that the ribbon goes over the screw that needs to
be modified, and so you would need to remove the ribbon to get at the screw.
I have seen a system where teh circuit board was flat, not bent, and so the
connector had the ribbon going parallel to the direction that the screws go,
rather than perpendicular to and over the screws' path if they were unscrewed.
- Remove the ribbon if necessary, making a note which way the ribbon gets
plugged back in. You may be able to get by with just remembering that the ribbon
had no twist.
- Turn the silver screw a quarter turn clockwise, on the part of the circuit
board that sticks out further,
not the black screw right on the edge that doesn't stick out as far.
- Put things back together enough to test the system. Try to test an original
disc, a CD-R, and a CD-RW. If the original discs no longer work, you may want to
try turning the screw counter-clockwise a bit. If a CD-RW still refuses to work, turn
the appropriate screw on the GD-ROM assembly by another quarter turn (as some references
will just tell you to turn a half-turn to begin with). If you work precise enough, you
should be able to get original discs, CD-R's and CD-RW's all working. Until these
tests are completed to your satisfaction, you may wish to leave
the outer screws off because you might need to go right back into the guts of the system
and try turning the screw again.
- Put things back together all the way, if you haven't already.
|
| 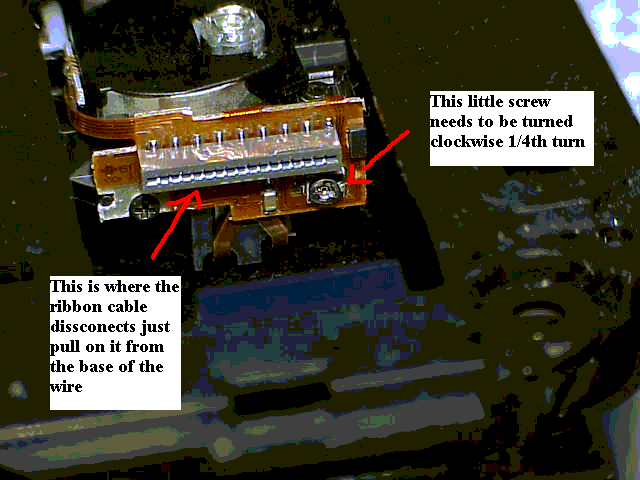
Image reduced to 75%. Cick to enlarge. |
|
|
Regarding CD-RW medium: The laser of a Dreamcast isn't powerful enough to read a
CD-RW disc. At least, it's not supposed to be. In reality, results are mixed: Some
dreamcasts can read CD-RW discs, but others (most of them, I think) can not. That is,
until you make an adjustment. In August of 2000, BOOB!'s web site
said:
I read this on a message board at a great Sega site called Eidolon's Inn
This was posted x15jq:
"Hello,
Today I decided to install a blue led in my dc. I became curious why the dc didnt read rw's. So i took apart the gd assembly (mine is samsung)and there is a bias screw under the ribbon. After playing with it for an hour, i found that when u turn it clockwise, the laser power increases and lets u have the dc read rw's. I have screenshots of doing the procedure if you need them."
Naflign if u read this could you please get in touch so we can publish the exact details...
The next day pictures were released by z100_man with apologies for the messed up
colors. One, MVC-105S.gif,
showed a picture of the screw. The screw in question is located on the underside of
the top part of the GD-ROM assembly, which is the black part that the lens hides in.
(Warning: This adjustment could make normal Dreamcast CD's fail to work. Although if
that happens, you should be able to undo the changes you made to fix that. With
precise enough work, you should be able to get original CD's, CD-R's, and CD-RW's
all workings.)
Available for:
FREE!
|
| System | Dreamcast |
| Region | Likely any |
| Model | Likely Any |
| Name of Device | Switch holding and battery destructing |
| Plays Imports? | Yes (swap required) |
| Plays Backups? | Yes (all DC's do) |
| Any More Extras? | - Some associated problems, see info below
| Usage Requirements | A controller that you can adjust the system time with. See notes about multi-CD games.
There will be a 3-minute wait you'll need to go through when you boot up. |
| Installation Requirements | - A long and narrow Phillips (standard X-shaped) screwdriver
- Some tape. You may be able to get by with a size 16 rubberband instead.
- There are various ways to do things. You can choose to require any one of the
following:
- A copy of the Web Browser CD. And a controller which you can plug into Port #2.
- A soldering iron. (You will be breaking a connection, so you don't need any solder.)
- 20 days of time to leave the system unplugged.
- If you have neither of the above, you'll need only a will to permanently damage part
of your system.
See Installation
instructions for details.
|
| Installation Instructions |
Understand that this involves permanently damaging your system. (As such, I haven't tested this.)
- Unplug anything attached to the system: Power cable, video
connector cable, connection cable like a phone line, and controllers. Remove any CD which might be in the drive.
-
Remove modem, broadband adapter, or dummy-cover which is on the bottom and back-right side of the Dreamcast.
- Remove 4 screws from the bottom of the system, one near each corner. These are the only 4 screws that
you'll need to remove (although you may choose to remove more, namely if you are using a rubberband instead
of tape).
- Lift the top off. Place it to the side.
- On the back left side is the power connector. On the back right side is a black switch sticking straight
up. When the Dreamcast is fully assembled and the CD lid is closed, the top part of the Dreamcast pushes
that switch back. Use the tape or the rubberband to get that switch stuck in a being-held-back position.
The Dreamcast will then think that the CD lid is always closed. Tape can work great, but NCS has some
alternate instructions.
- These instructions have you removing the drive assembly by removing 3 screws.
These screws are likely the ones holding down the little metal box that the black plastic with the laser
is sitting on top of. (The black switch which is supposed to detect when the CD is opened is on this
drive assembly.)
- "Loop a size 16 rubber band from the sensor to the little nub on the underside of the DC GD-Rom assembly. Looping the rubber band once should provide the proper amount of tension."
- Replace the GD-ROM Assembly, screwing it back into place.
Again, tape works just fine. By using that, you shouldn't need to remove the GD-ROM assembly.
- Locate the battery. It is slightly behind the second controller port.
NCS says the battery "is ringed with a purple
polymer and is labeled with the manufacturer's name (Panasonic)." On my system it's covered in a blue
plastic and is labeled "Sanyo".
- Now you need to make the system forget the system time. There are four ways to do this:
- Leaving the system unplugged for more than 20 days should do the trick. (Sega's documentation
says the battery should be able to last 20 days after being charged for a couple of hours.)
- This method should work on US Dreamcasts. It involves doing nothing to disable the battery until you put the system back
together. Place a Dreamcast web browser disc into the DC and insert a controller into port #2.
Hold the X and the B buttons on the second controller. Then, while still holding the buttons down,
turn the system on. Wait for the ISP screen of the web browser to load, and then quit holding the X and the B buttons.
NCS says
"This procedure will clear the system memory settings."
Then turn the DC off. Insert a native territory game
or demo into the dreamcast unit. Then follow the procedures outlined below.
-
The third method is likely the worst of them all, being damaging and therefore
the most irreversable.
GameEnhancer.Net says
to "Cut off the resister beside the button shape battery". Likely this refers to the pink
thingamabopper located just left of the battery at position R1 of the circuit board, not the blue
thingamabopper located a bit further away, to the right and a bit closer to the front of the system than
the battery (located at position F1). But we're not even sure if those are resisters, so don't
trust our understanding of GameEnhancer.Net's instructions.
- The second method, provided by
NCS, uses a soldering iron and has you doing the following steps:
- The first thing to do is to remove what NCS calls the pcboard. (Actually, they don't tell you
to remove it, but since they talk about the underside of the board, I think it makes sense to.)
The pcboard referred to here is the board that the battery and controller ports are on.
To do this, remove the white ribbon attached to the CN3 port of the pcboard.
- Remove the 4 screws that go through the black controller ports and through the
pcboard which are all helping to hold the pcboard down.
- If you think you can remove the cable going from the pcboard to the fan,
be sure to remember that the red cable was towards the front of the system.
However,
it doesn't look like that cable was really designed to be easy to remove.
It may not
be easy to remove the cable instead of breaking it's connection, though, so I recommend
you just keep the pcboard on that short leash if you can. Then remove
the pcboard from it's place by putting up on it, and possibly pushing it towards the
back of the system by placing your finger through the front of the system and pushing
on the controller ports. (Note that the face plate surrounding the controller ports
is being kept in place from the middle and underneath the pcboard, and therefore removing
it is not beneficial in trying to remove the board.
- Now, back to NCS's instructions:
On the circuit board just in front of the battery are the words "BT1". Note this.
Also, these instructions had you unplugging the white ribbon that goes to CN3 on the
little circuit board that the battery is on, which they call the pcboard.
- The battery is attached to the controller port with three solder points. Your objective is to
desolder the solder point labeled with the BT1 designation on the pcboard. This point is by
itself while the other two points are in parallel. The other points are labeled "+" and "-". A simple
way to desolder this point is by flipping the controller port over and applying your soldering iron
to the solder side point and pushing the battery away from the board as the heat melts the joint.
-
Once the BT1 connection is lifted from it's recess, bend the leg of the battery upwards.
Note that NCS says they have "adapted a simple switch to toggle between battery and no battery but this may be not worthwhile for most who use this swap
procedure."
- Put the system back together. This involves reconnecting any ribbons or cables you took off,
such as the data cable to CN3 or the power cable for the fan at CN4.
Screw the system back up, place the modem back in place, and plug the
necessary plugs back into the system. Place a CD in the drive. You're done.
|
|
| ![]() |
|
Why you should use this:
- Figure out if you even like the Japanese game you have before you spend money on a mod chip.
Also, go ahead and do this until you receive the Mod Chip. It costs you only a piece of tape
and some time, and if you are too scared to do this much tinkering with your system then you'll
never install the MOD chip which involves more unscrewing than this.
After installation:
-
According to SEGA: "The rechargeable battery in Dreamcast isn't a user-serviceable part. To have the battery replaced, follow the directions for repairs before sending or bringing Dreamcast to an authorized Sega repair center."
So, you can't just take the battery out. When you cut off the resister or use a soldering iron to
loosen the connection to the battery, the Dreamcast will lose the ability to save the
data with the unremovable, rechargable battery that Sega thinks you'd never have any reason to remove.
Anyway, the Dreamcast will forget the time of day when you power it off wtihout a battery.
-
Boot up a game of your choice that is designed for the same region as the Dreamcast unit. The system
will then do a region check to notice that you're not using an incorrect game. Then it will notice that
the system's time isn't set, and it will prompt you for the system, and quit trying to boot up the game.
-
You need to wait for about 3 minutes, apparently a little less, until the disc in the system stops
spinning.
Note that the CD lid can be open during this entire time since you made the system lose its
ability to notice when the lid is open. During this time, you can set the system's time.
-
When the disc in the drive stops spinning, replace it with the import disc of your desire. Since the
system doesn't think you opened the CD lid, it won't bother to do another region check. And, wha-lah,
you're playing an imported game.
Side effects:
- I don't know if removing the battery can be detected by any games. Probably not, since it's just
assumed that the battery works and there is no shortage of electricity while the system is turned on.
-
However, I wouldn't be at all surprised if multi-disc games have a problem with a system that never opens
it's CD lid (or which never thinks its CD lid is opened).
Information provided by, and so thanks go to:
-
http://www.gameenhancer.net/dreamcast.html
- http://www.ncsx.com/ncs110199/ncs1101m.htm
- http://www.ncsx.com/ncs110199/ncs1101w.htm
|
| System | Dreamcast |
| Region | Unknown |
| Model | Unknown |
| Name of Device | DC Modchip (4 wire) |
| Plays Imports? | Yes |
| Plays Backups? | Yes (a normal DC does) |
| Any More Extras? | None |
| Usage Requirements | |
| Installation Requirements | Unknown, looks like some |
| Installation Instructions | Unknown, looks like some |
| ![]() |
|
Available for:
$??.97 at
|
This section is for a PSX (the original PlayStation) and the PSOne (which
is smaller than the original PSX). The term PS1 may refer to both of these
units.
As reported by
eMulatorzOne.cOm, some Game Enhancers are need you to follow a special procedure to use the
cheat code system in the enhancer if you have a "stealth mod chip"
in the system. The procedure is to:
- Insert CD
- Keep door open
- Turn on Playstation
- Select
Cheat Code (optional)
- Close door
- Within one or two seconds, select
'start game' or 'start game with cheat code'
Note that the Playstation 2 is largely compatible with the PS1. (It plays
most PS1 games just fine, and can even use PS1 controllers.) If you're in
the market for a system, consider the more expensive PS2.
CommLink software (from another web site, I beieve eMulatorzOne.cOm) is
available locally here.
Suggested
| System | Playstation |
| Region | Unknown |
| Model | PSX, not the 9000 series without
a parallel
adapter made for the SCPH-900x series. Not for PSOne. |
| Name of Device | Game Booster - 2 in 1 |
| Plays Imports? | Yes (see requirements) |
| Plays Backups? | Yes (see requirements) |
| Any More Extras? | - Plays Nintendo Game Boy games (without sound).
- Speed up boot process by skipping system intro screen.
- Cheat System compatible with Action Replay codes and many Game Shark codes
| | Usage Requirements | Backups/Imports require swapping discs with original CDs |
| Installation Requirements | Unknown, looks like none |
| Installation Instructions | Unknown, looks like it just plugs in |
| 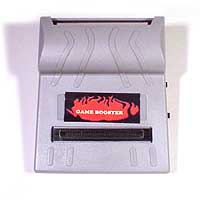 |
|
I'm not sure how this works. It may require Gameboy cartridges, or maybe it requires a CD of
pirated ROMs. eMulatorzOne.cOm reports
95% compatibility rate for the Gameboy compatibility, but no sound is supported. This likely refers to simply
black and white Gameboy games, not titles meant to require the GameBoy Color or GameBoy Advanced systems.
It's not clear to me which features deal with Playstation games and which deal with Gameboy games played on the
Playstation.
Available for:
$39.97 at eMulatorzOne.cOm's
|
| System | Playstation |
| Region | Unknown |
| Model | PSX, not the 9000 series without
a parallel
adapter made for the SCPH-900x series. Not for PSOne. |
| Name of Device | MP3 Smart-DJ |
| Plays Imports? | Yes (see requirements) |
| Plays Backups? | Yes (see requirements) |
| Any More Extras? | - Play MP3 files on CD-R with your PSX!
- It appears that the audio jacks seen are output jacks.
- Cheat System compatible with Action Replay codes and many Game Shark codes
- On back of the PSX-Amp Enhancer is a connector that
can plug into PCs that have the PC CommLink card. This "enables many more
features" (quote from eMulatorzOne.cOm) such as working with cheats.
- Every unit ships with a spring that installs into the door hinge of your
PlayStation (reported by eMulatorzOne.cOm, this may be a feature of that
website rather than the product)
- Speed up boot process by skipping system intro screen.
- Memory Card Management System: Copy saves, whole cards, format cards, more.
| | Usage Requirements | Backups/Imports require swapping discs with original CDs |
| Installation Requirements | Unknown, looks like none |
| Installation Instructions | Unknown, looks like it just plugs in |
|  |
|
- If you are using a Playstation system with a Stealth Mod Chip, there is a special procedure you need to follow
which is described at the top of the Playstation section.
-
Do not switch your PSX-Amp Game Enhancer into PAL mode unless you have a PAL PlayStation.
- With optional PC connector cable sold seperately you can discover codes by searching
through Playstation's memory, update the BIOS of your Game Enhancer if a new version becomes
available, and more. Sold seperately, this card comes with a PC connector cable.
Available for:
$69.97 at eMulatorzOne.cOm's
The PC card (image here from eMulatorzOne.cOm's) is available for:
$34.97 at at eMulatorzOne.cOm's
|
| System | Playstation |
| Region | Unknown |
| Model | PSX, not the 9000 series without
a parallel
adapter made for the SCPH-900x series. Not for PSOne. |
| Name of Device | 2-Meg Game Enhancer 3 |
| Plays Imports? | Yes (see requirements) |
| Plays Backups? | Yes (see requirements) |
| Any More Extras? | -
Cheat System compatible with Action Replay codes and many Game Shark codes
- Speed up boot process by skipping system intro screen.
- Has PC Connection Port which can be used with the PC CommLink card. This
card, sold seperately, can help you search the PlayStation's memory to create
new cheat codes, and more.
| | Usage Requirements | Backups/Imports require swapping discs with original CDs |
| Installation Requirements | No Soldering Required. Beyond that: Unknown, looks like none |
| Installation Instructions | Unknown, looks like it just plugs in |
| 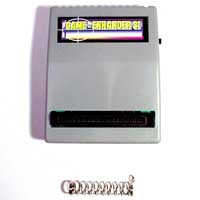 |
|
- If you are using a Playstation system with a Stealth Mod Chip, there is a special procedure you need to follow
which is described at the top of the Playstation section.
-
Do not switch your Game Enhancer into PAL mode unless you have a PAL PlayStation.
- With optional PC connector cable sold seperately you can discover codes by searching
through Playstation's memory, update the BIOS of your Game Enhancer if a new version becomes
available, and more. Sold seperately, comes with a PC connector cable.
Available for:
$69.97 at eMulatorzOne.cOm's
The PC card (image here from eMulatorzOne.cOm's) is available for:
$34.97 at at eMulatorzOne.cOm's
|
| System | Playstation |
| Region | Unknown |
| Model | PSX, not the 9000 series without
a parallel
adapter made for the SCPH-900x series. Not for PSOne. |
| Name of Device | 'Power Replay' Game Enhancer |
| Plays Imports? | Yes (see requirements) |
| Plays Backups? | Yes (see requirements) |
| Any More Extras? | -
Cheat System compatible with Action Replay codes and many Game Shark codes
- "special high-speed communications port for further
expansion. An optional communications package allows you to connect your PlayStation
via Power Replay to any PC for powerful cheat finding and debugging." (quote
is from eMulatorzOne.cOm.
| | Usage Requirements | Backups/Imports require swapping discs with original CDs |
| Installation Requirements | No Soldering Required. Beyond that: Unknown, looks like none |
| Installation Instructions | Unknown, looks like it just plugs in |
| 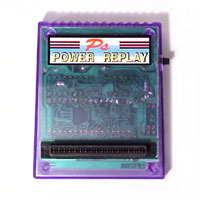 |
|
- If you are using a Playstation system with a Stealth Mod Chip, there is a special procedure you need to follow
which is described at the top of the Playstation section.
-
If the communications package is different than the PC CommLink card other devices use, maybe it really
does connect to any PC via use of a serial or parallel port. (Unlike the PC CommLink which only works in,
hmm, looks like it needs a newer PC with PCI.) In that case, maybe this is better than the 2MB card listed
on this page.
Available for:
$69.97 at eMulatorzOne.cOm's
|
Nintendo 64
Interesting device:
The Tri-Star 64 could play NES and SNES games. (This was not released by Nintendo.)
There was a Gameboy adapter to let a Gameboy be played on this system. (This was not released by Nintendo.)
Interesting device:
The Super Gameboy was an officially released Gameboy Emulator for the Super NES. A Gameboy
game was inserted into this extra-tall "Super NES cartridge". The Super Gameboy also displayed
games in colors which you could change. Some cartridges were made to be "Super Gameboy Enhanced"
and supported colorful borders around the virtualized Gameboy screen, and also supported up to 16
colors instead of the 4 that normal Gameboy games could show (which on a regular Gameboy was
displayed as green, dark green, much darker green, and black). In Japan there was a Super Gameboy II
released after the first Super Gameboy. The Super Gameboy II included support for the Gameboy link
cables which the first Super Gameboy did not support.
Suggested:
If you want to import a game, I suggest Nakitek's Game Saver+ device. It is reported to be able
to play both SNES cartridges and Super Famicom cartridges, and can plug into both systems.
It also has additional functionality. Good luck finding one. I would expect that this
device probably has the same problems as a Game Genie, in that some titles may be able to
detect that the cartridge isn't connected straight to the system: The cartridge's software
will then think you are using a copying device, and will refuse to work. This can be gotten
around in the case of the Game Genie by using some Game Genie codes, and I haven't tested this
yet but maybe the Game Genie, combined with this device (or cartridge copiers), will work.
Note that the Nakitek's Game Saver+ has additional functions. It can slow the system down to
half-speed, and it can save the RAM of your system and then restore the RAM later (such like the
"Saved State" function built into emulators). This saved data can be saved indefinitely as long
as the Game Saver+ remains plugged into the wall (it can use the SNES's plug, and it has a plug
to give power to the SNES) or for as long as the six AA batteries you provide don't run out.
I do not have information at this time about cartridge copiers. Surely they do exist.
I believe one was called the Super Wildcard DX.
Information on playing a NES game in a Famicom is below.
In order to play a Famicom game in a NES, you'll need a converter.
One way to find such a converter is to find a copy of Excitebike.
When Nintendo released Excitebike, they had a shortage in America for
the cartridges that fit in a NES. However, they had some extra copies
in Japan, and the old 8-bit NES games often used English for words like
"Start" (since Japanese know English, on average, far better than I know
their language, and since English letters took up less ROM space).
So what Nintendo did is they placed the Japanese circuitry
and a converter into a standard NES cartridge. If you weigh, even by hand, an
Excitebike Cartridge and another cartridge, the Excitebike cartridge can be
noticably (but not by much) heavier.
I heard there are other early cartridges that came with this converter. More
details should be provided here at a later date.
I do not have any information on cartridge copiers for the 8-bit NES or
the Famicom (or the Famicom Disk System).
Converters exist to allow a NES to be played in a Famicom (or a GameAxe Color).
They can be commonly found on eBay by searching under the word "Game Axe".
The Game Axe Color is a portable Famicom (the Japanese version of a NES). It can
play Famicom games and, with a converter, it can play NES games. It also has A/V
inputs to allow another device to use it's built in back-lit LCD display, a
controller port for a pirated controller (since the Famicom's controllers were
attached to the system and so the pirated systems released in Asia were the only
real standard way of making a connection), built-in turbo buttons, a Sega-Genesis
compatible AV-out port, and battery and AC-power capabilities.
Because this device is a portable Famicom, please read the Famicom section for any
related information.