The Plastic Jumping Flea


* or *

The $12 Uke!


Click To Hear The Plastic Jumping Flea!

This is a simple project that borrows equally from the mountain dulcimer and the Tupperware lady. The result is a very playable and decent sounding ukulele made for the cost of about $12. The design came about with the desire to create a stringed instrument that was both cheap to build and capable of making real music. The mountain dulcimer-like neck bears all the string tension, keeps construction simple and allows use of common materials.

It starts out with a stick, literally. In this case, scrap salvaged from the dumpster of a local cabinet shop. They routinely throw away useable pieces of maple, poplar and cherry. I used a piece of poplar, but maple, cherry, mahogany or a number of hardwoods would suffice. The piece I used was about 21" long, 1 1/2" wide, and 7/8" thick.

The length of wood is utilized as both neck and body. The headstock is cut slightly resembling the flat nature of a Fender neck. Four commercially made friction pegs were mounted in the headstock, as both a practical and, at ~$8.00, a inexpensive solution. If your local music store doesn't carry uke tuners, a good inexpensive set (part # UP1, about $7.50) can be purchased from Elderly Instruments(buy a set of ukulele strings while you're at it). If you've got guitar tuners available, use 'em. They'll work fine. The nut and saddle are made of scrap 1/4" thick oak. The frets are flat toothpicks, glued to the surface of the fingerboard. You may ask, "Why flat toothpicks?" Well:
1)They're cheap
2)They're fairly uniform in thickness, requiring little, if any leveling
3)They're durable enough for the uke's nylon strings if a good finish is applied. I used polyurethane.
4)They're easily glued onto the fingerboard.

If you have access to real fretwire and feel comfortable installing them, then go for it.

The scale length was copied from an existing concert sized ukulele (that of the Fluke ukulele, 15 9/16"). If you wish to use a different scale length, go to THE EMI FRET-PLACEMENT CALCULATOR to determine where the frets will go.

Don't feel compelled to copy exactly the way I've made the peghead (or anything else, for that matter). If you have more modest tools and skills, design your uke to utilize them wisely.


Fingerboard dots by Sharpie Pen!


Notice the excessive wood removal under the strings? Perhaps a bit overboard.

The finished neck/stick will be playable, albeit without any acoustic volume whatsoever. This is where the next part comes in...the soundbox. The box is made from a cheap tupperware-style food container, obtained from the local $.99 Store. The soundboard is made from some posterboard, left over from a different project. This type of posterboard is a sandwich of paper over a foam core and is about 1/4" thick. I chose this as soundboard material because it's cheap, lightweight, fairly stiff, and I already had some to use. No internal soundboard bracing is needed.

I traced the opening of the food container on the posterboard and cut it to size. At this point, I cut the soundhole and glued the soundboard to the food container with a hot glue gun. After the hot glue set, I fastened the neck/stick to the soundboard with Goop adhesive. Hot glue is probably wiser if you may disassemble the uke, as it is easily taken apart with a hot spatula.


HotDamm! It's even microwave safe!

Parting Notes

Obviously, some very serious compromises were made in the interest of keeping this instrument simple. However, none of these compromises keep it from being absolutely functional. A traditionally constructed instrument would probably sound sweeter, last longer and look nicer. That is, if you have the money, tooling and skill to build it properly. That being said, this instrument can be a surprisingly fine performer. As constructed, it has decent volume, stays in tune and plays well.

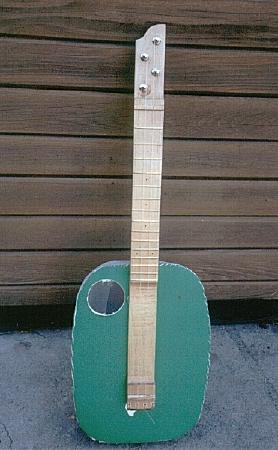
The food container I used makes for a deeper soundbox than the average uke. And the mountain dulcimer style neck places the strings higher from the soundboard than the average uke. Both these factors can take some getting used to for the experienced uke player. While unusual, they do offer some advantages, such as fuller tone and better clearance when playing with a plectrum.

While the soundboard material I used works well, don't be afraid to experiment with other materials. I suspect just about anything that is that is stiff and very lightweight will do. I'm gonna try some courrugated sheet plastic, the type used in a manner very much like corrugated cardboard, and some cedar shingle material from a construction site.

What seems promising about this overall design is that it seems it may scale well. That is, I suspect one could easily make other instruments using very similar configurations, simply adjusting the neck and body sizes accordingly. Imagine a Mexican vihuela (as if that instrument isn't humble enough already), or a guitar, or a mandola, etc. If you have a bolt-on electric guitar neck sitting around, hack out a stick body/bridge for it and affix it to appropriately sized soundbox. Of course, if you make a metal-stringed instrument, wooden frets just won't do. Try cable ties (thanks, Mirjan Milovanovic!). Sure, they'll wear out, but they're so easy to replace. Posterboard is cheap and plastic containers come in a variety of sizes. Then tell me how it works.

Special thanks to Phil Van Tee and Bart Hopkin for the inspiration of flat toothpick frets and foam soundboards. Without these ideas, this instrument could not have been possible.

Back to FolkUrban Music

Any questions? tpe123@yahoo.com