1963 THUNDERBIRD SPORTS ROADSTER
November 2, 2004 update:
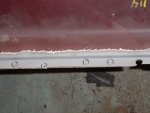
The old repair work to the quarters was done with a pop-rivet gun.
They were riveted along the seam just above the wheel opening and all along
the bottom and up the door post. When I got the spotwelds drilled out
along the fin and down to the patch seam, I was able to simply pull the
quarters off without cutting or drilling the rivets at all. They had
very little holding power.
Last winter I helped a friend do some repair
work on his '63 Roadster. The previous owner had patched the bottom
of the spare tire well by pop-riveting a patch in there,
and we were going to redo it correctly.
To do so, we had to remove the gas tank because we were going to weld
the new patch in and the tank is tight to the well area, and we didn't want to burn
down my garage, or his car.
No big deal to remove a gas tank, right? NOT!!
After removing the fuel line and gauge electrical wire from inside the access panel
in the trunk, and the nuts from the "J" hooks on the tank straps the tank drops
right out. Not in this car. Turns out the previous owner pop-riveted
the gas tank to the trunk floor!! Fortunately it didn't leak!
If you own a pop-rivet tool, do yourself and fellow Tbird owners a favor...
Give it to someone who owns a Chevy or Mopar!!! :-)
Note that before I drilled out the spot welds on the donor quarters,
I sandblasted all the edges where the welds were. This make it a lot easier to locate
them rather than trying to find them through all the paint and primer.
I like to use
Blair Spotweld Cutters
See more about them and why
HERE
.
There were 151 welds on each quarter that had to be drilled out to seperate
the skins from the structure behind them. So if you're replacing both
quarters with take off parts, you'll have over 600 spotwelds to drill out!
After seperating them, I scraped
all the old undercoating off the back sides and then sandblasted the edges
where they will be welded back together when they get applied to the car.
This removes all the old primer and undercoating and makes a cleaner weld
with a lot less smoke from all that old $hit burning.
Later on in the restoration, I'll spray a rust neutralizer inside all of the
body cavities to stop any surface rust that I couldn't sandblast
(suchas the flat metal inside the quarters) and other areas I simply
can't get at with the sanblaster, and then follow that with rust-proofing chemical.
After everything is cleaned up, you're ready to install the "new" quarters.
If you've ever worked with the "patch panels" that are available,
you'll REALLY appreciate installing real "Henry" panels,
they fit like the proverbial "glove"!
Drill out spotwelds
Ladies and Gentlemen...
We have Seperation!
Scrape old undercoatings
Wanna go cruisin?
Last fresh air
until 2005!
All cleaned up
Left side clean too
Fits like a glove!
New front bumper??
Page 1
Page 3
Page 4
Email
Tom Maruska
Return to