1963 THUNDERBIRD SPORTS ROADSTER
Complete Rotisserie Restoration
in progress now
November 19, 2004 update:
The old undercoating is completely scraped off the bottom of the car now,
and all the old seam sealer is scraped off as well. The seam sealer
can hide rust in the corners and out of the way areas that you won't
ever find without removing it. I didn't find any rust in any of these
spots. Removing the old seam sealer also helps to eliminate that
"old car smell" for the nice fresh smelling "new car" this will be.
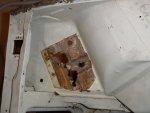
You can see the rust in the battery tray area that was covered over
by "Pop river Pete". It's bad enough to pop rivet patches on, but when
they leave the rust there and simply cover it up, that really sucks.
Everyone knows that in any car, the battery area rusts and usually
needs repair, so if you're going to fix it, even with pop rivets,
at least cut out the rust and paint or caulk the raw metal edges
to keep the rust from spreading.
The new patch panel looks like it'll fit perfectly, I'll show you later.
The patch panel is from
Classic Sheet Metal
,
They make excellent fitting repair panels for many years of thunderbirds and
you can buy direct from them, so be sure to check them out.
Today I'll be erecting my tent over the car in preparation for sandblasting
which I'll begin next Monday....
Wed, Dec. 1st update
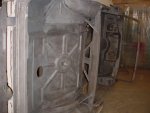
The sandblasting of the body shell and the blastable areas of the
other body parts (hood, deck, doors etc) is complete,
and the pictures have been added below
It'll take another 3 or 4 days to sandblast all of the suspension parts,
bumper brackets, brake drums and backing plates and the many other
pieces that need sandblasting.
It's really nice to clean up a car that is as solid as this one for a change.
If there's any rust at all on a car, sandblasting will find it. I'm
very pleasantly surprised that there were no surprises. The only bad
areas were the quarters, battery and 2 floor areas previously mentioned.
The quarters have been replaced and after I get the rest of the sandblasting
of small parts completed, I'll repair the floors and battery area
and post the pictures of the process. Keep posted....
Inverted flight
Old undercoating gone
Old seam seal gone
Old seam seal gone
Old Bat Tray patch removed
New bat tray & old patch
Top Clean front view
Back view
Bottom Clean front view
Back view
Page 1
Page 6
Page 7
Page 8
Email
Tom Maruska
Return to